


User Manual
User Manual
1. Introduction to the Manual
1.1 Purpose
This manual provides a succinct introduction to the primary functions of UltiHome and UltiHome Business, walking you through the processes of account registration, plant creation, and Wi-Fi configuration.
The text should also serve as a reference point that supports new users in familiarizing themselves with the app.
1.2 Scope
The content of this manual is suitable for WiFi+BLE stick users, pattern vendors and device maintenance personnel who use our device.
2. Downloading the ‘UltiHome’ App
2.1 Android Phone users can search for ‘UltiHome’ in the Google Play Store, or scan the QR code below to be redirected to a download link!

- The UltiHome application only supports mobile devices running Android 10.0 and above.
- The application does not currently support Tablets or other devices with a foldable or horizontal screen.
- If you are an installer, please download the version entitled ‘UltiHome Business’.
- If you are a customer, please download the version entitled ‘UltiHome’.
2.2 iOS/Apple users can search for ‘UltiHome’ in the App Store or scan the QR code below to download the application.

- The UltiHome application only supports iOS 13.0 and above.
- The application does not currently support Tablets or other devices with a foldable or horizontal screen.
- If you are an installer, please download the version entitled ‘UltiHome Business’.
- If you are a customer, please download the version entitled ‘UltiHome’.
2.3 Web Version URL
3. Registering your Account
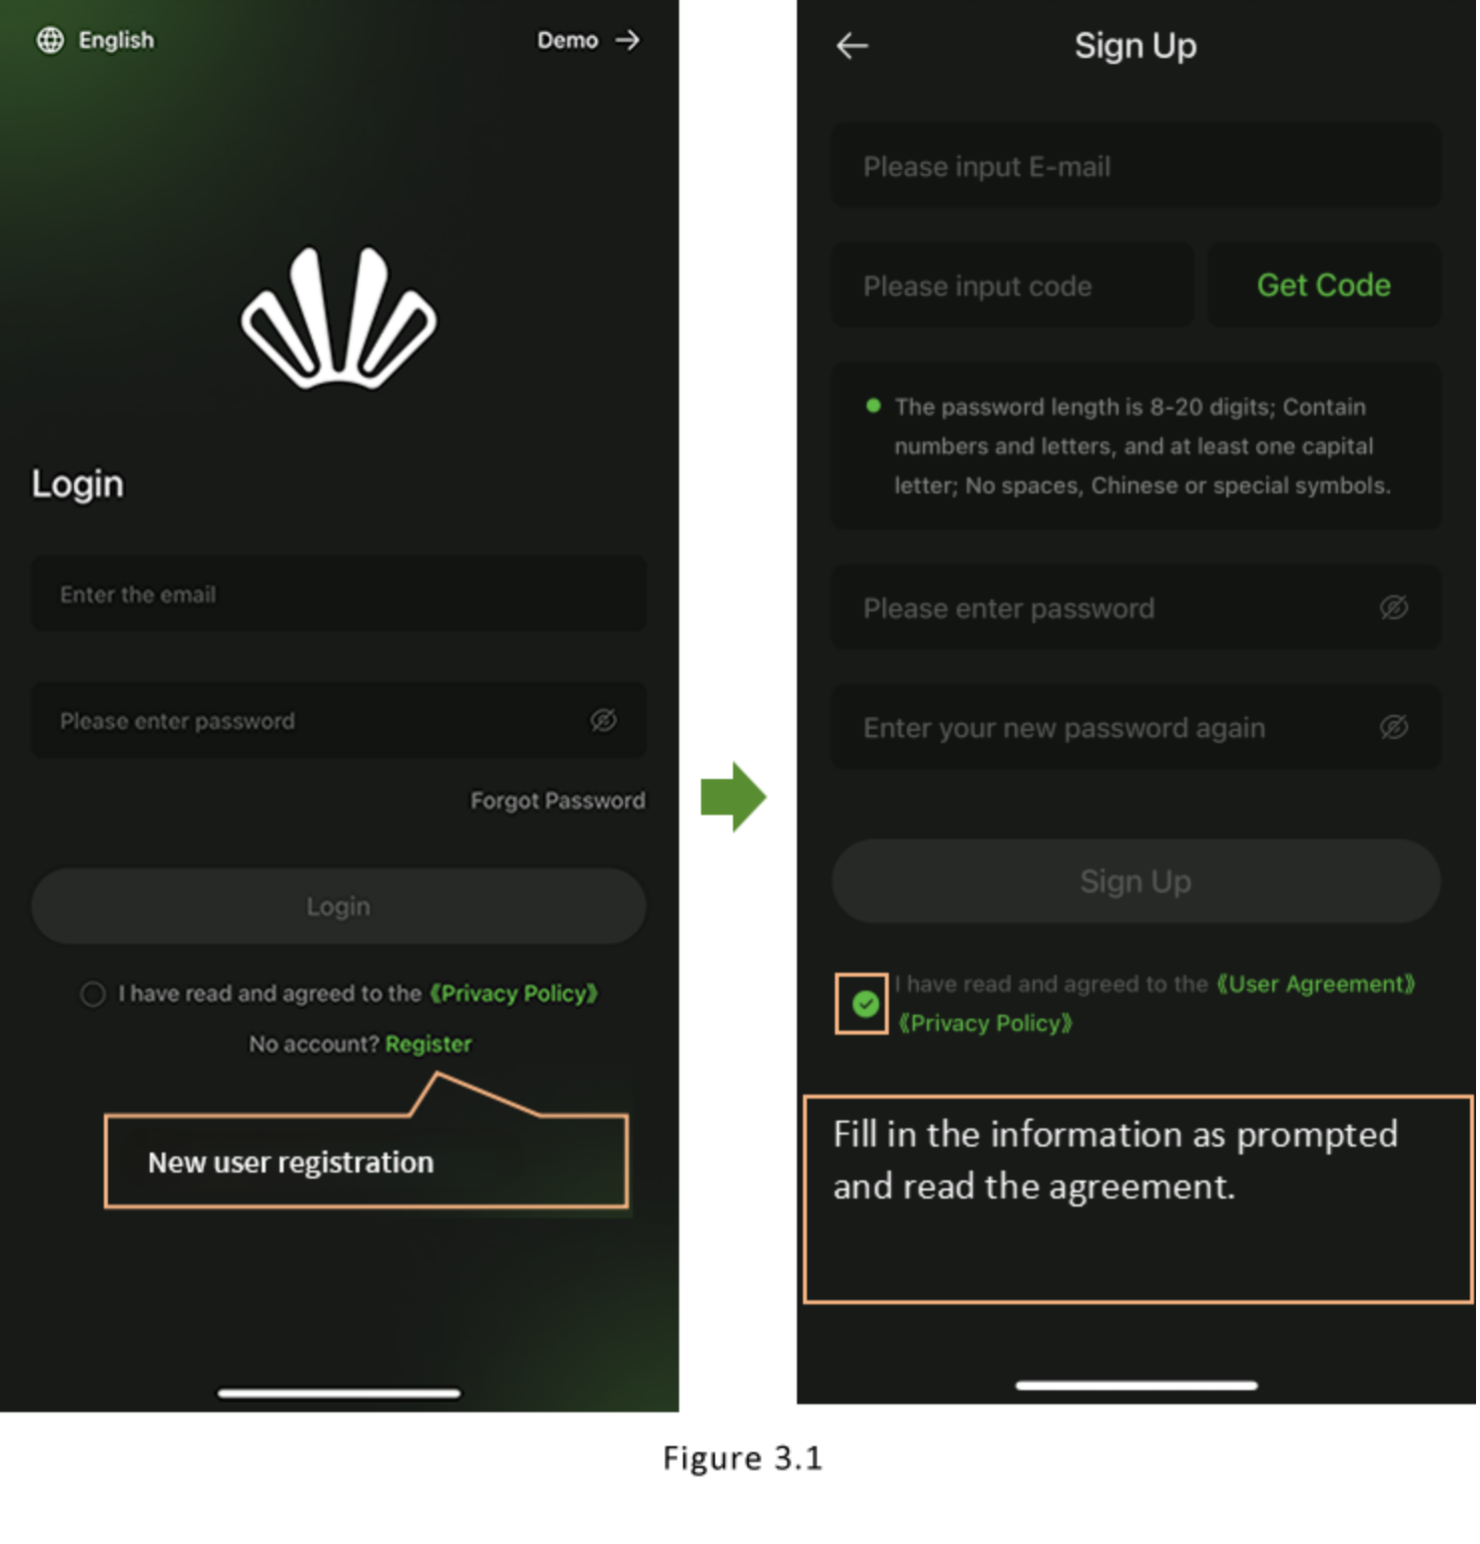
3.1 Registration Process
After loading the app, you can register an account using the following steps:
4. Creating a Plant
Pre - work: Take photos of the WiFi stick to record the QR - code information, SN - code information, and key information. After taking the photos, insert the QR - code end into the WIFI stick interface of the inverter, and then start the following steps.
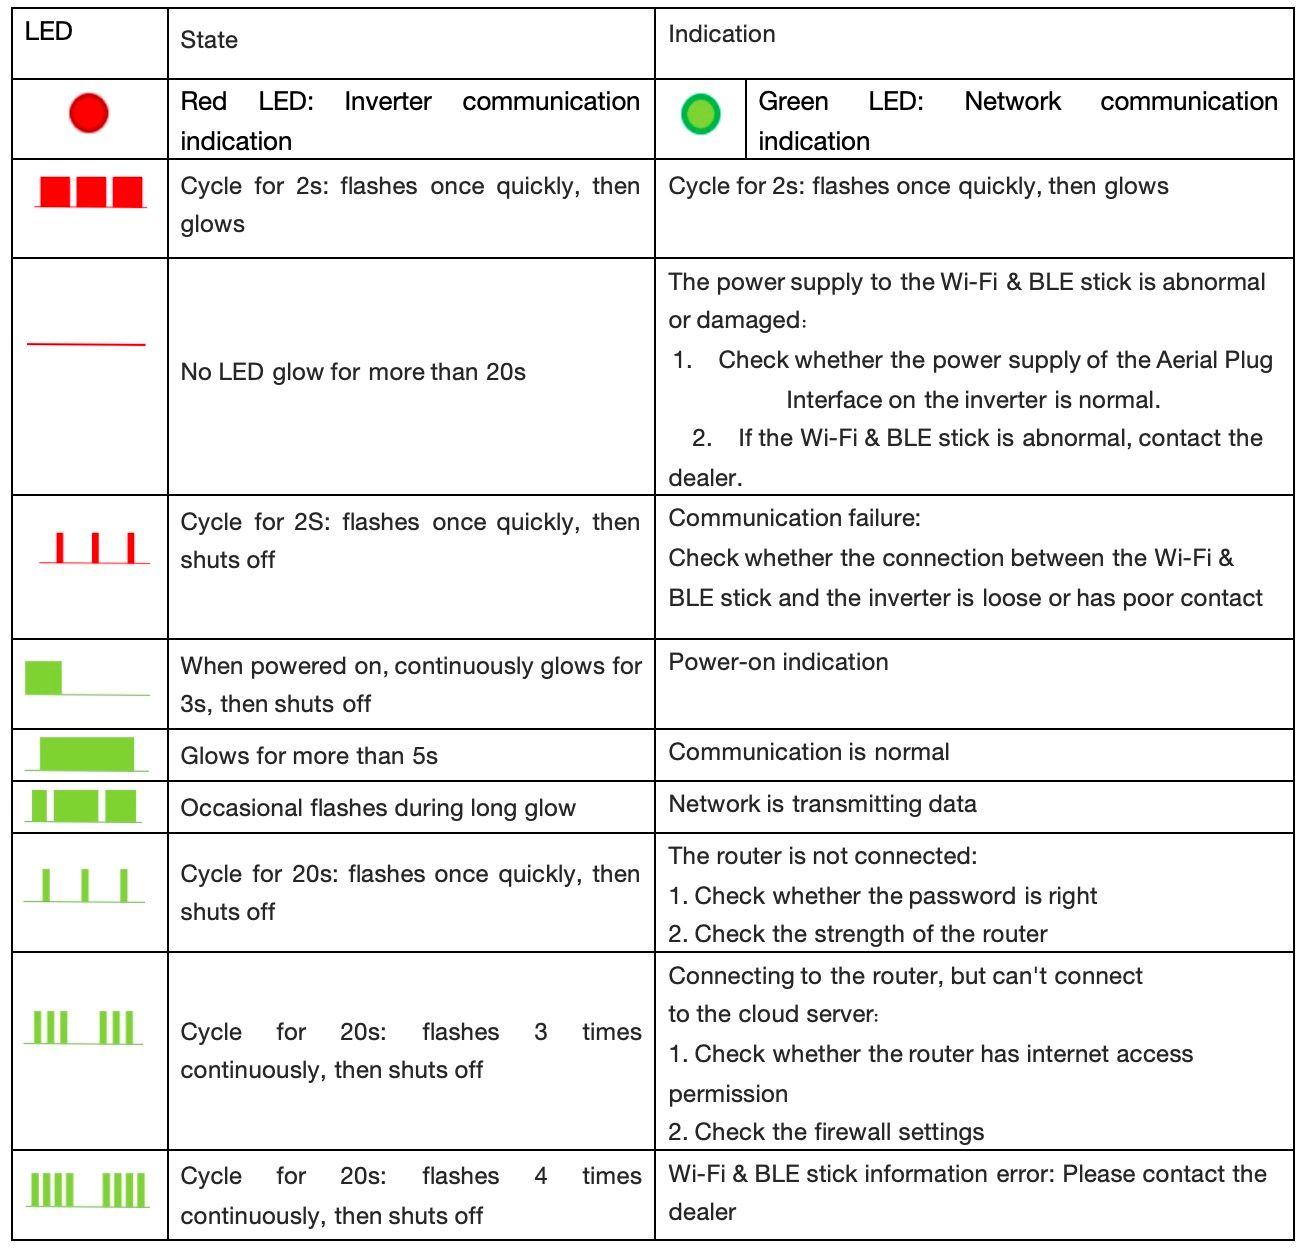
LED indication and troubleshooting
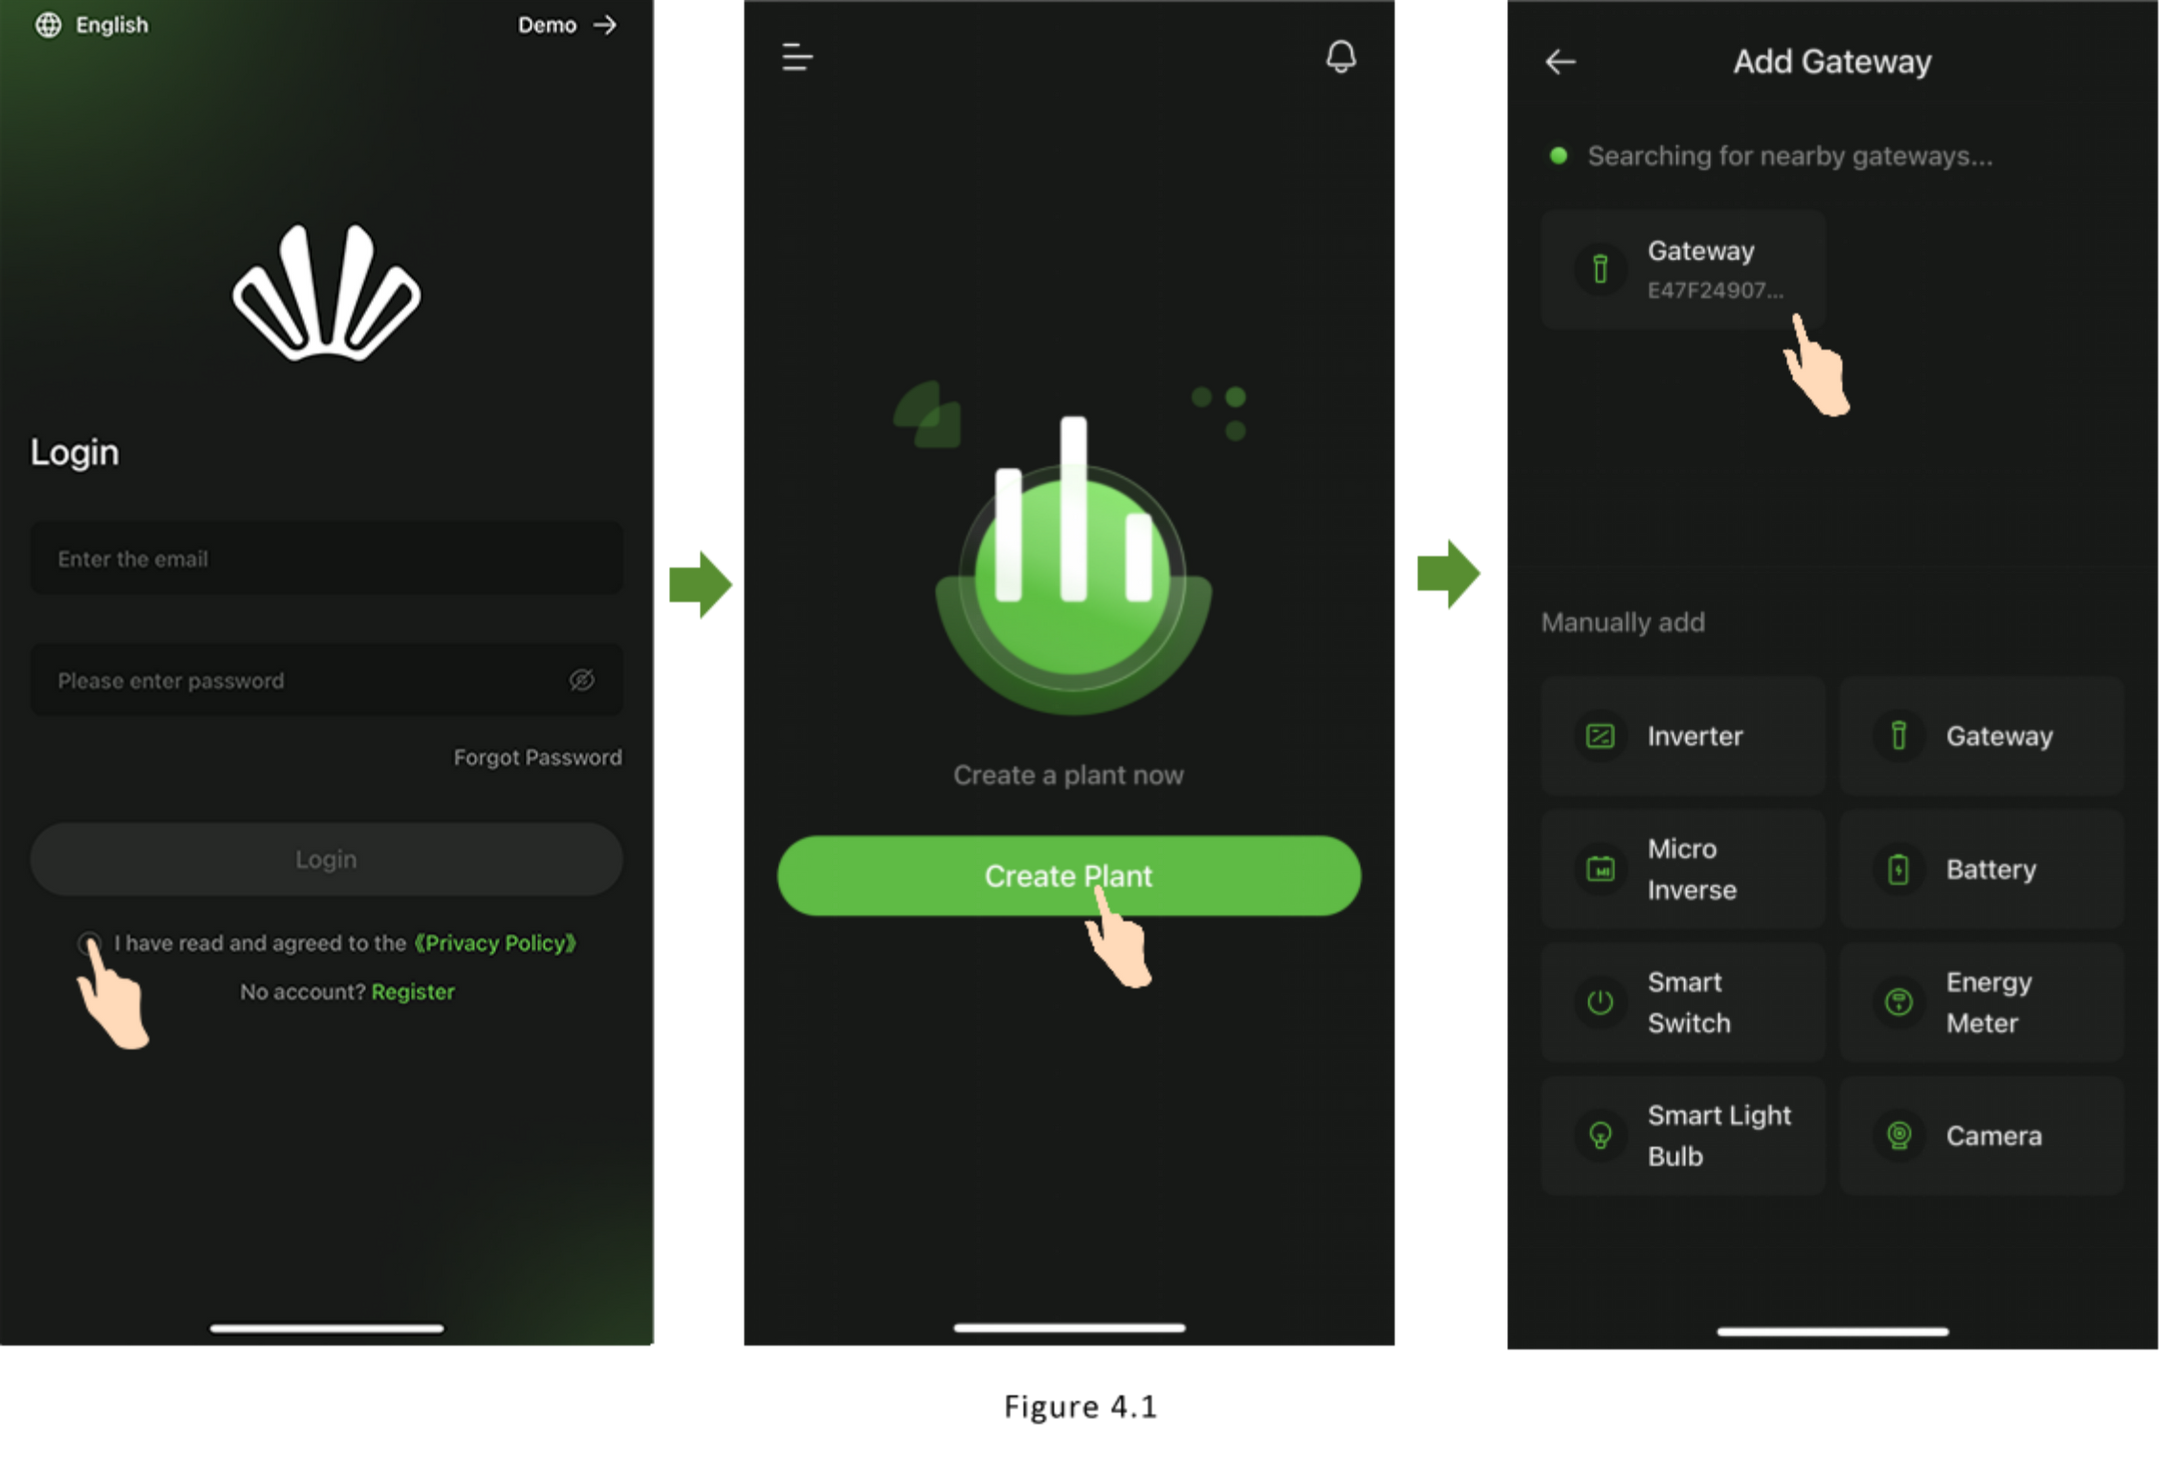
4.1 Add Gateway
After registering your account and successfully logging into the app, you can create a plant by following the prompts shown in Figure 4.1
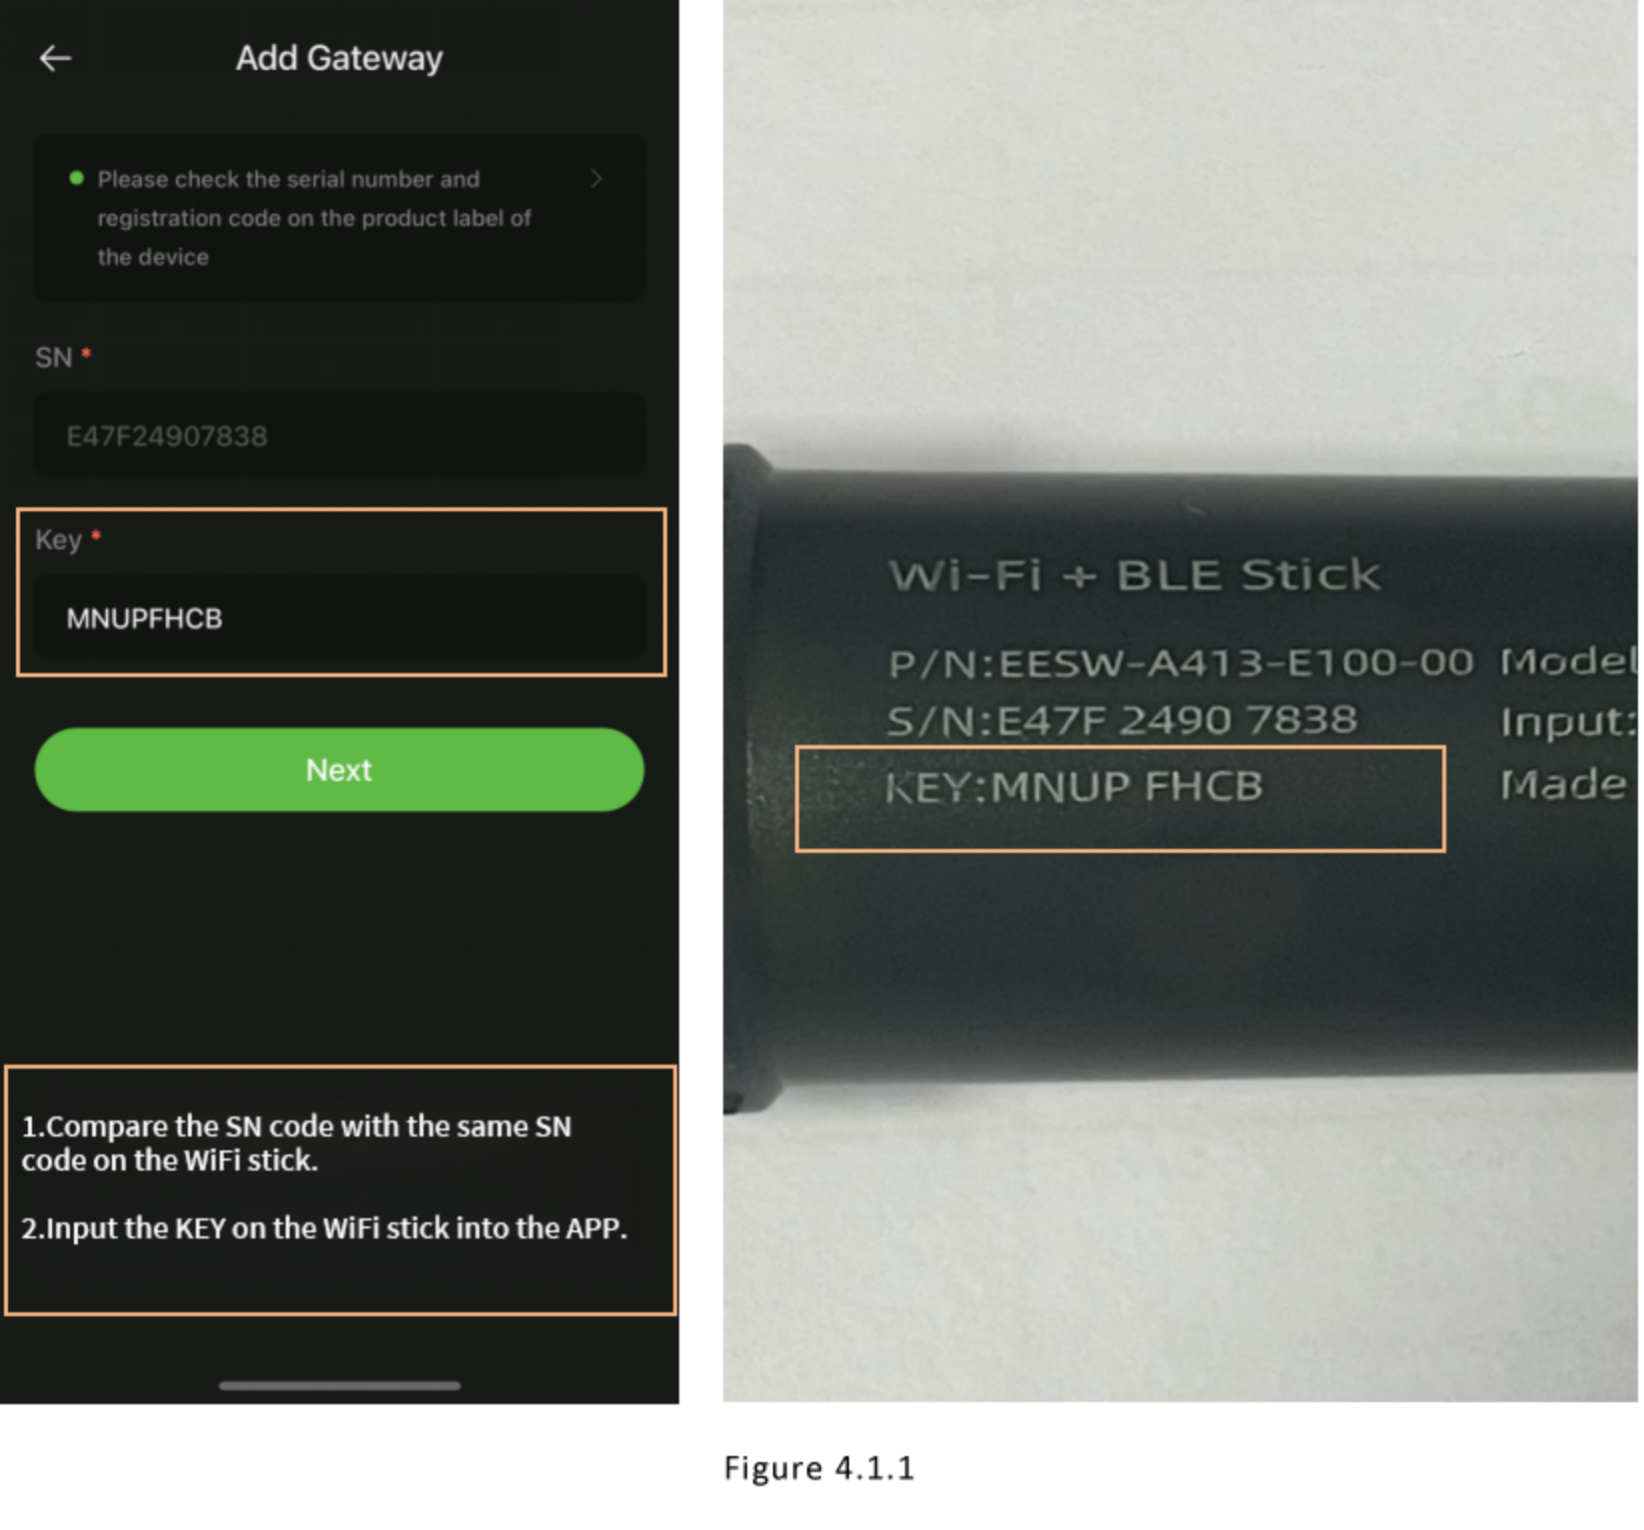
When you encounter the ‘Add Gateway’ page, you should compare the SN code identified by the UltiHome app with the SN code on your WiFi stick. When prompted to enter the Key, you enter the Key on the WiFi stick (see Figure 4.1.1).
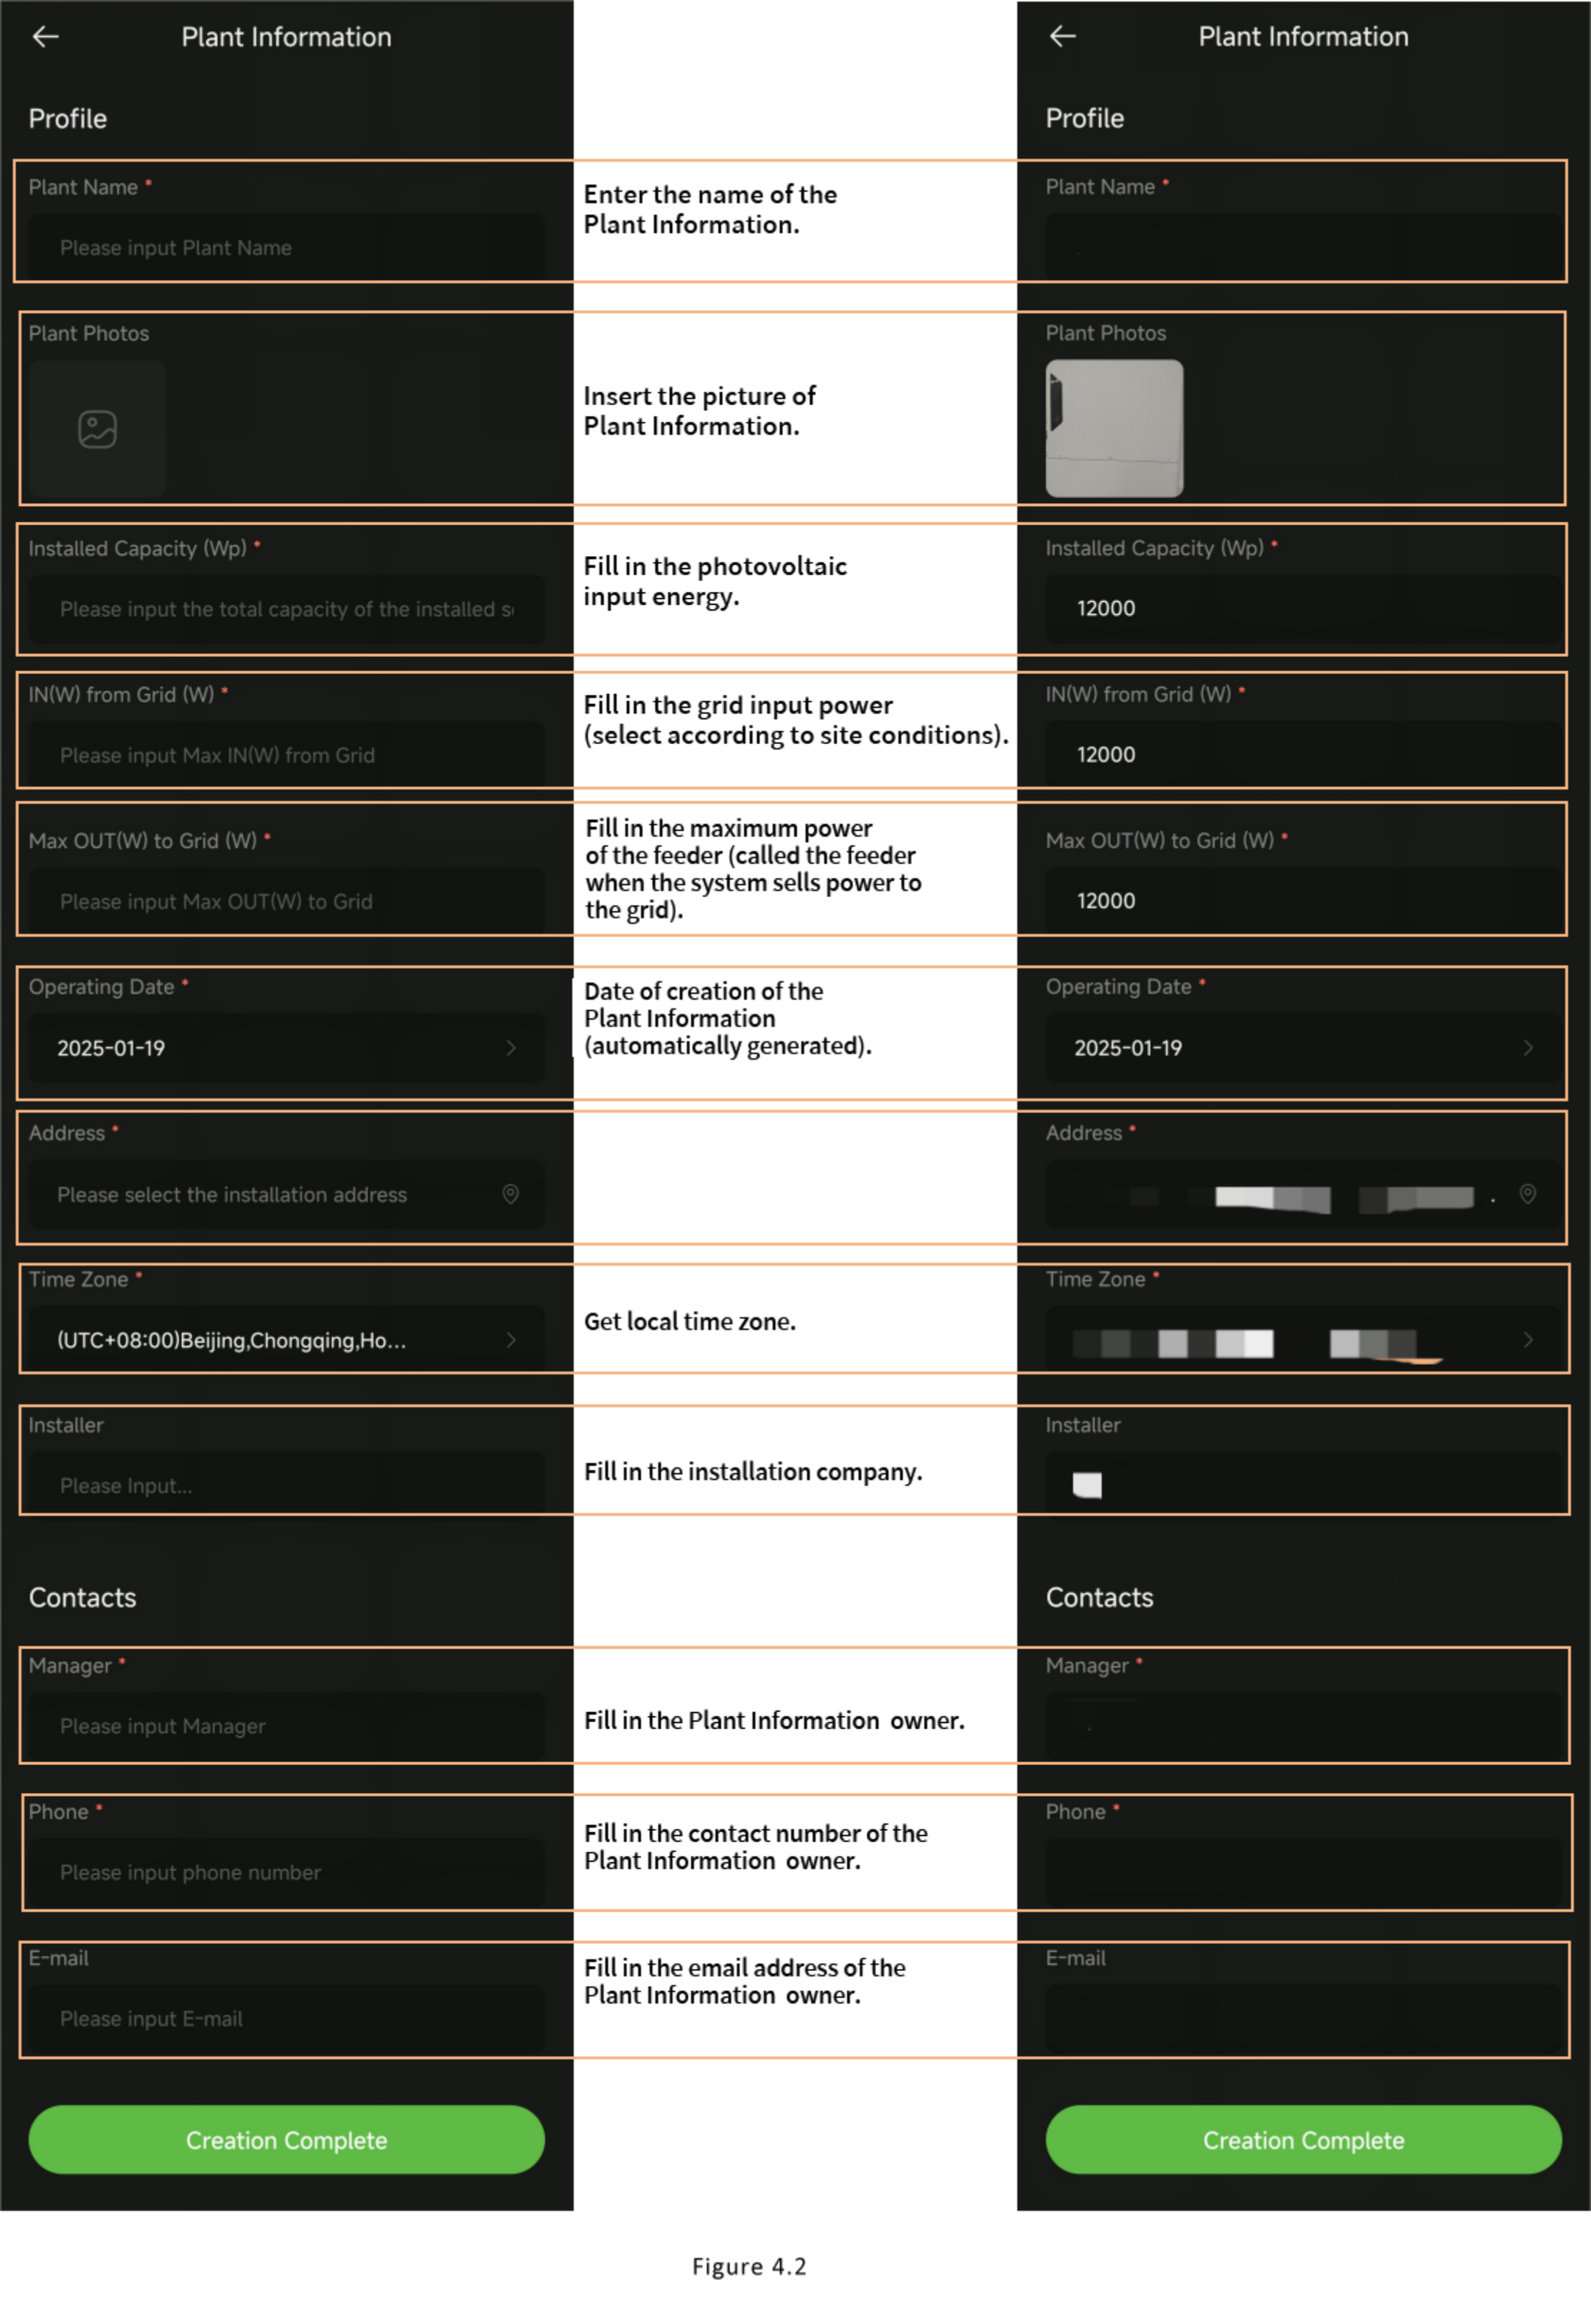
4.2 Fill In the Plant Information
Fill in the basic parameter information about your Plant Information. The items marked with an asterisk (*) are required in order to proceed with the setup.
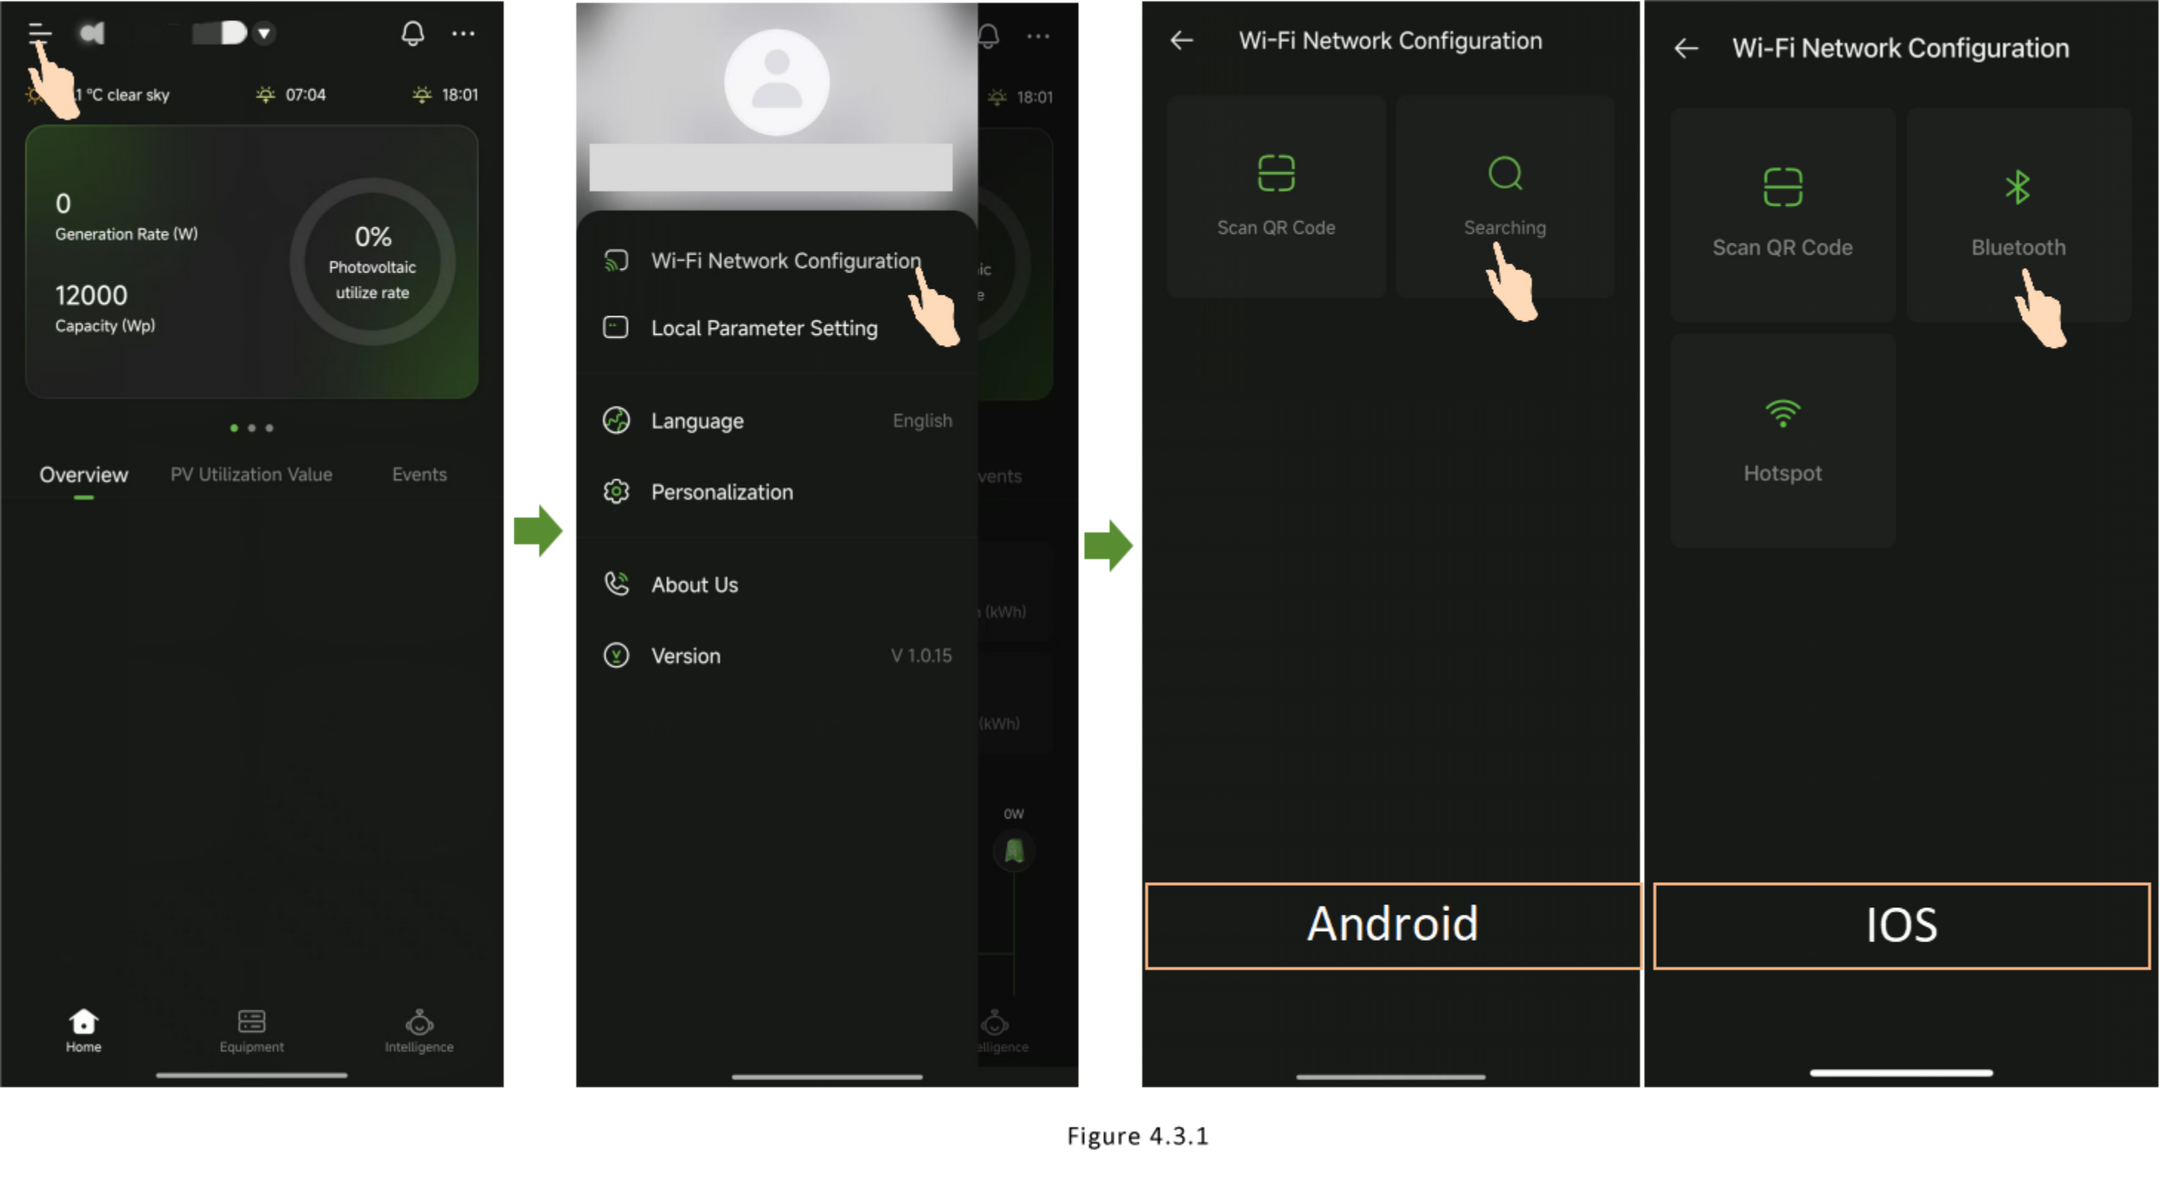
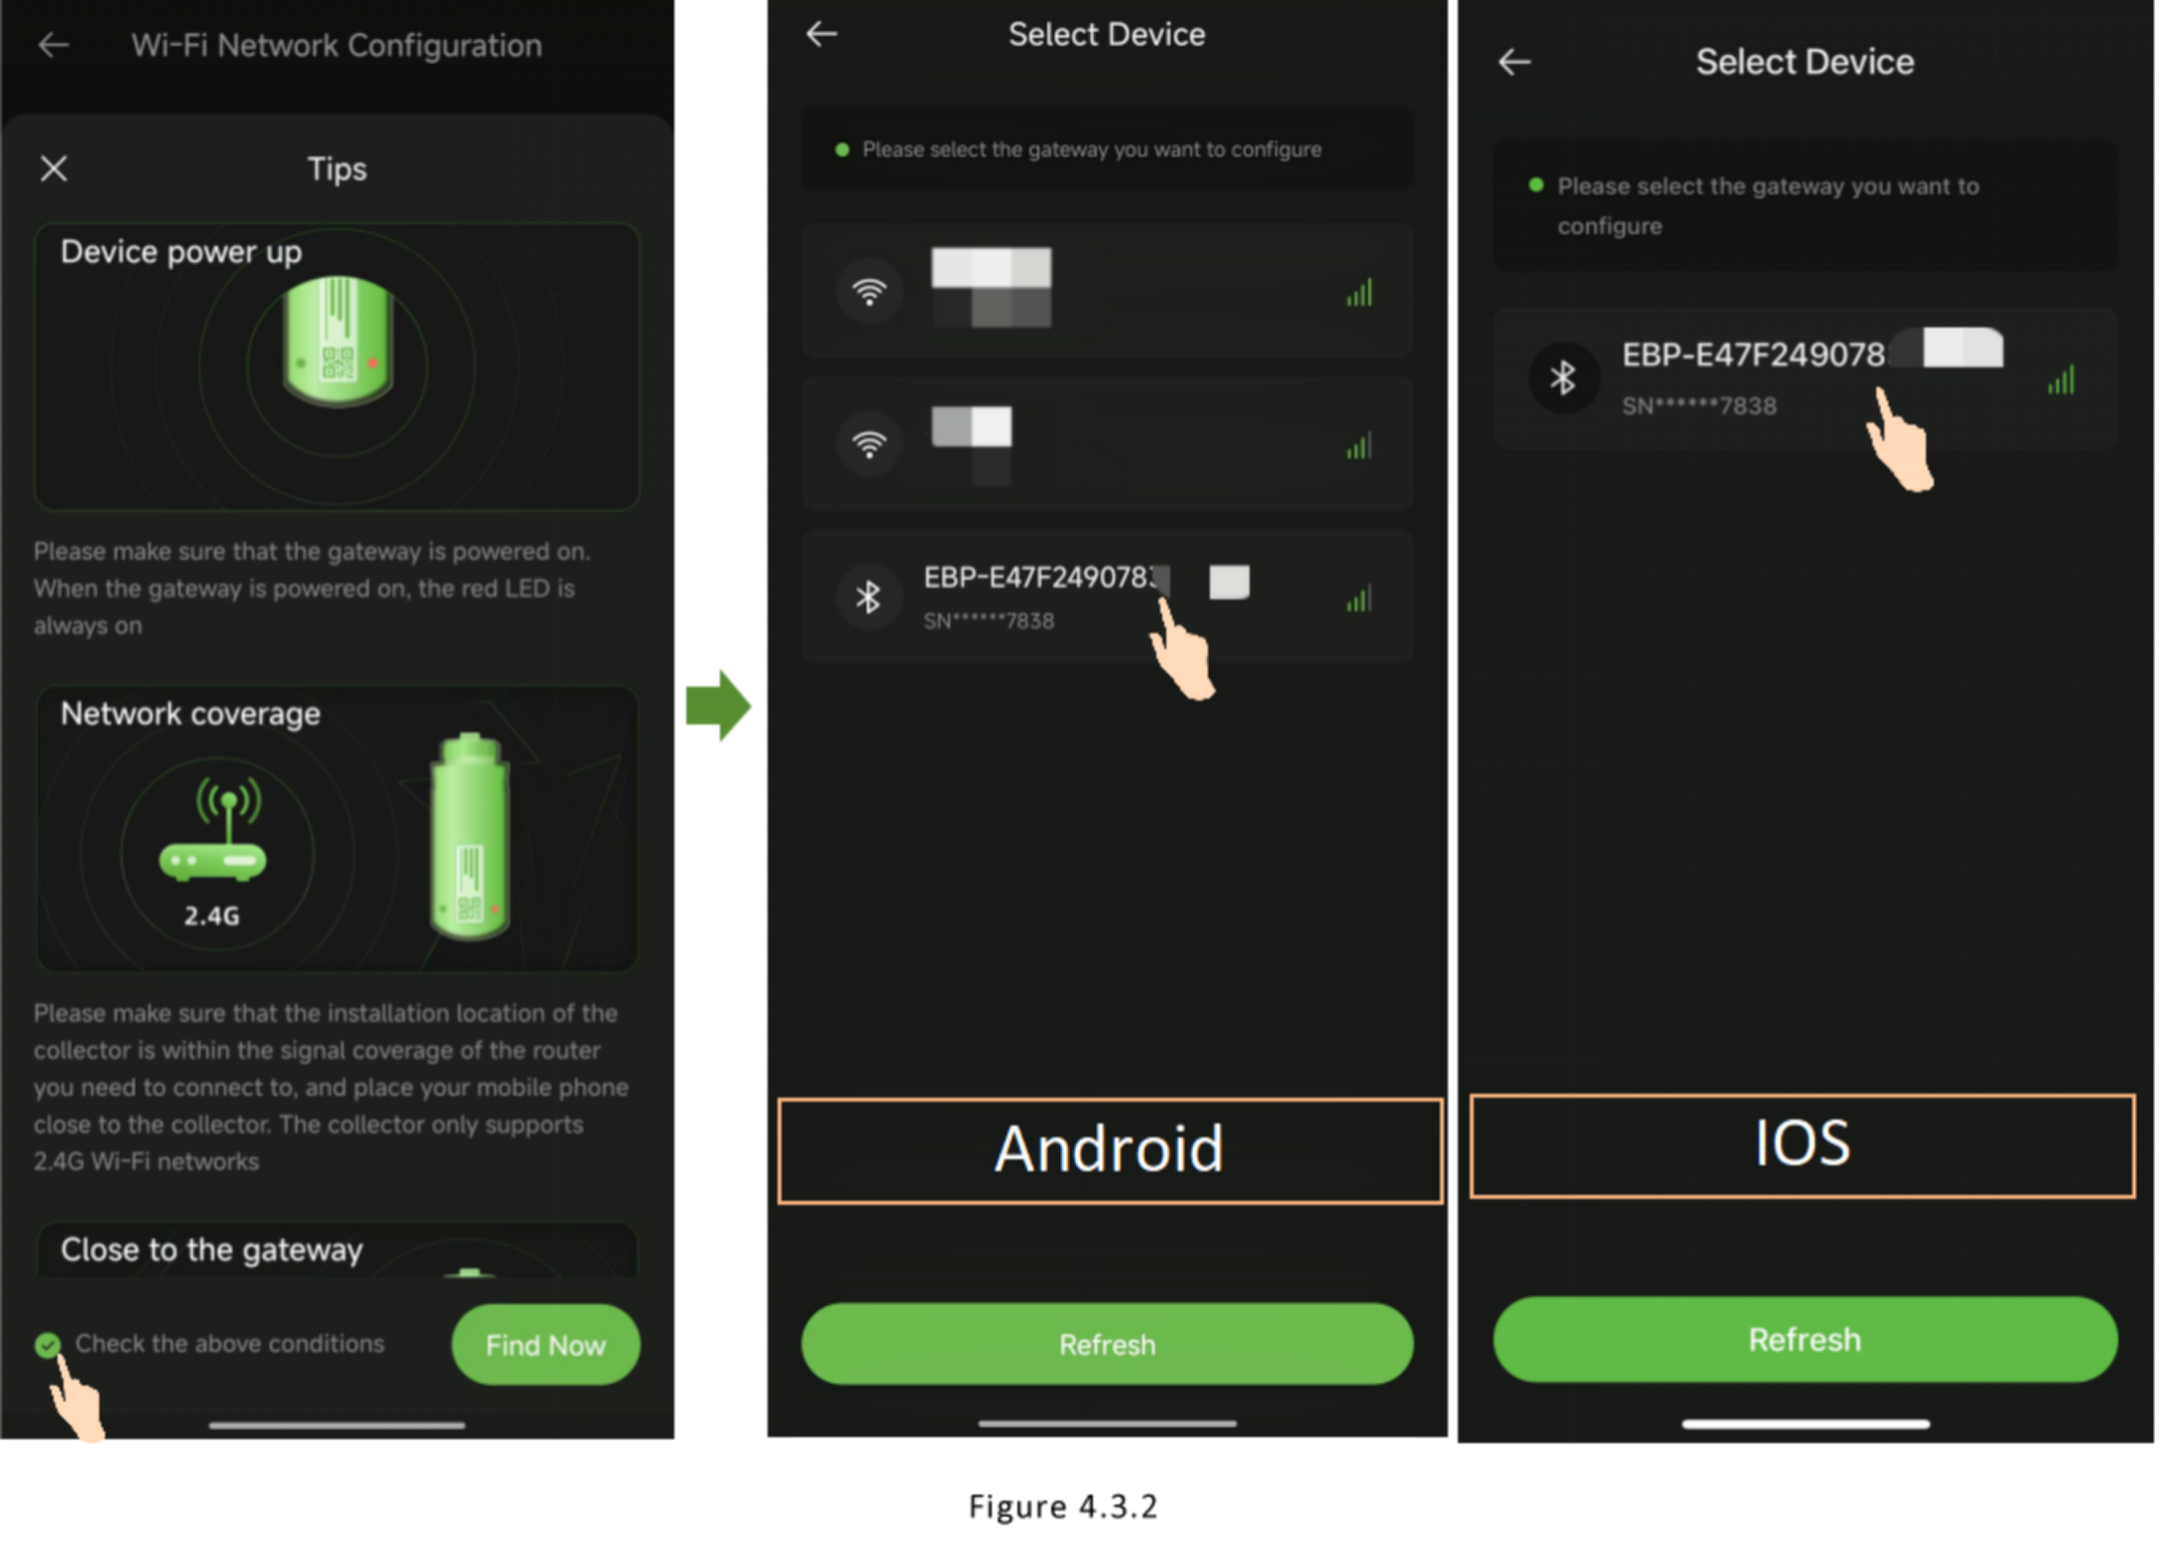
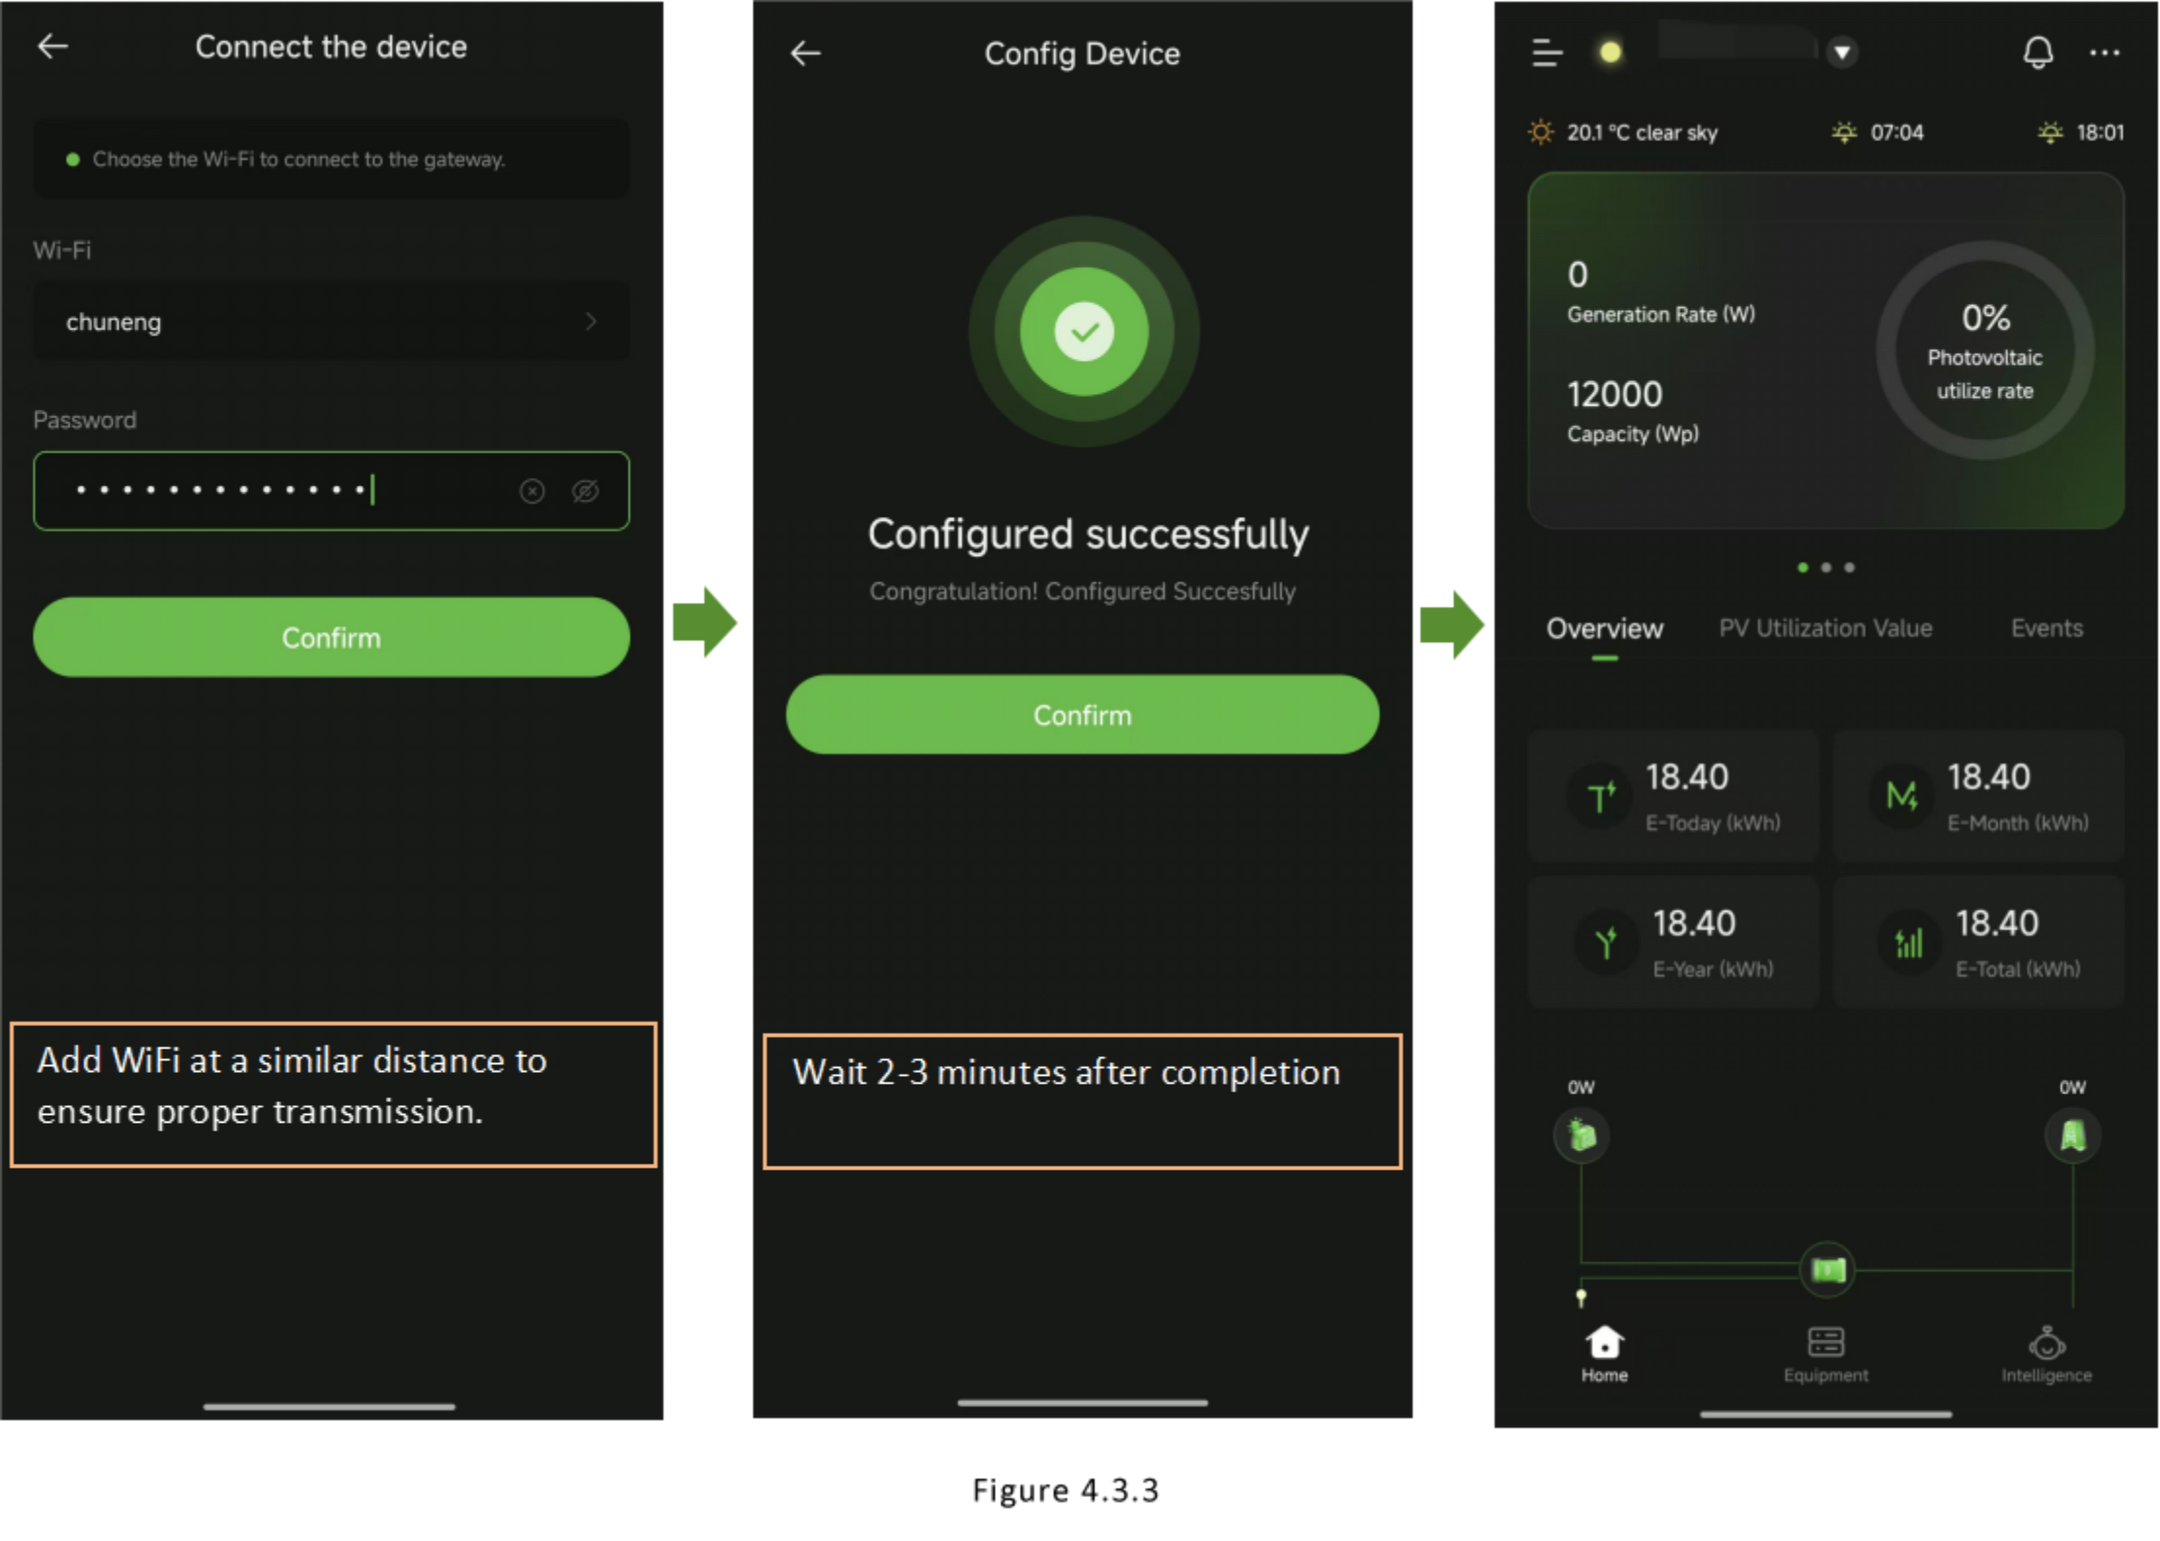
4.3 Configure the WiFi Network
To configure the WiFi network, turn on Bluetooth and follow the instructions shown in Figures 4.3.1, 4.3.2, 4.3.3.
5.Three - phase RESS
5.1 Parameter Settings
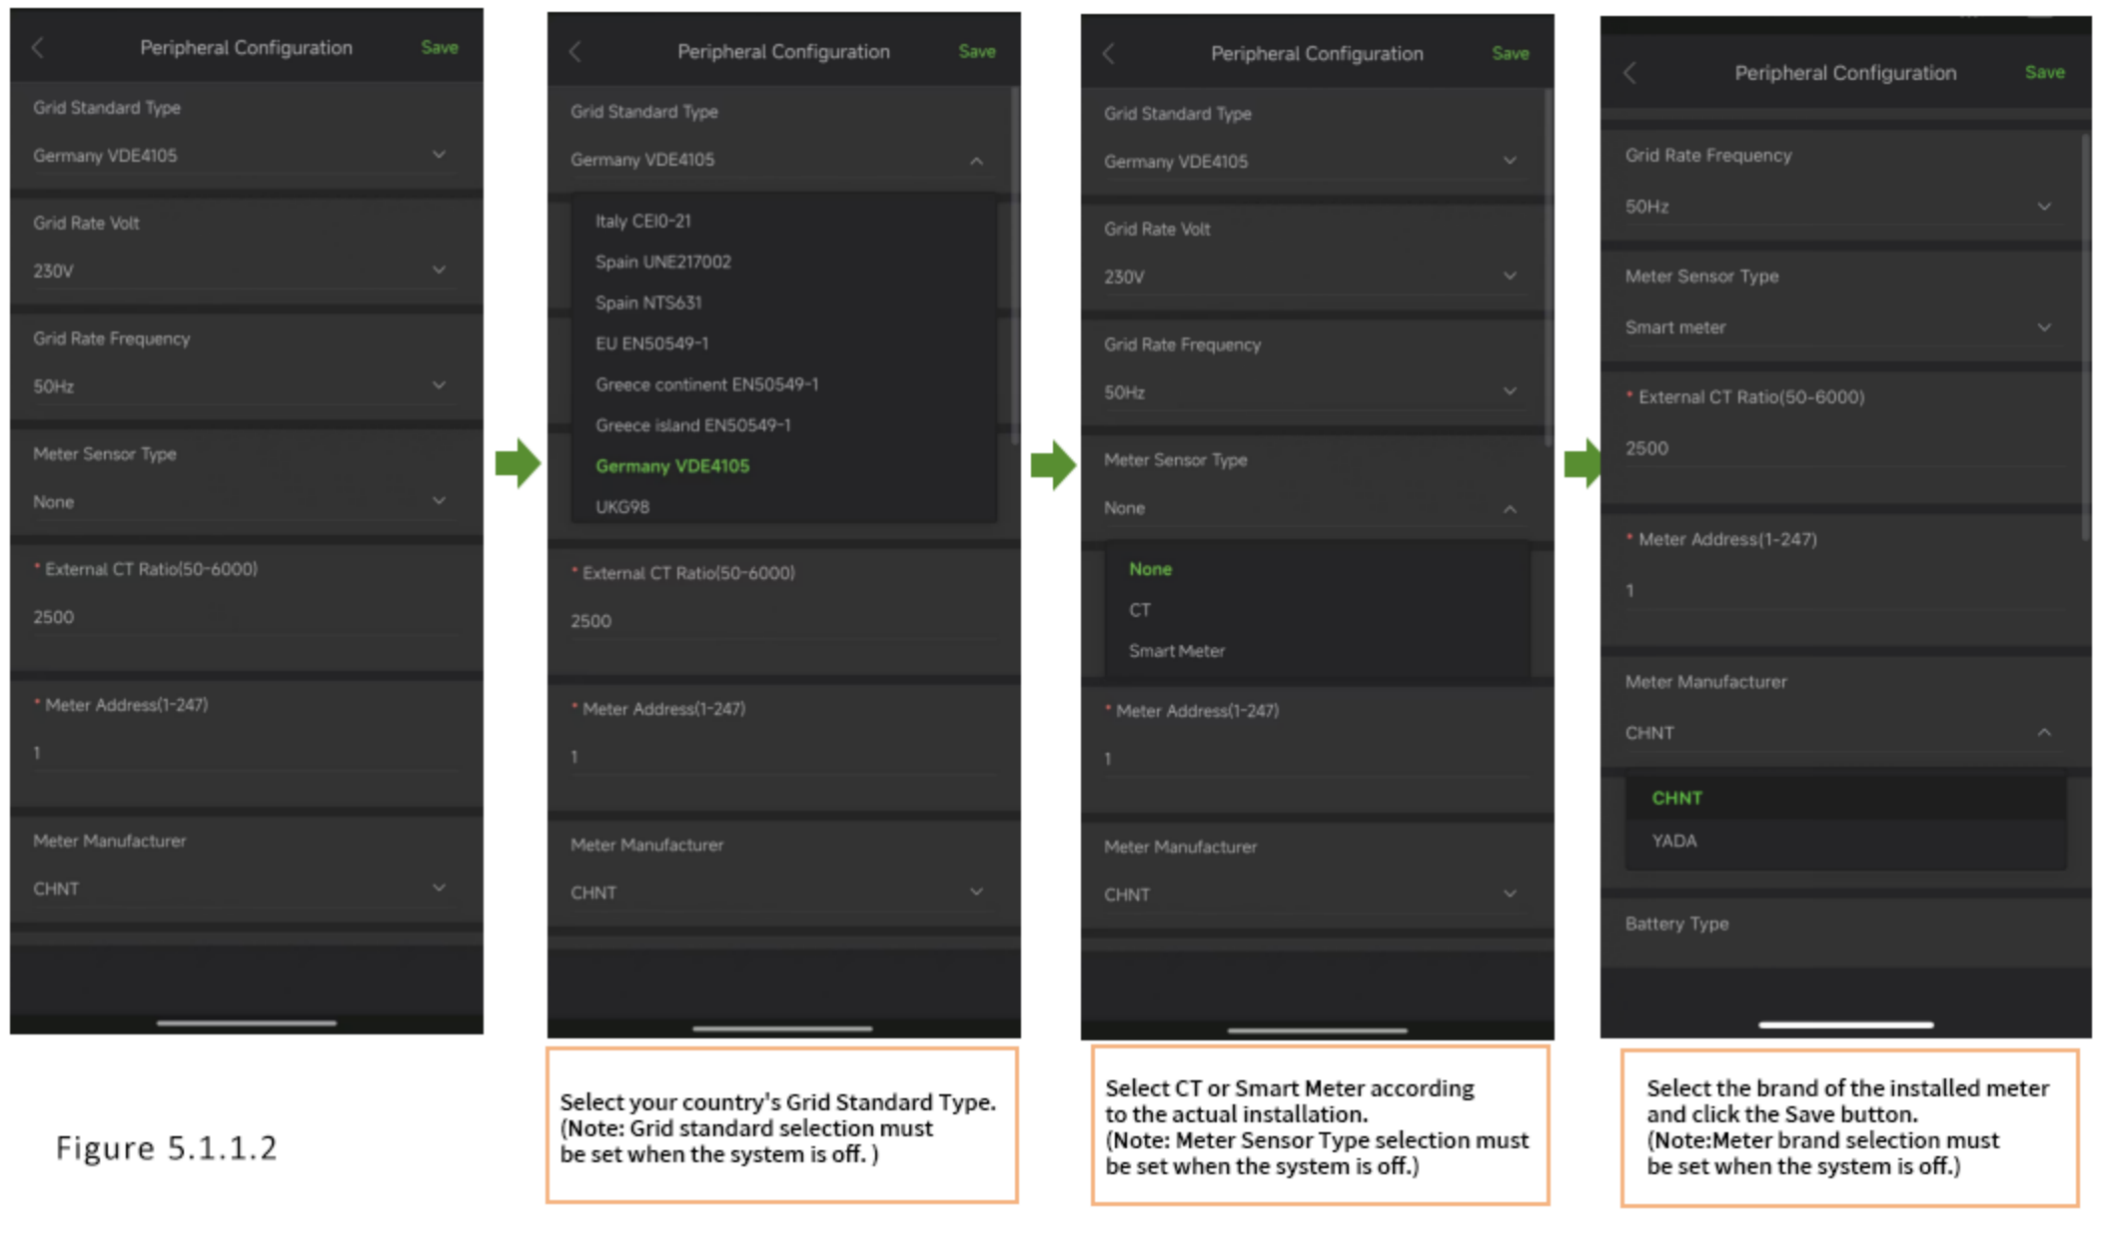
5.1.1 Establish the grid standard and make a selection between a current transformer (CT) and a meter.
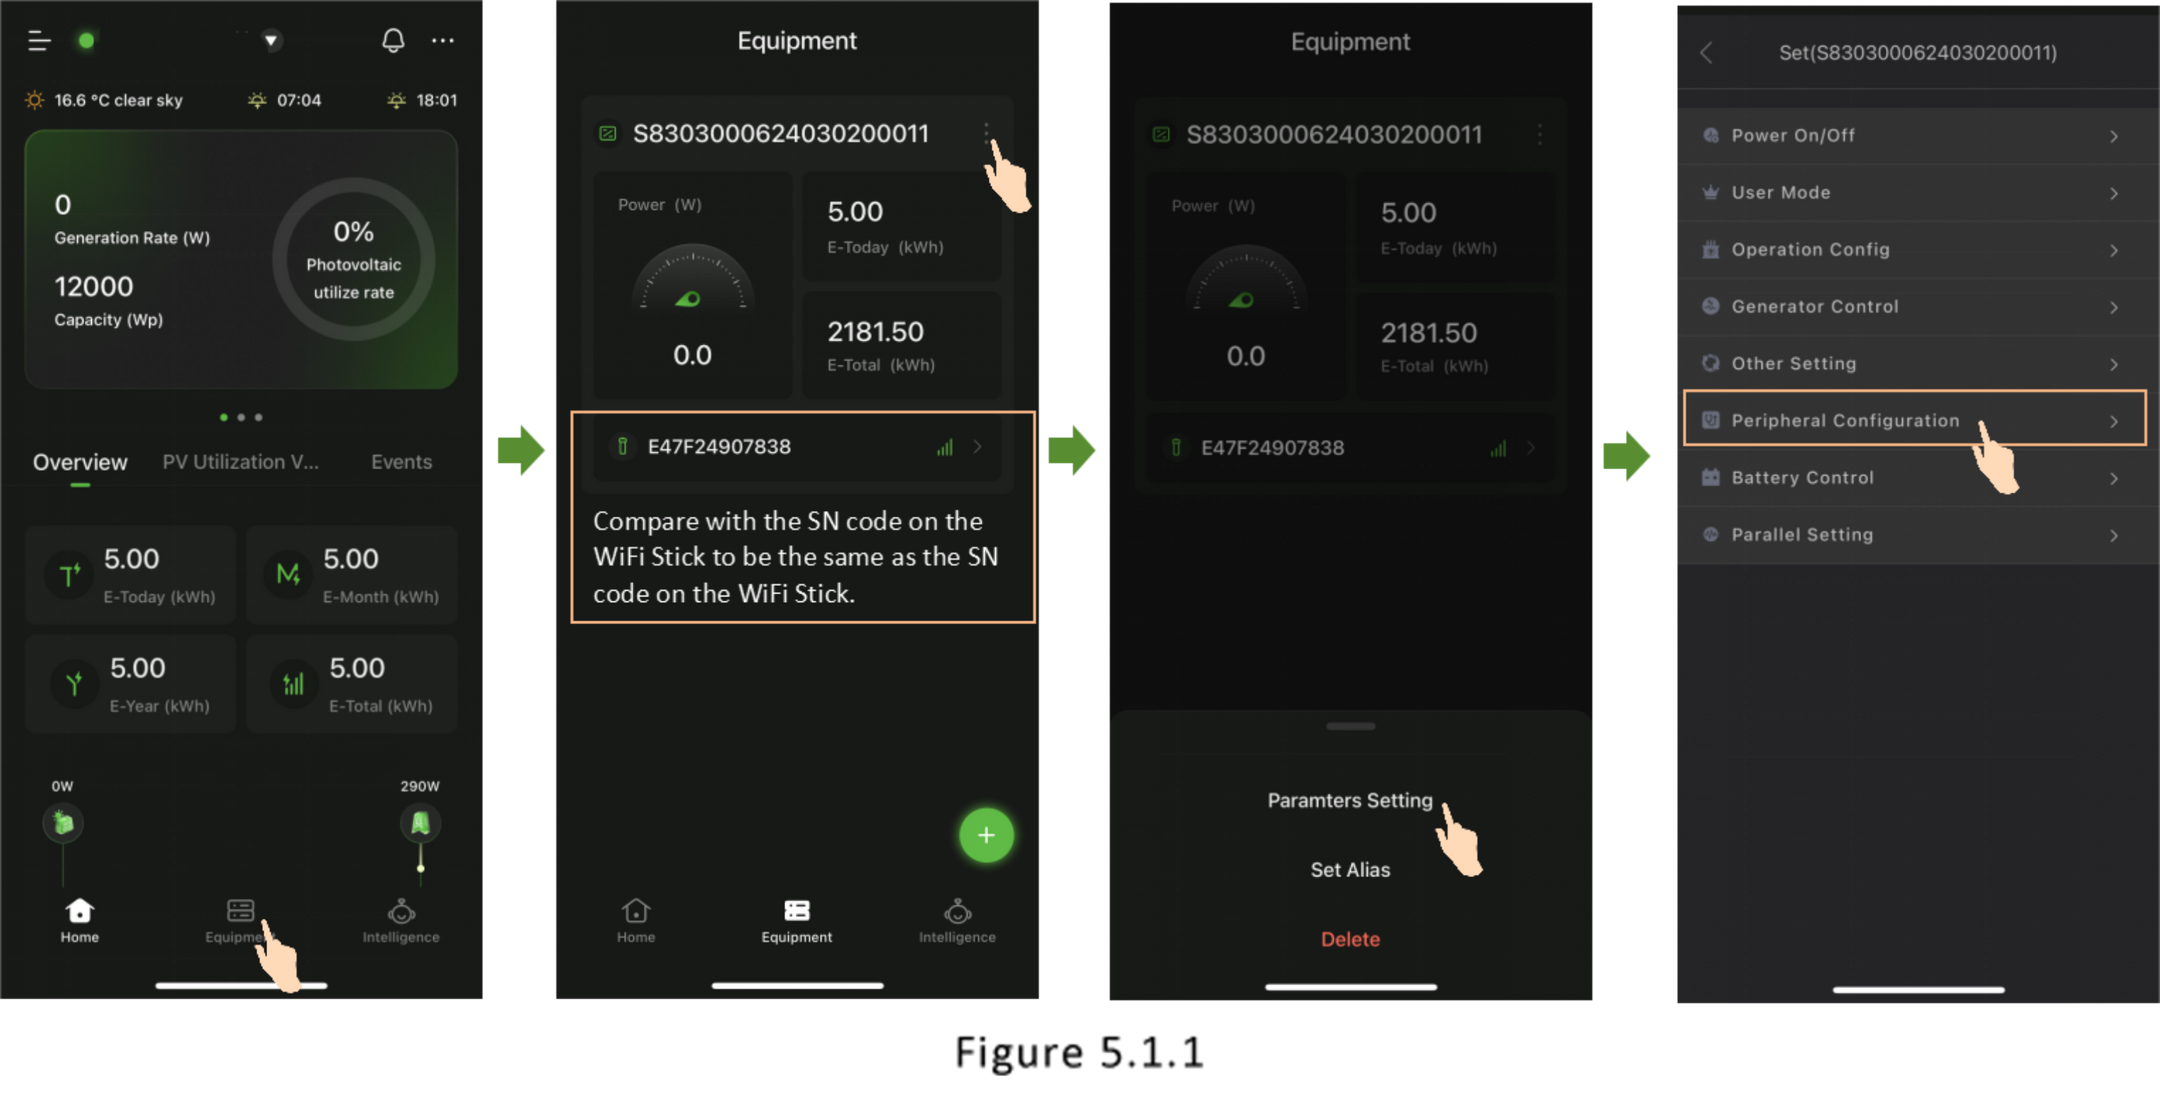
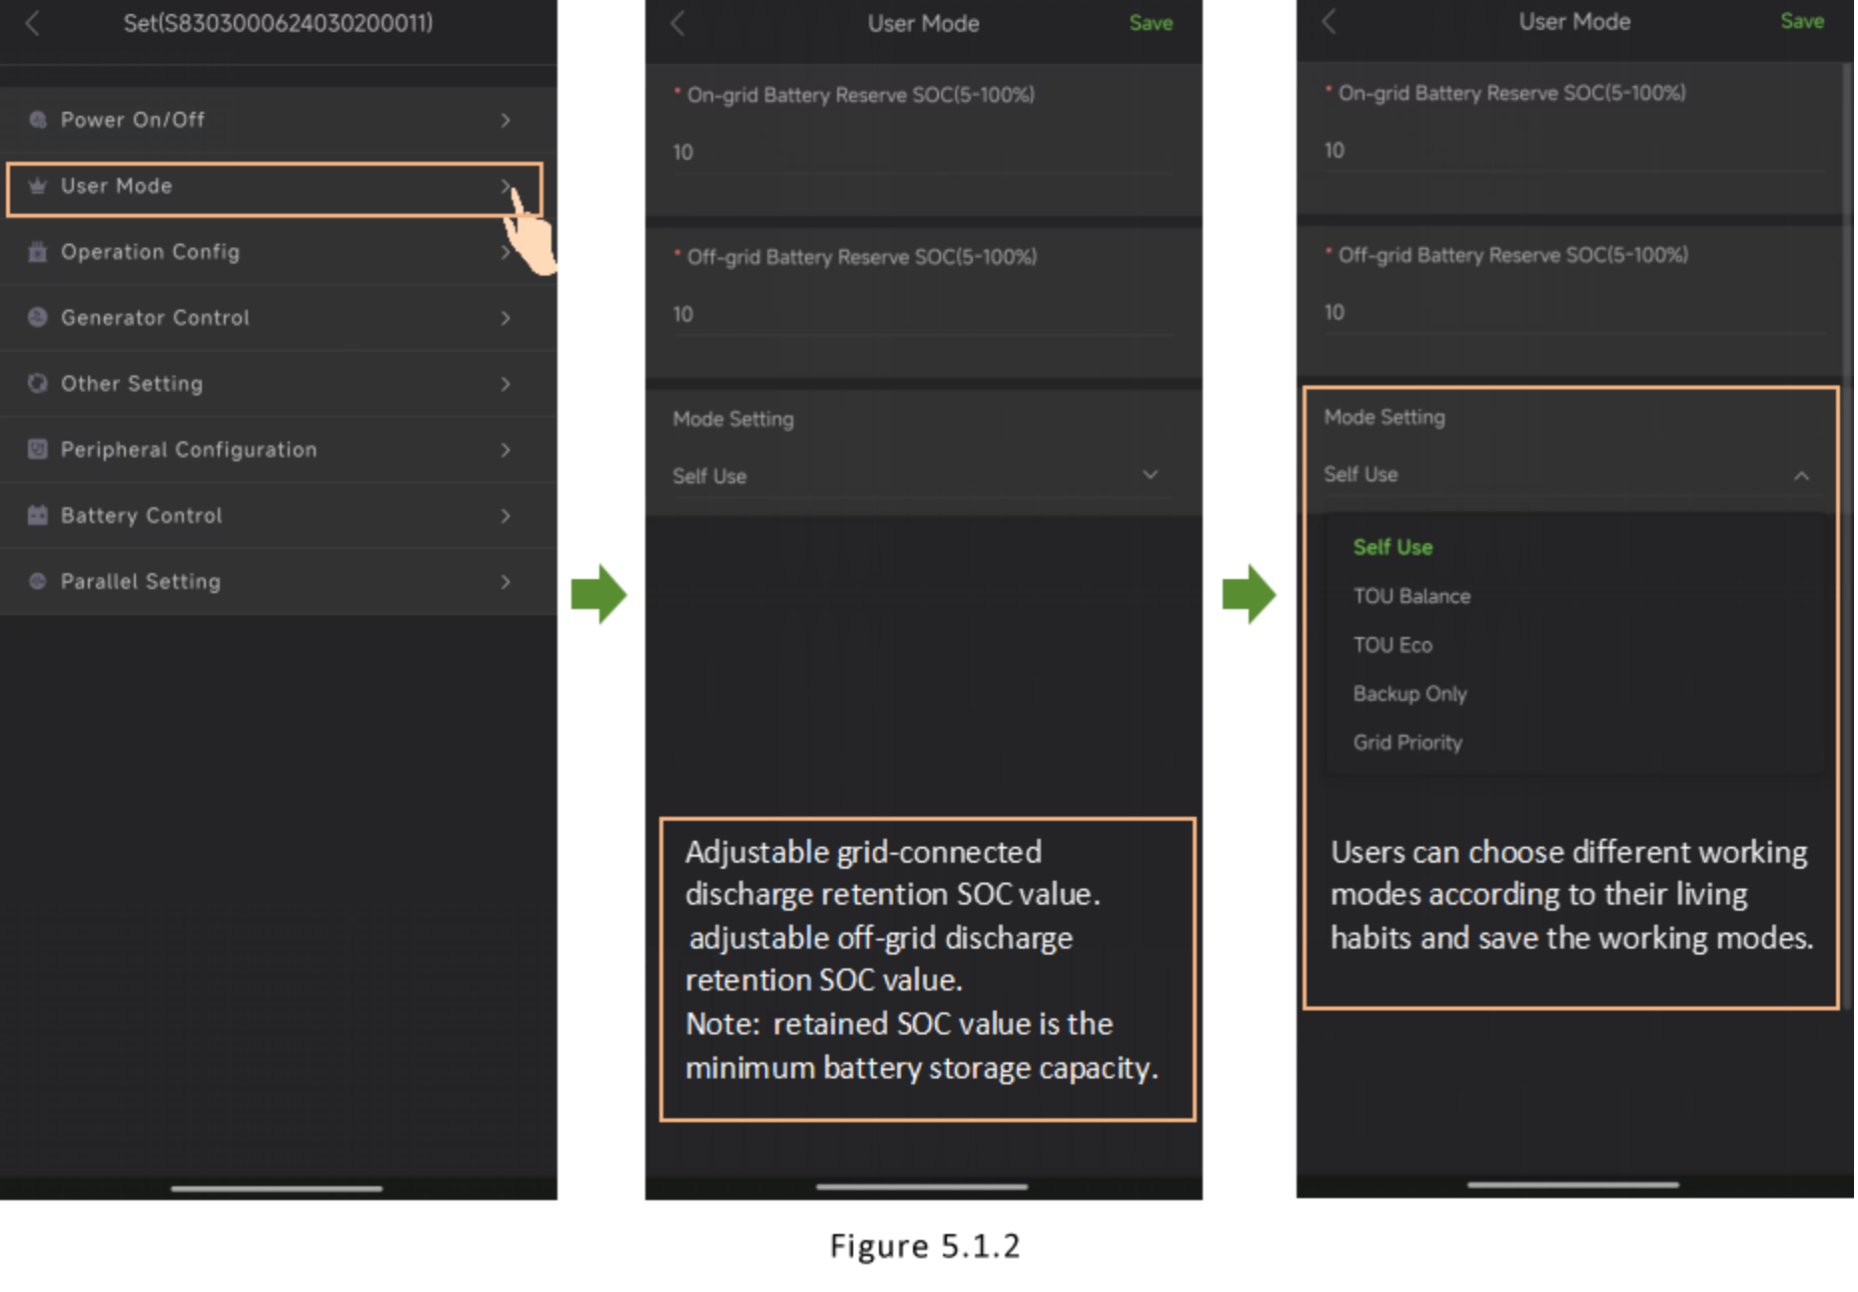
5.1.2 Select User Mode and Set Battery Reserve SOC
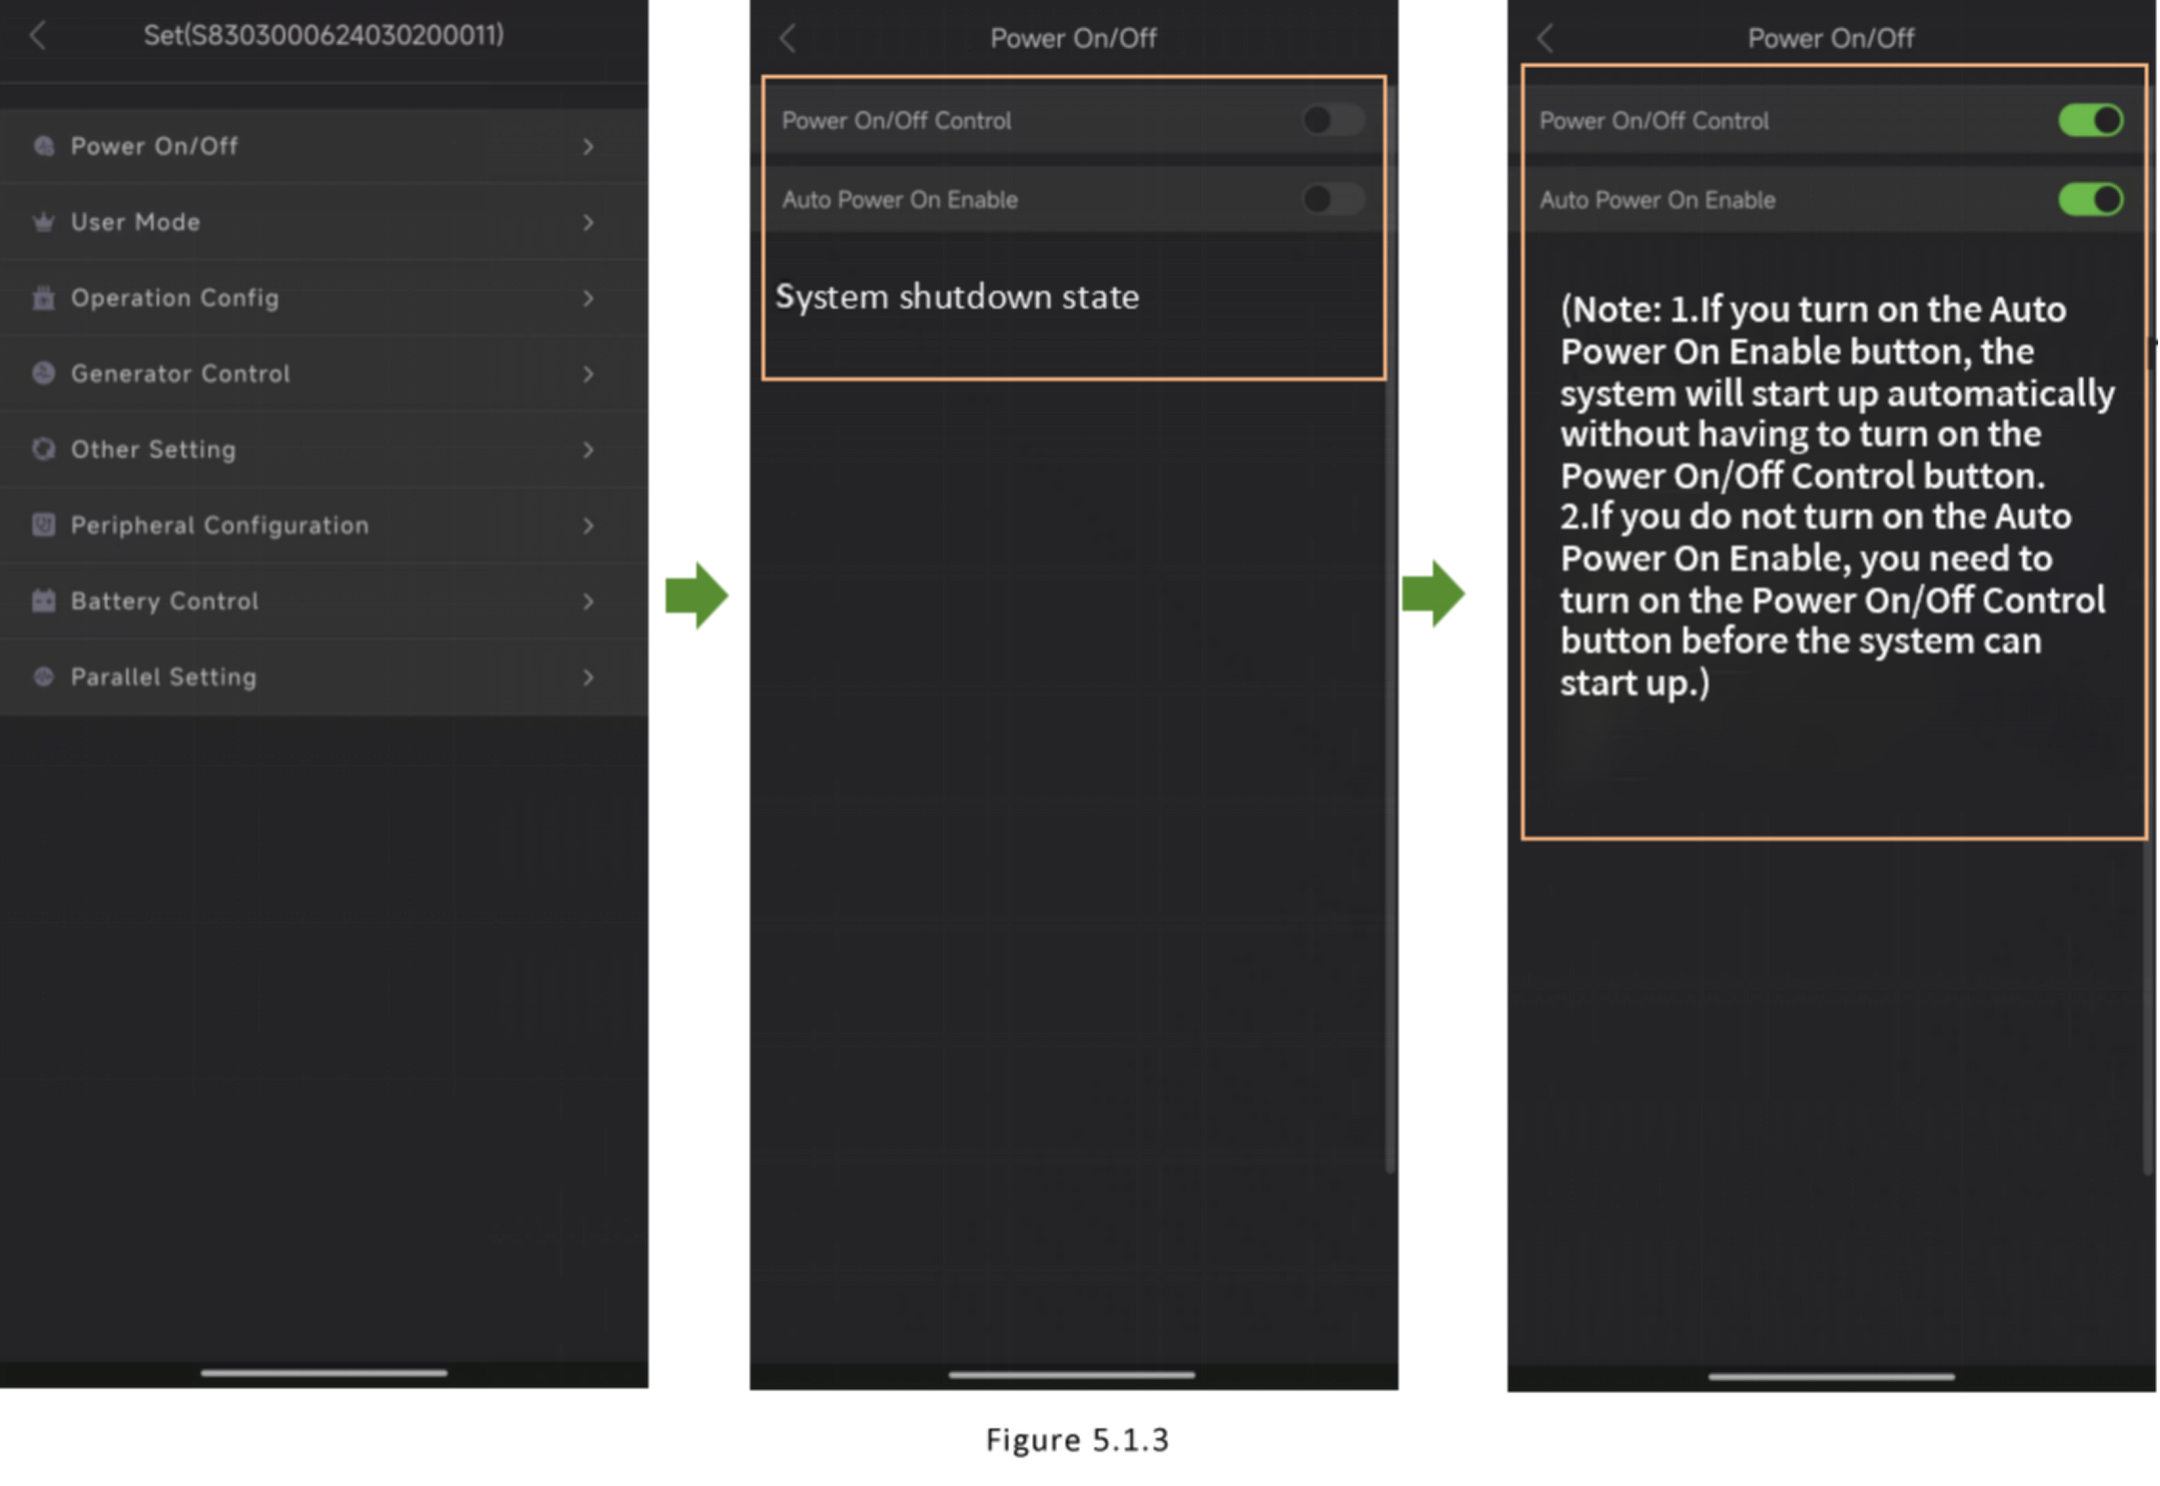
5.1.3 Power On/Off
5.2 Mode Setting Descriptions
Load is the first priority in any operating mode.
5.2.1 Self Use: Energy priority is load → battery → grid.
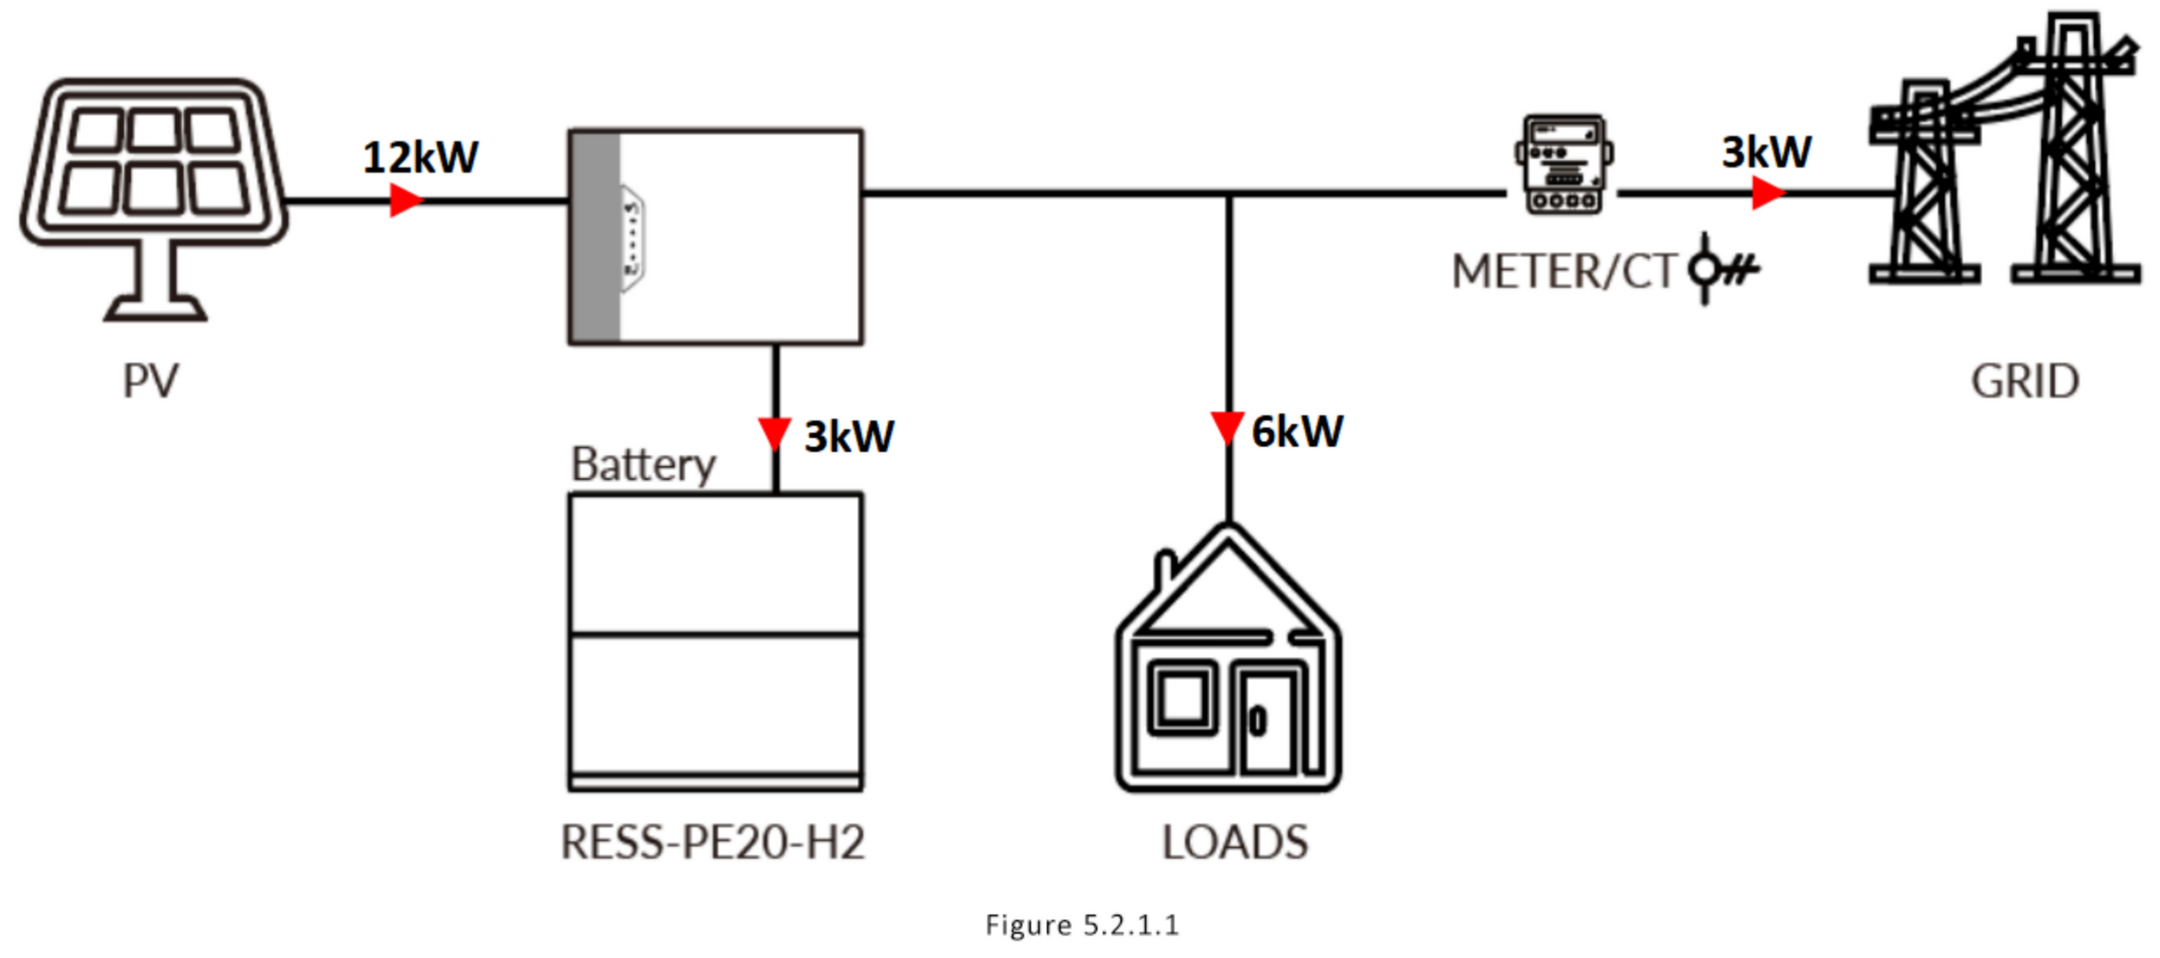
5.2.1.1 The power generated by the photovoltaic system is first used to supply the connected loads. If the generated power exceeds the load demand, the surplus energy is used to charge the battery. Once both the loads and the battery are fully supplied, any remaining power is fed into the grid.
The energy priority is load → battery → grid, as is shown in Figure 5.2.1.1.
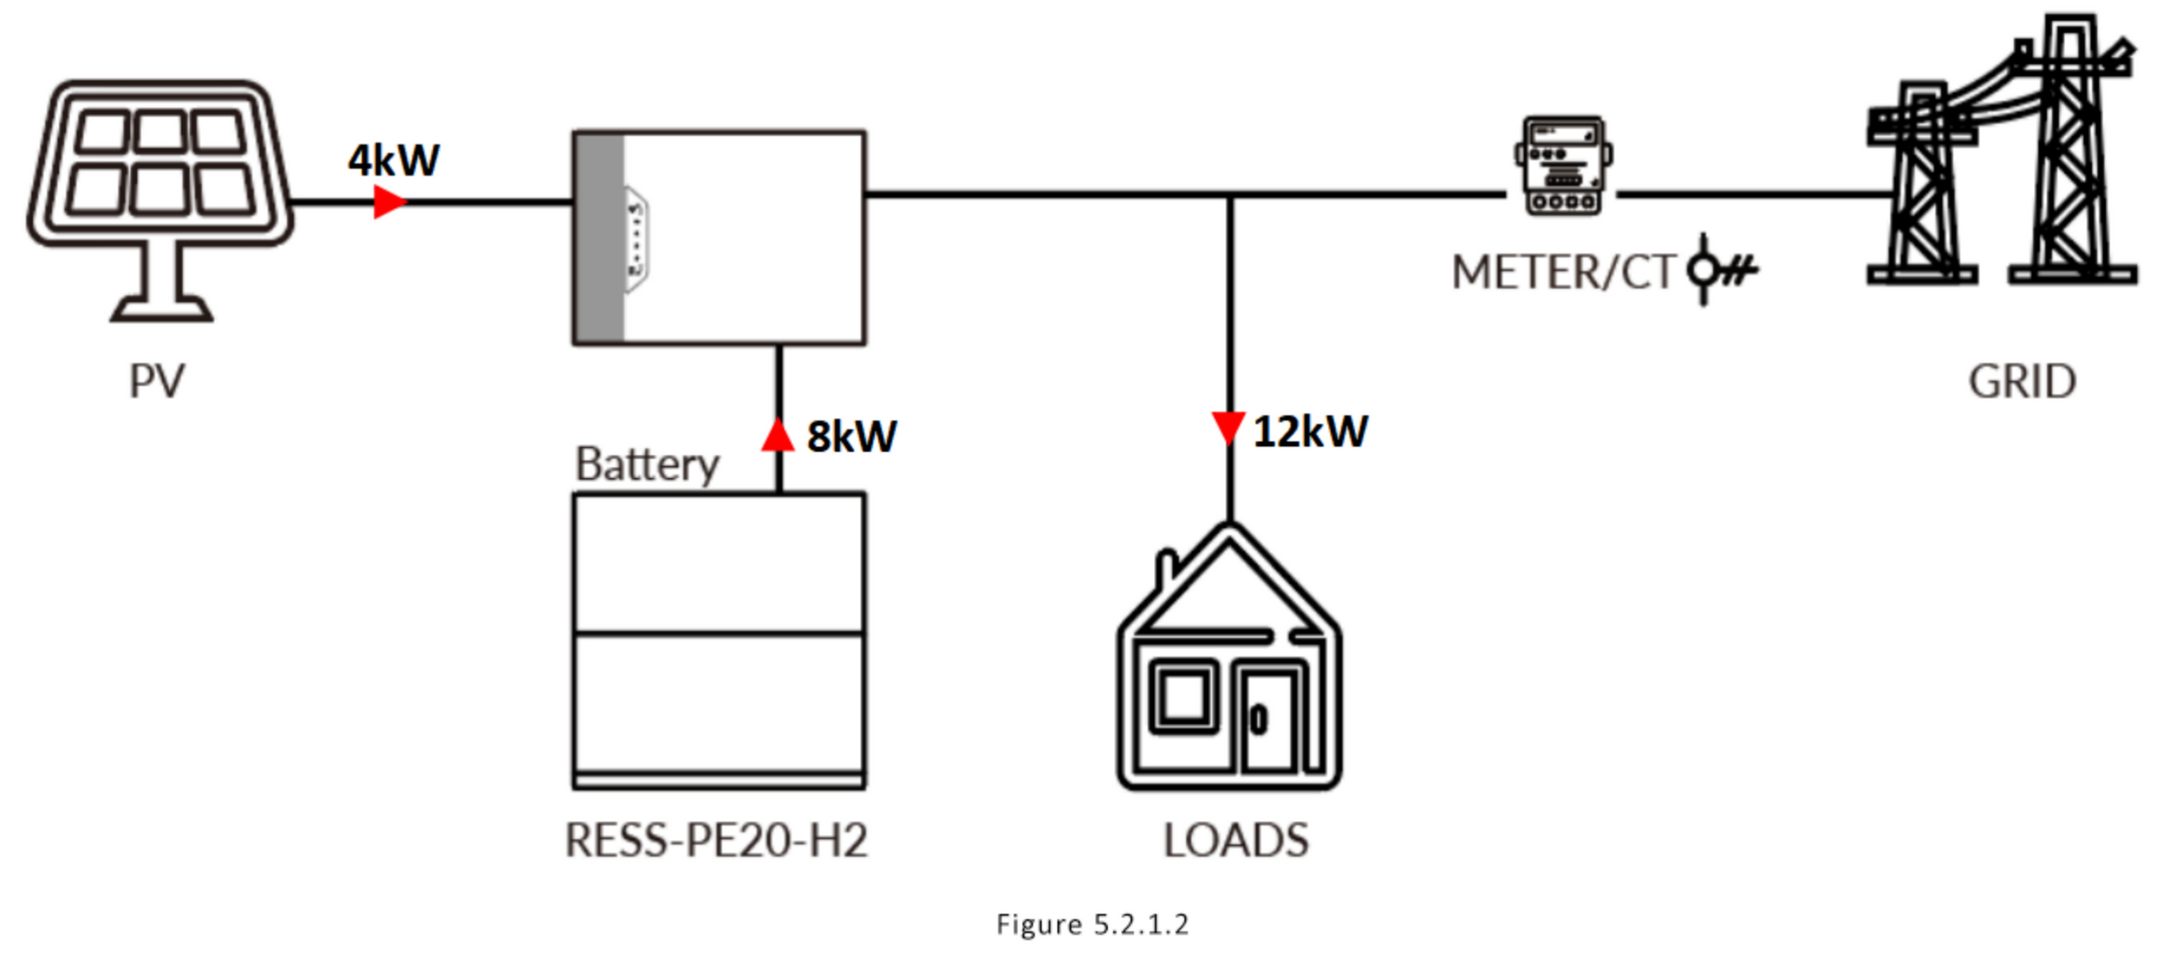
5.2.1.2 When the photovoltaic system, grid, and battery are all available, the photovoltaic power is prioritized to supply the load. If the photovoltaic power is insufficient to meet the load demand, the battery will simultaneously supplement the power supply. This is shown in Figure 5.2.1.2.
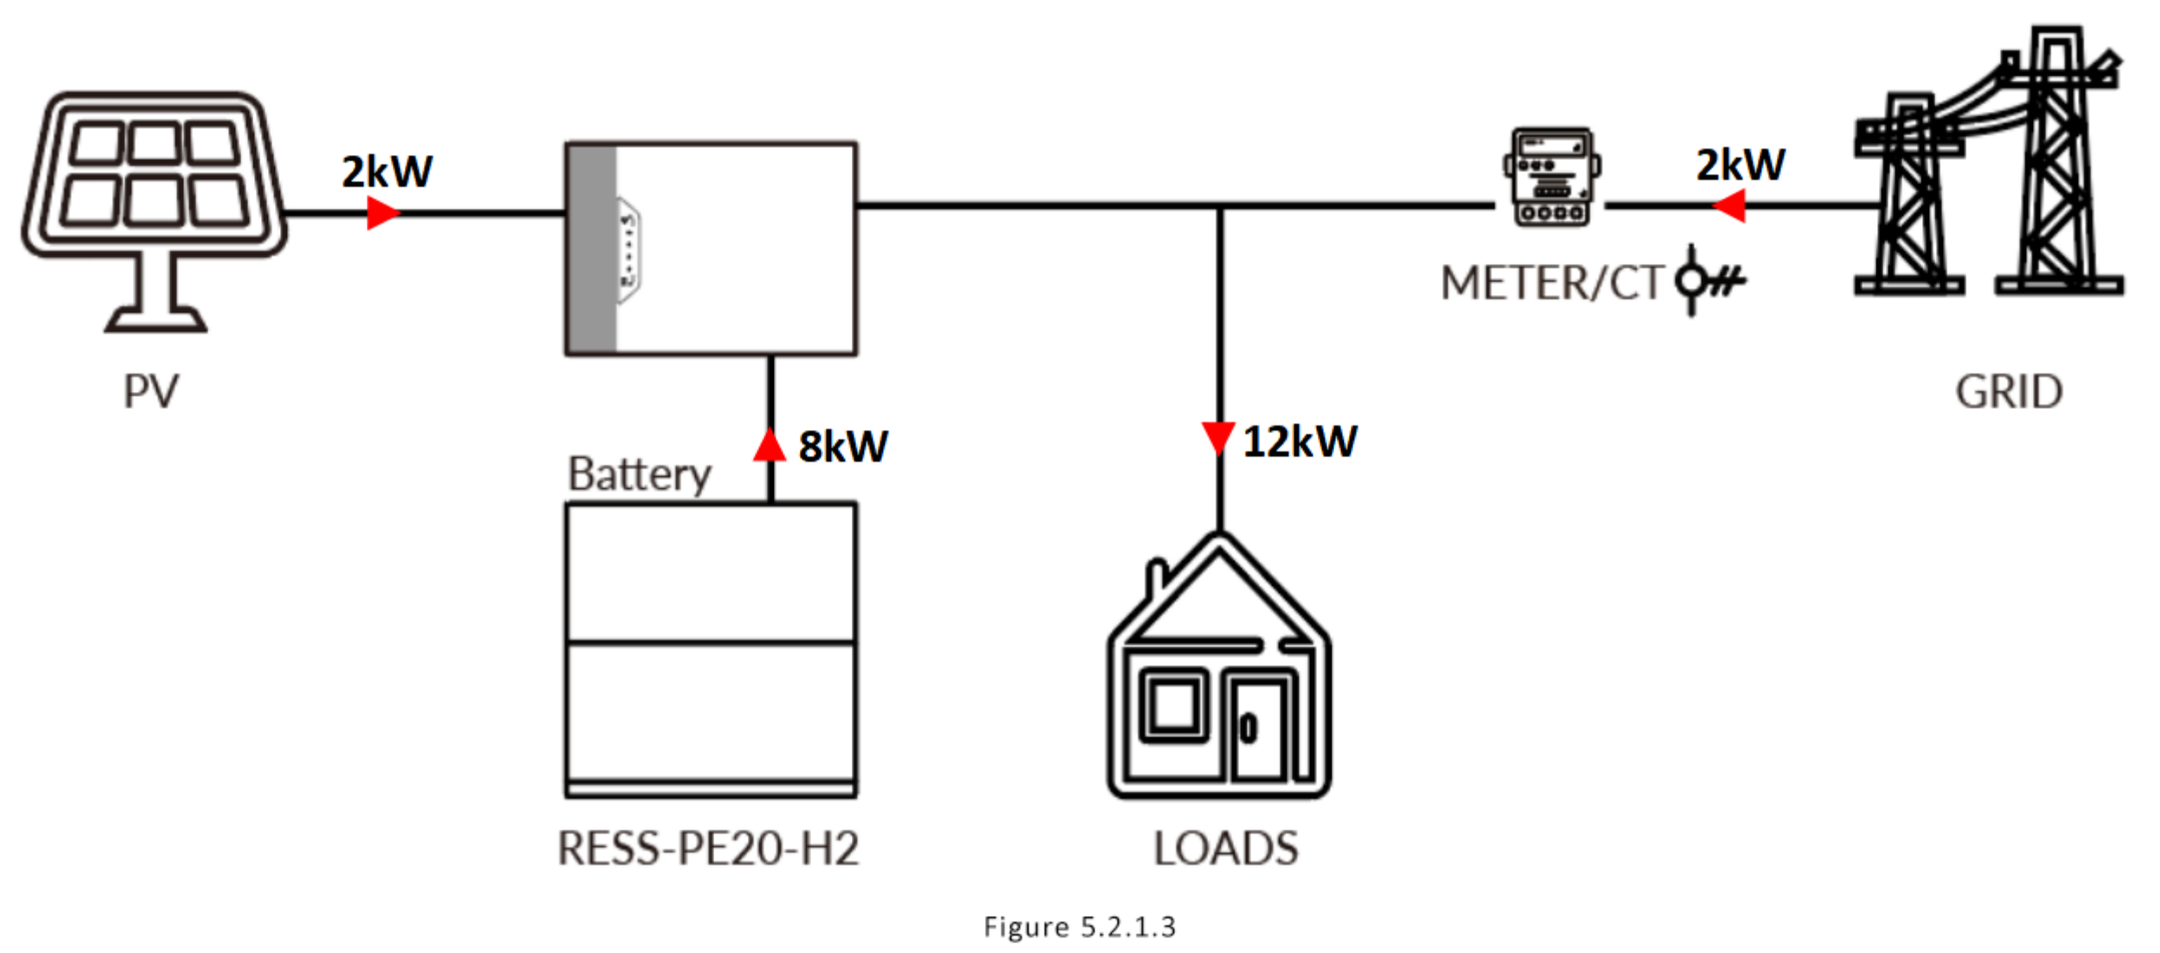
5.2.1.3 When the photovoltaic system, grid, and battery are all available, the electricity generated by the photovoltaic system is used to power the loads first. If the combined power from the photovoltaic system and the battery is insufficient to meet the load demand, the grid will supply the remaining power. This is illustrated in Figure 5.2.1.3
5.2.1.4 When there is no photovoltaic power supply, the battery will discharge first to meet the load. When the battery capacity is insufficient, the grid will supply power to the load. This flow is shown in Figure 5.2.1.4.

5.2.2 TOU Balance
In this mode, the user can set a time period according to the PV adequacy and time-sharing tariff. Three tariff modes can be selected for each time period:
5.2.2.1 When Peak Price is selected: The system will run in self-generation and self-consumption mode (see 5.2.1 for details).
5.2.2.2 When Flat Price is selected: The system will operate in self-generation and self-consumption mode (see 5.2.1 for details).
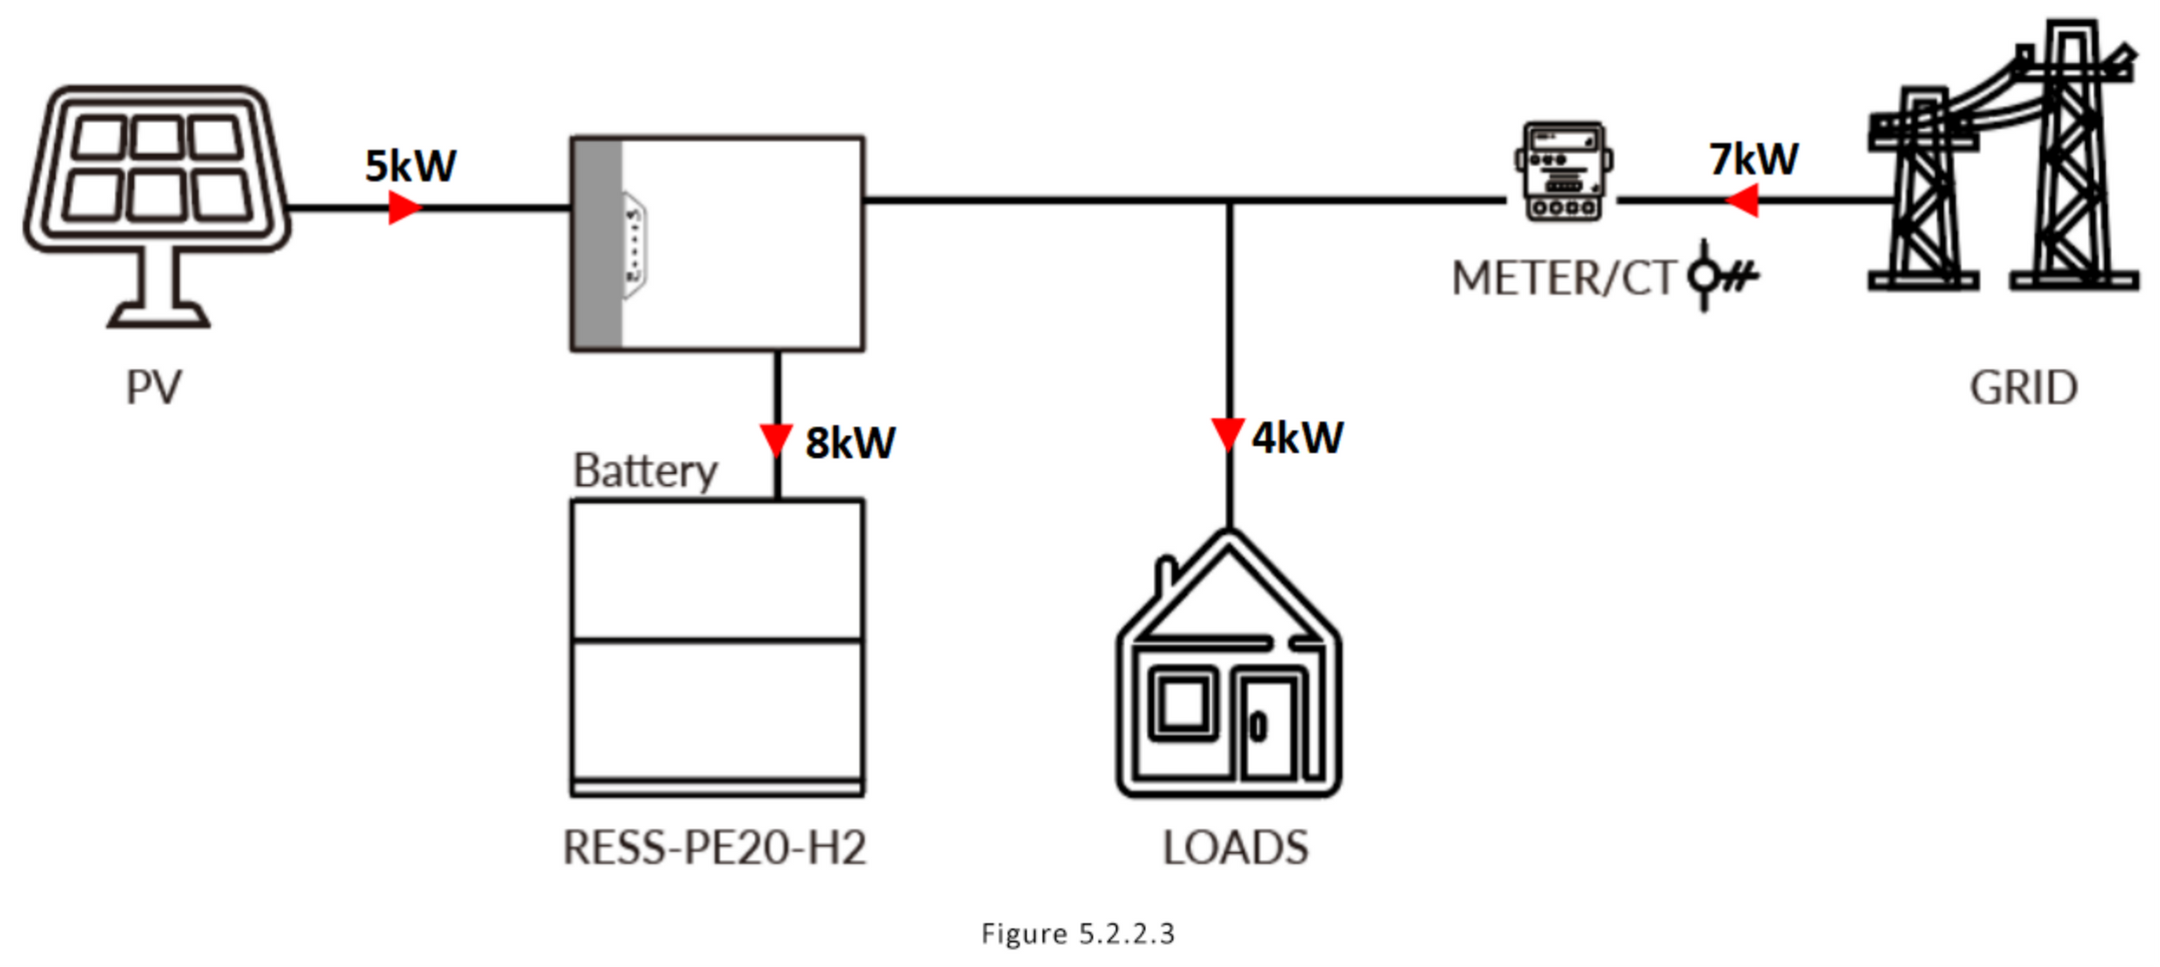
5.2.2.3 When Valley Price is selected: You should first meet the power demand of the load, then charge the battery until it is fully charged (see Figure 5.2.2.3).
5.2.3 TOU Eco
In this mode, the user can configure time periods based on photovoltaic power availability and time-of-use electricity pricing. For each time period, three electricity price modes can be selected:
5.2.3.1 When Peak Price is selected: The load power supply will be given priority, and the excess energy will be delivered to the grid. This is shown in Figure 5.2.3.1.

5.2.3.2 When Flat Price is selected: The system will operate in self-generation and self-consumption mode (see 5.2.1 for details).
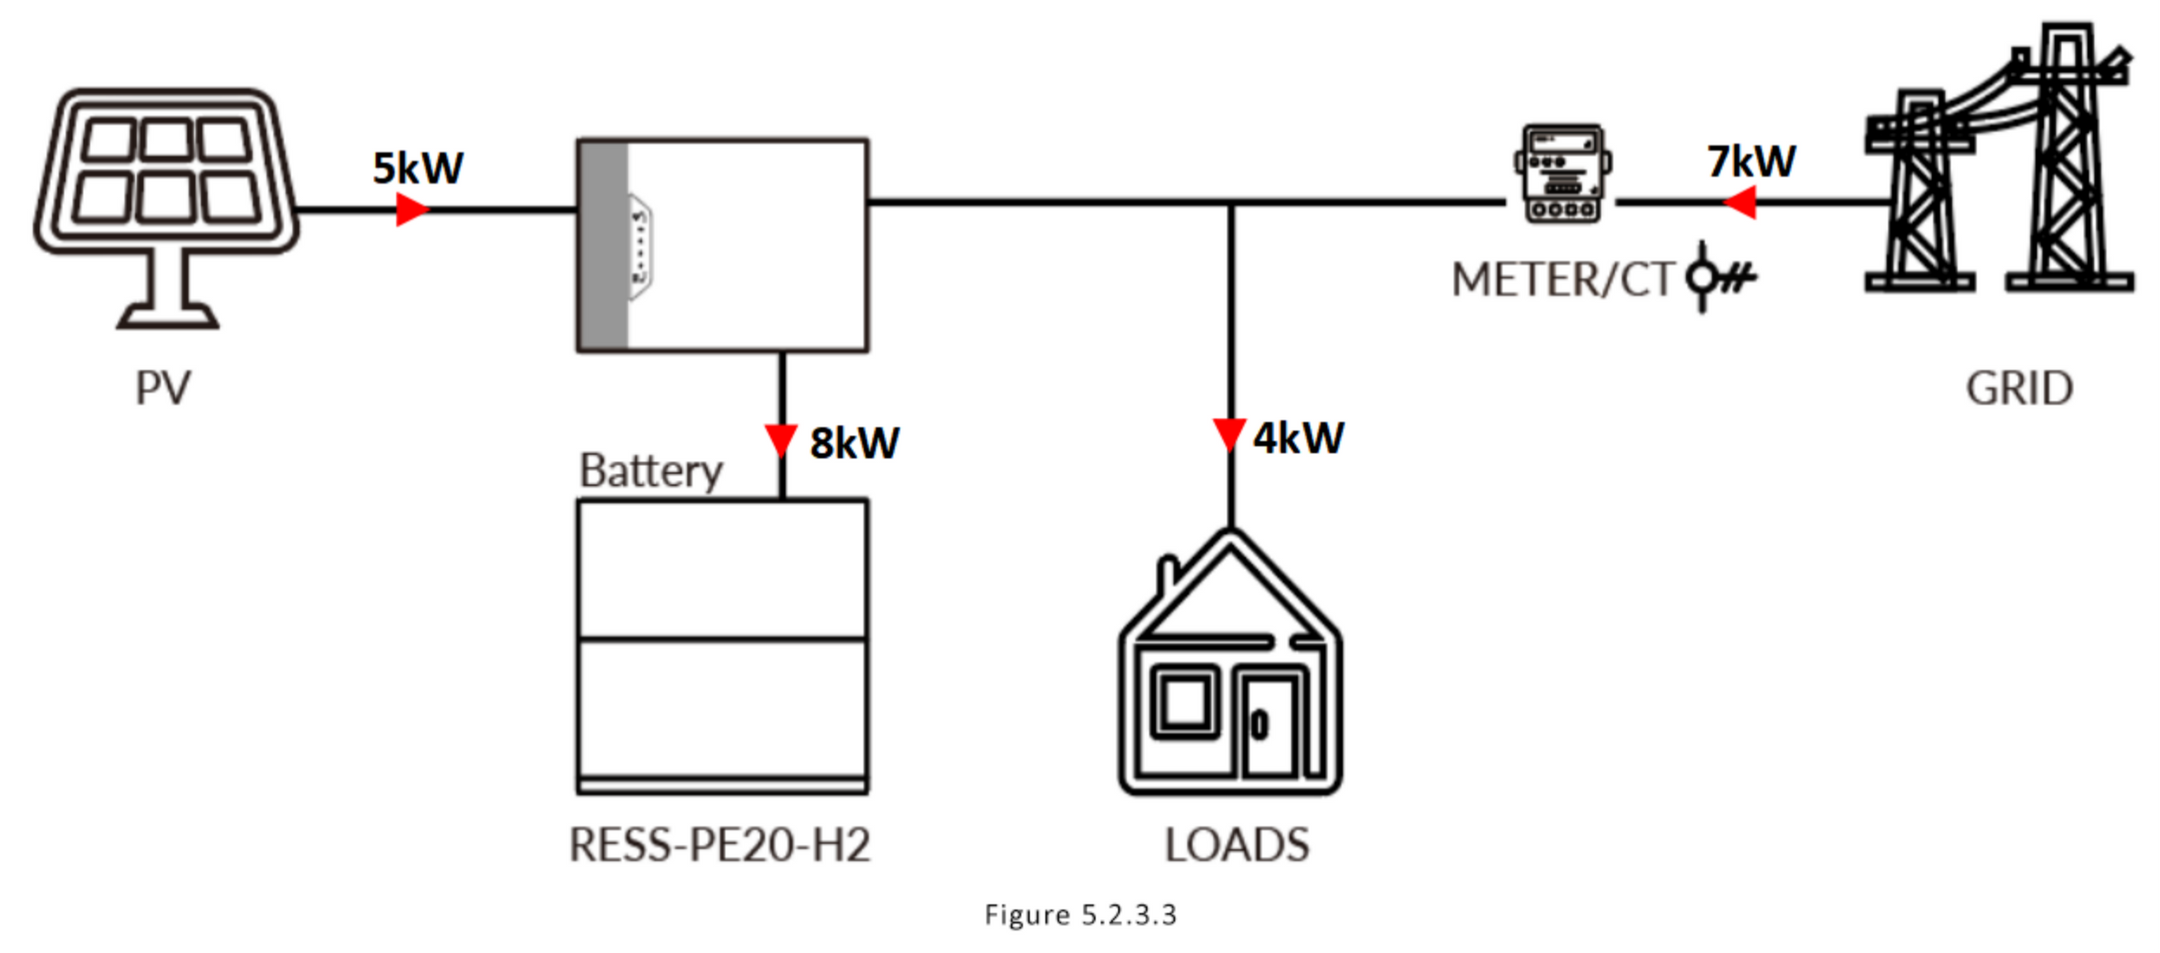
5.2.3.3 When Valley Price is selected: First meet the power demand of the load, then charge the battery until fully charged (Figure 5.2.3.3).
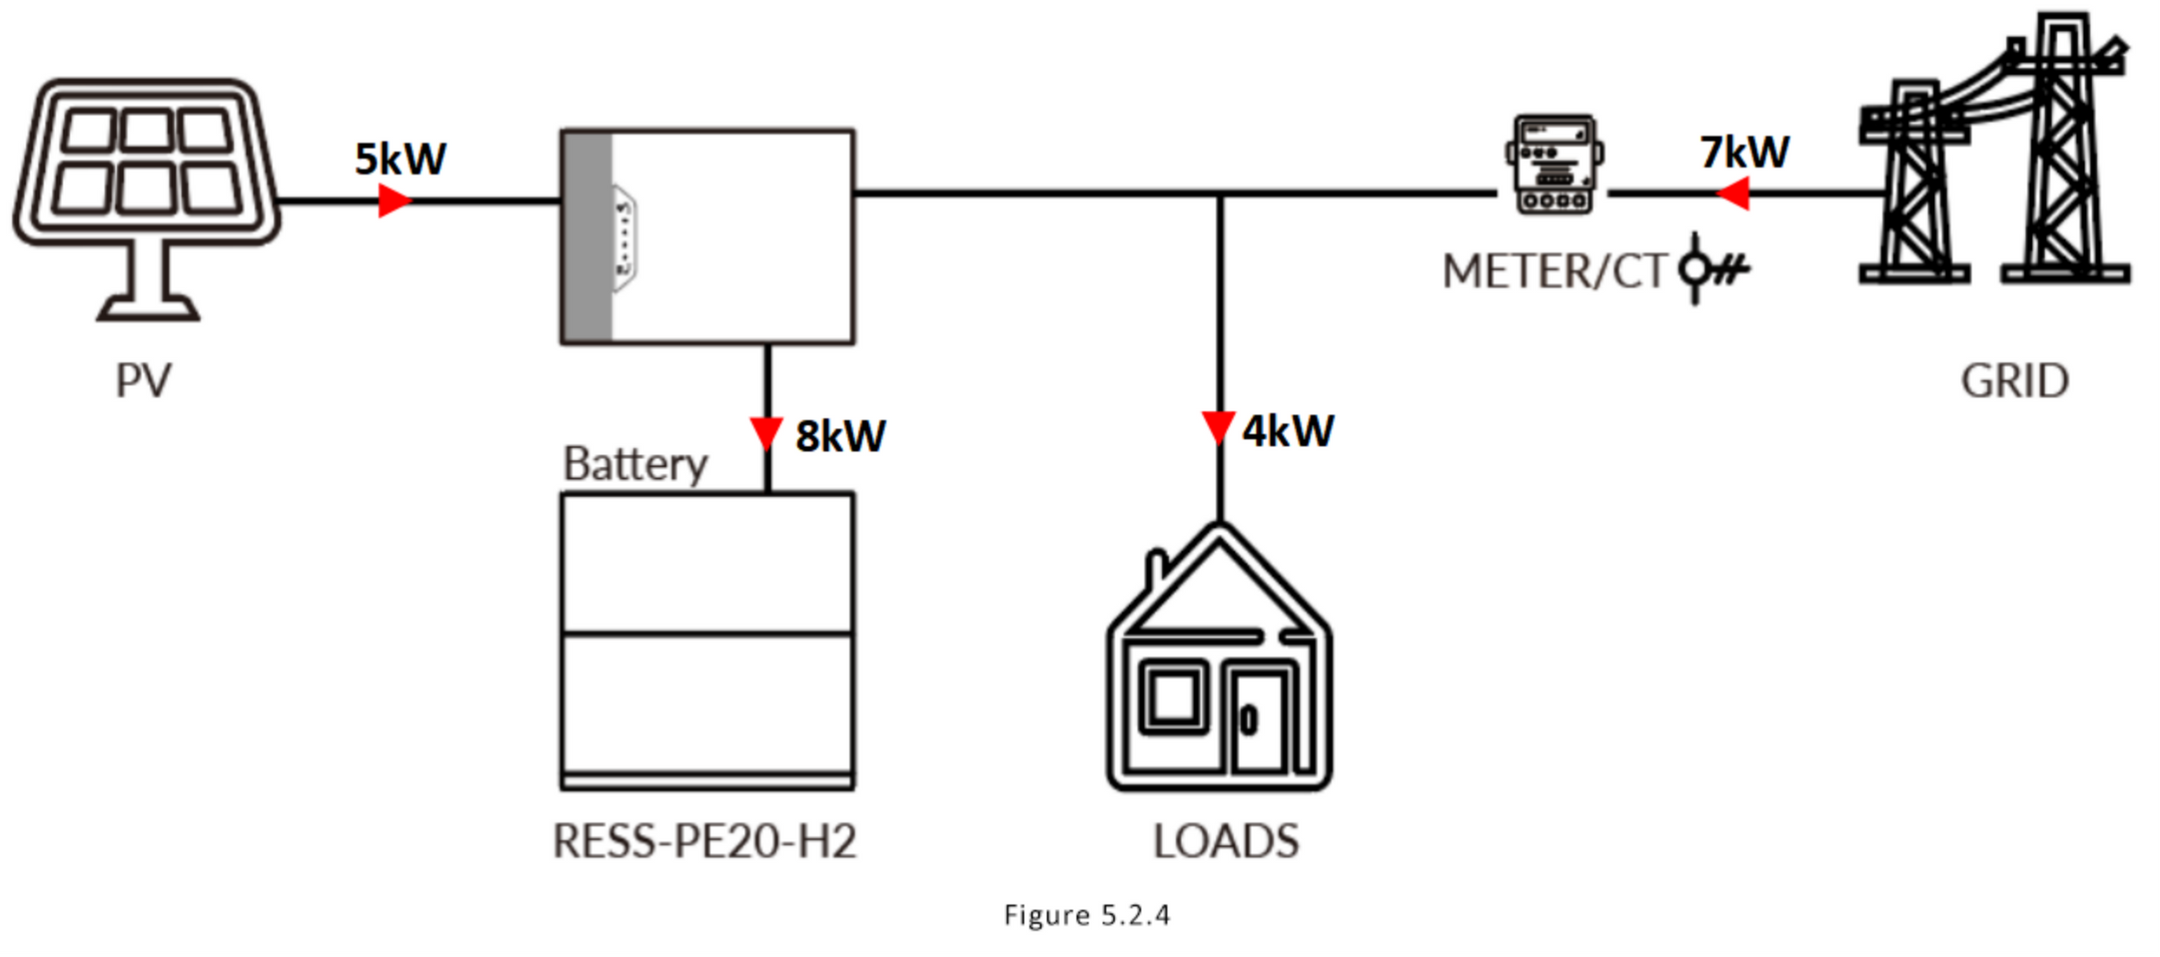
5.2.4 Backup Only
Energy Priority: Load → Battery
After entering this mode, the power demand of the load is met first, and the battery is then charged to full power.
When the grid is out of power, the system provides emergency power through photovoltaic or battery to power household loads. This process is illustrated in Figure 5.2.4
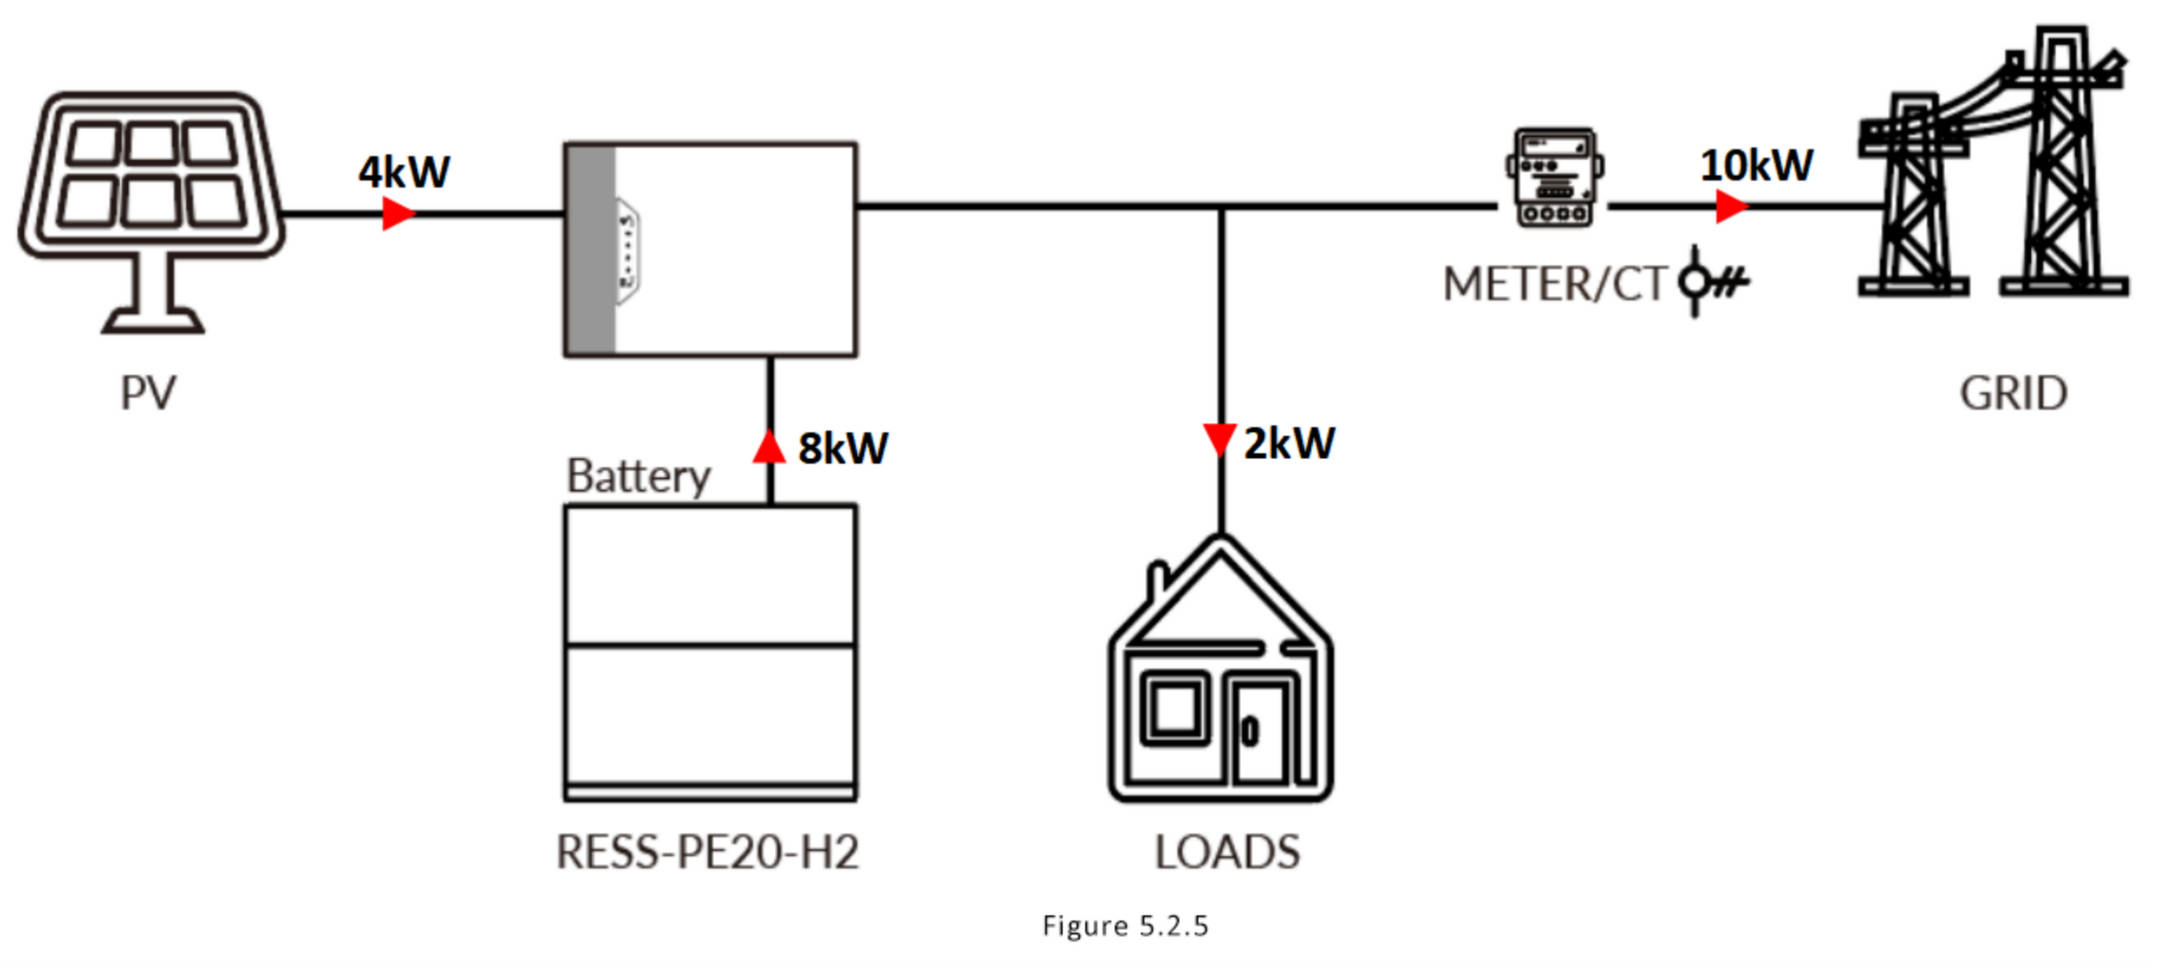
5.2.5 Grid Priority
Energy Priority: Load → Grid
When the system operates in this mode, the load power supply is given priority, and any excess energy will be transmitted to the grid, as shown in Figure 5.2.5.
6. Single-phase RESS
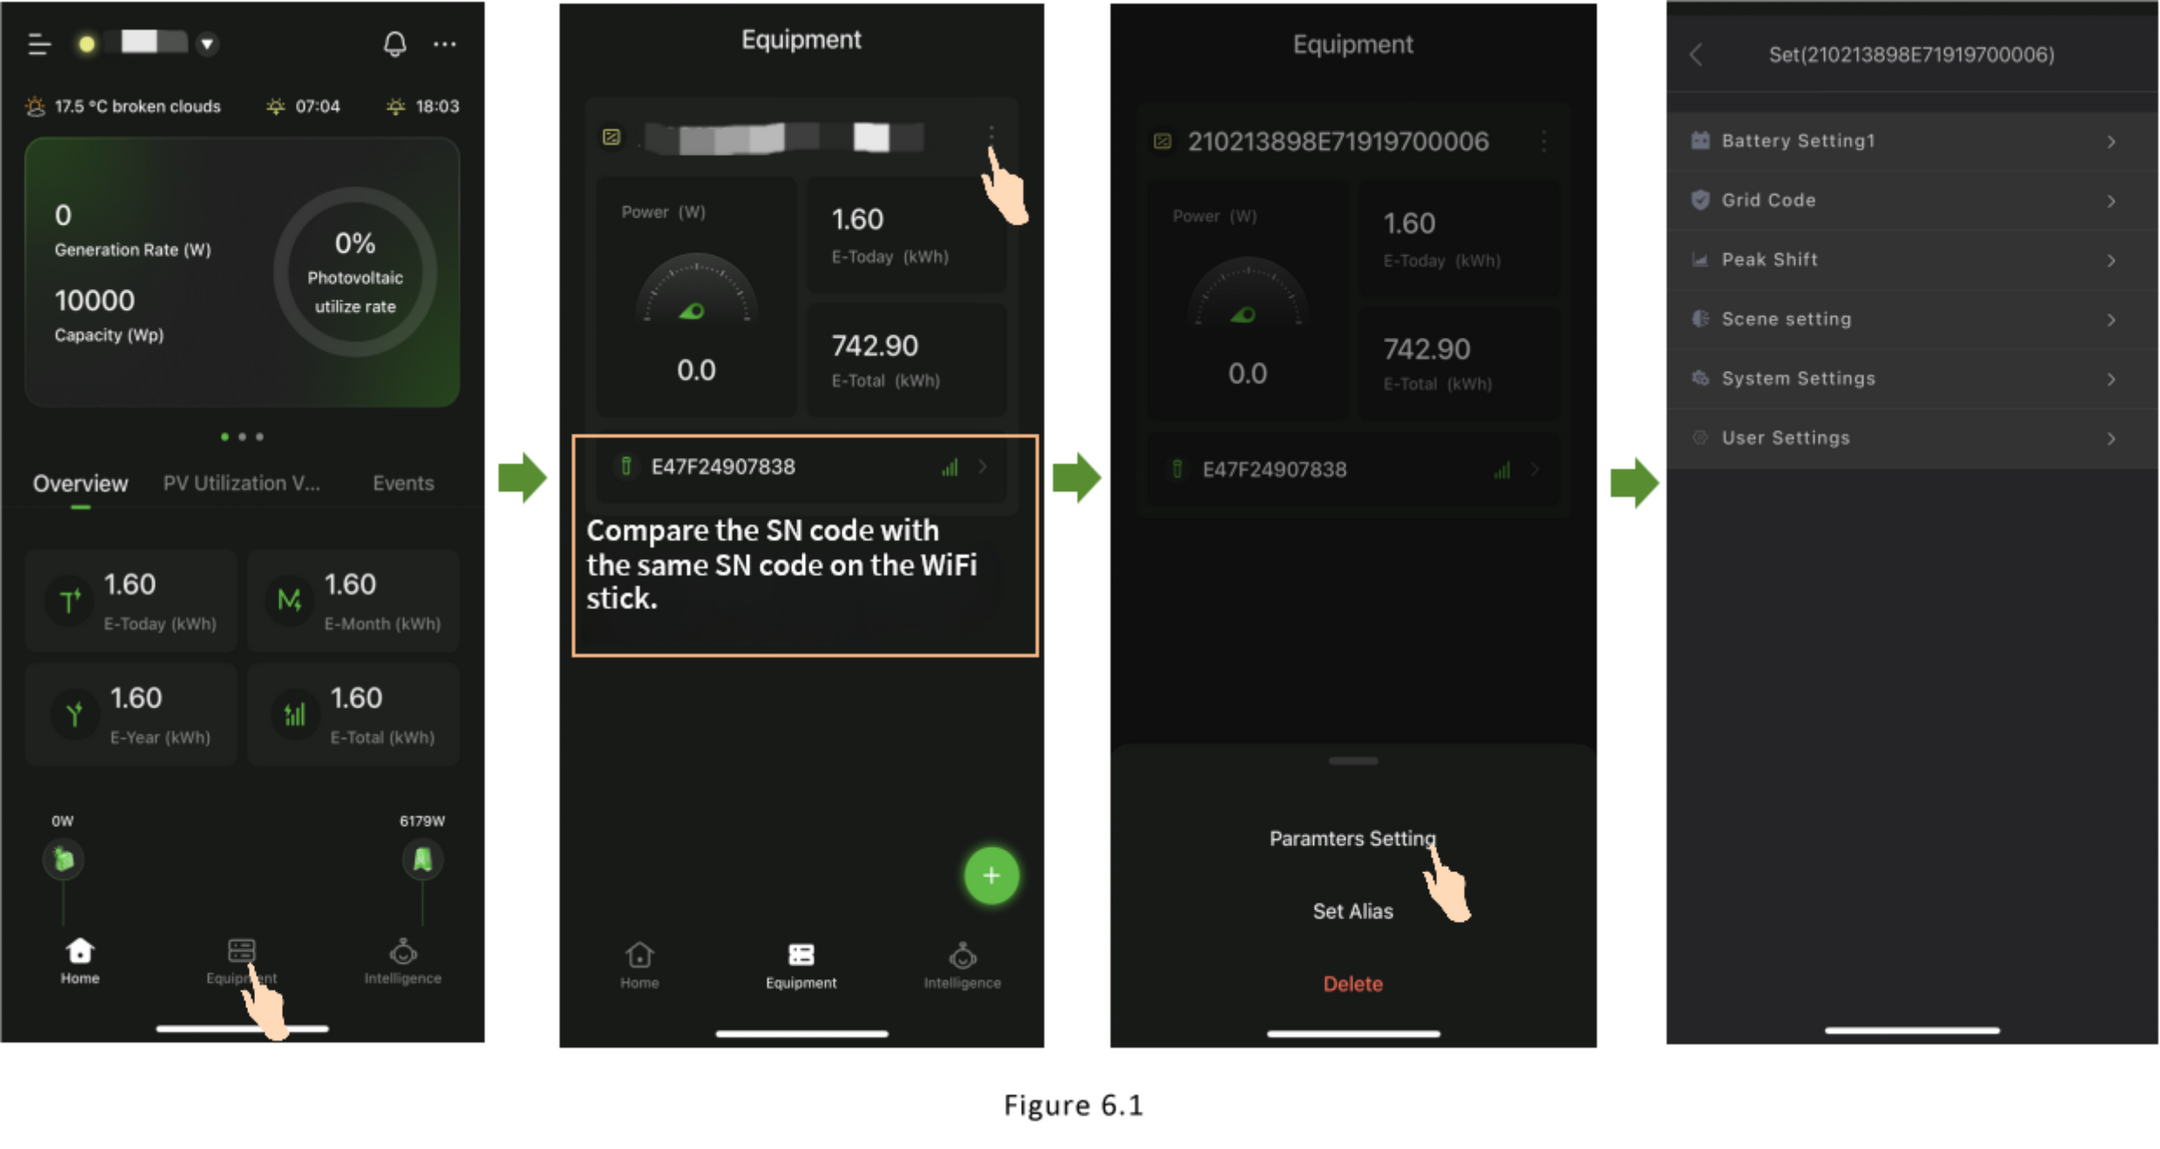
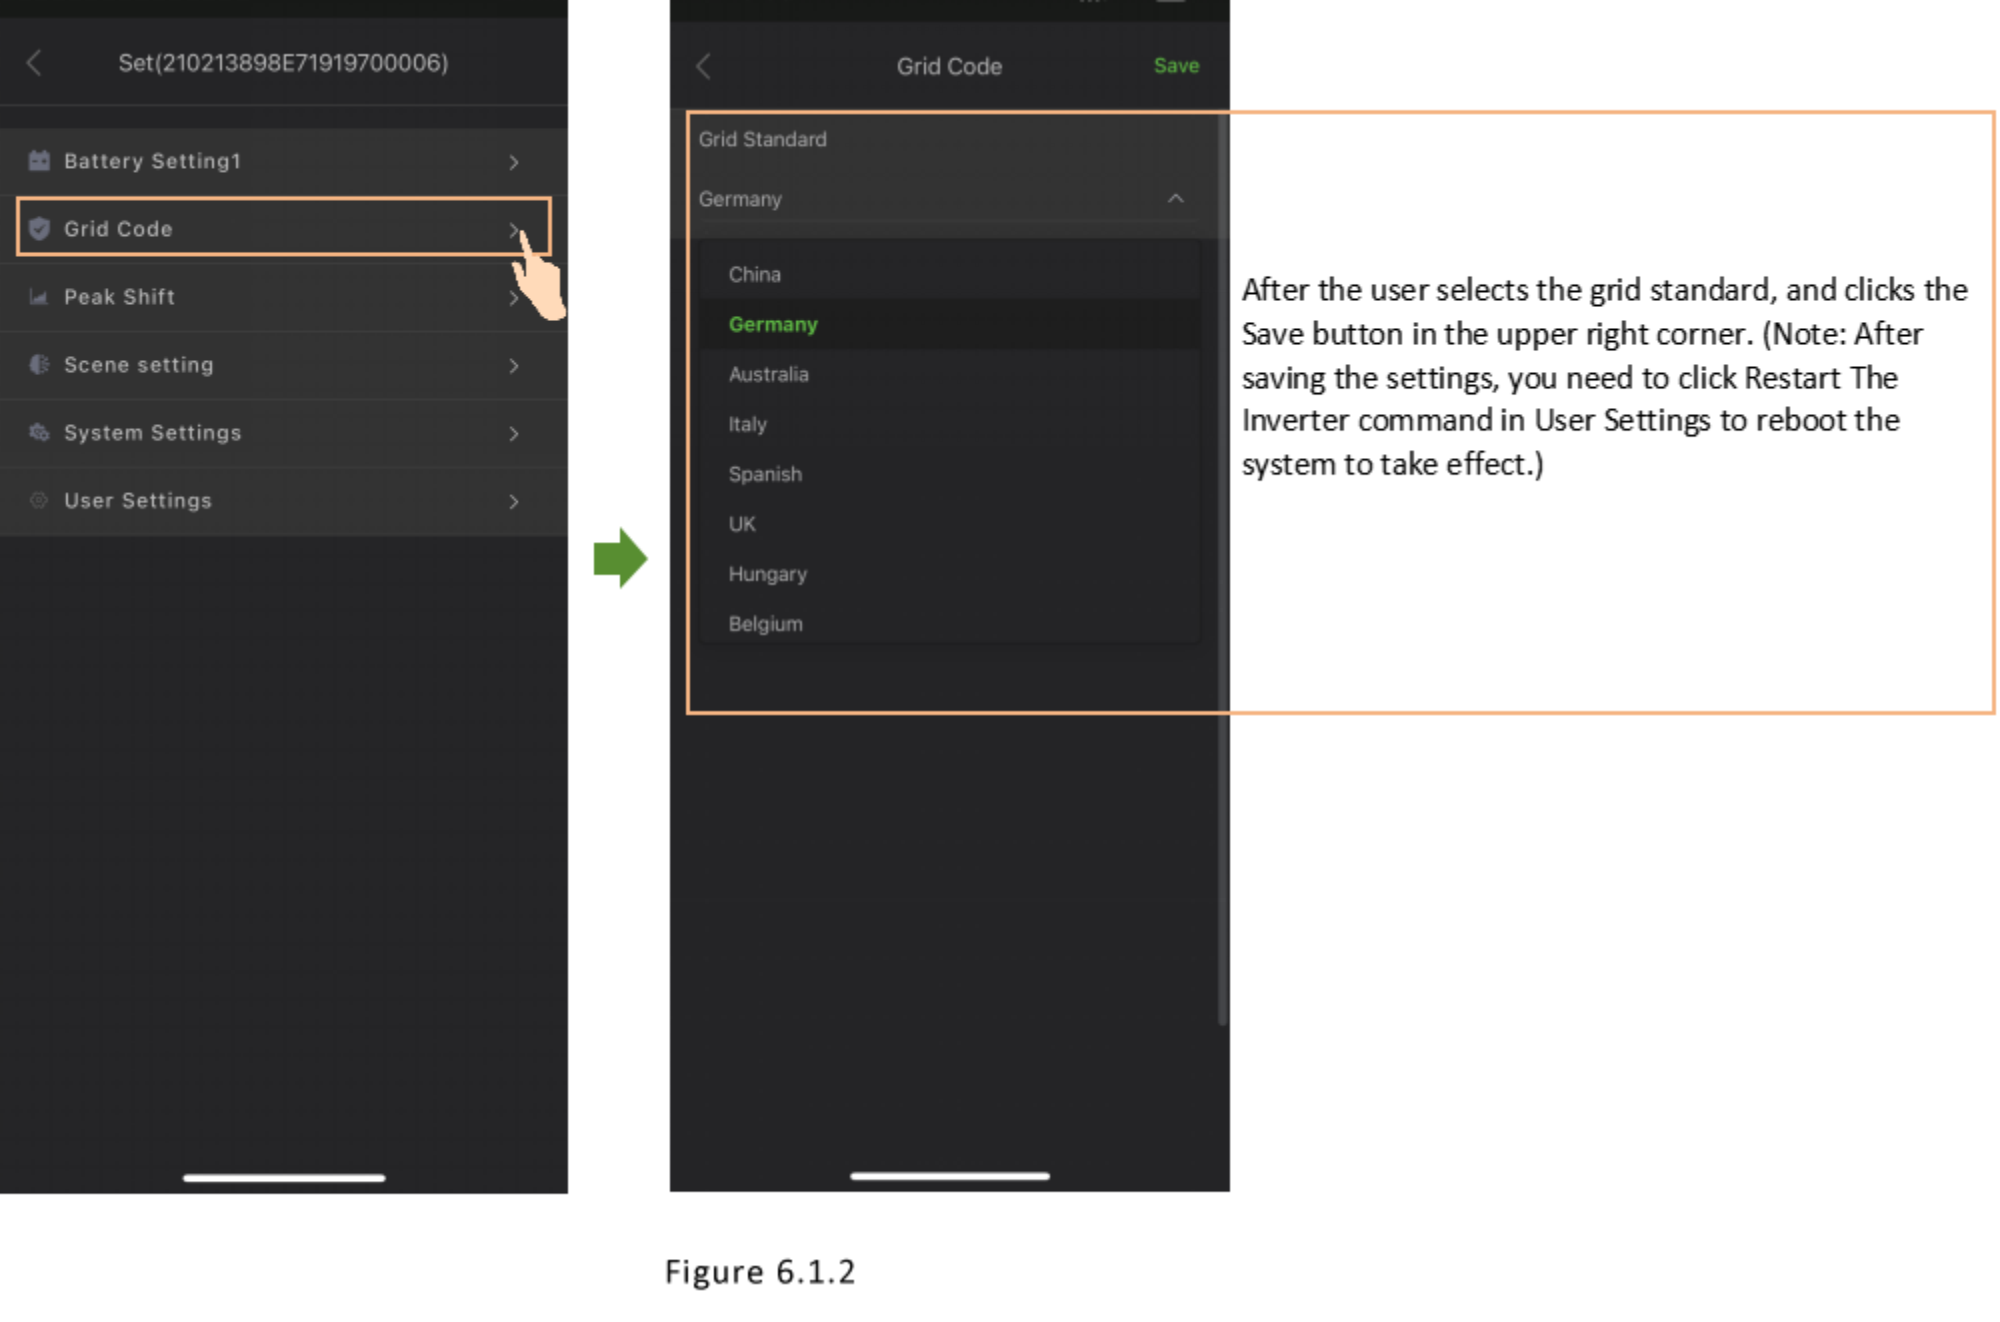
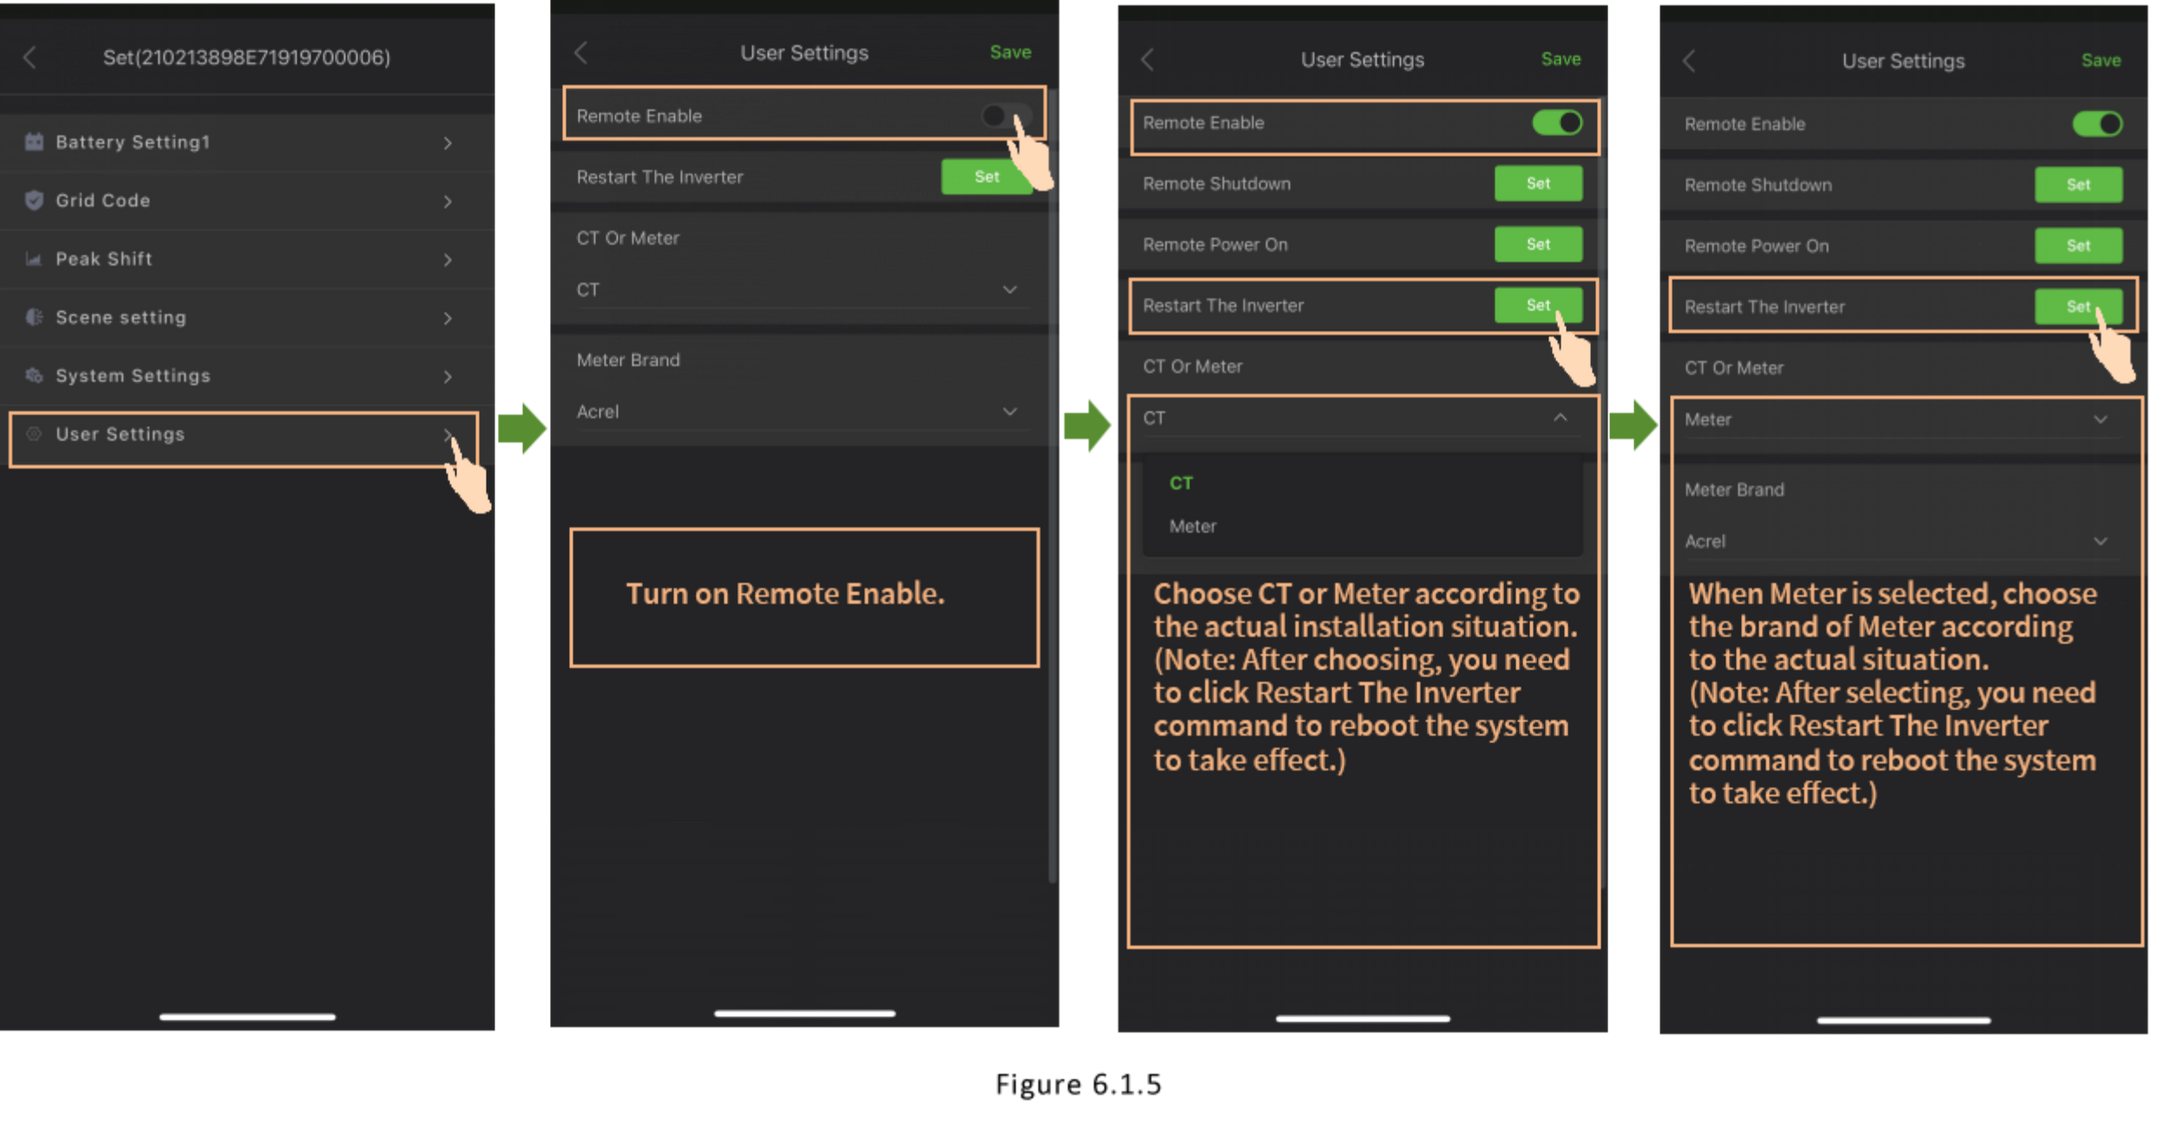
6.1 App settings
As shown in Figures 6.1, 6.1.1, 6.1.2, 6.1.3, 6.1.4 and 6.1.5.
6.1.1 Set the depth of discharge
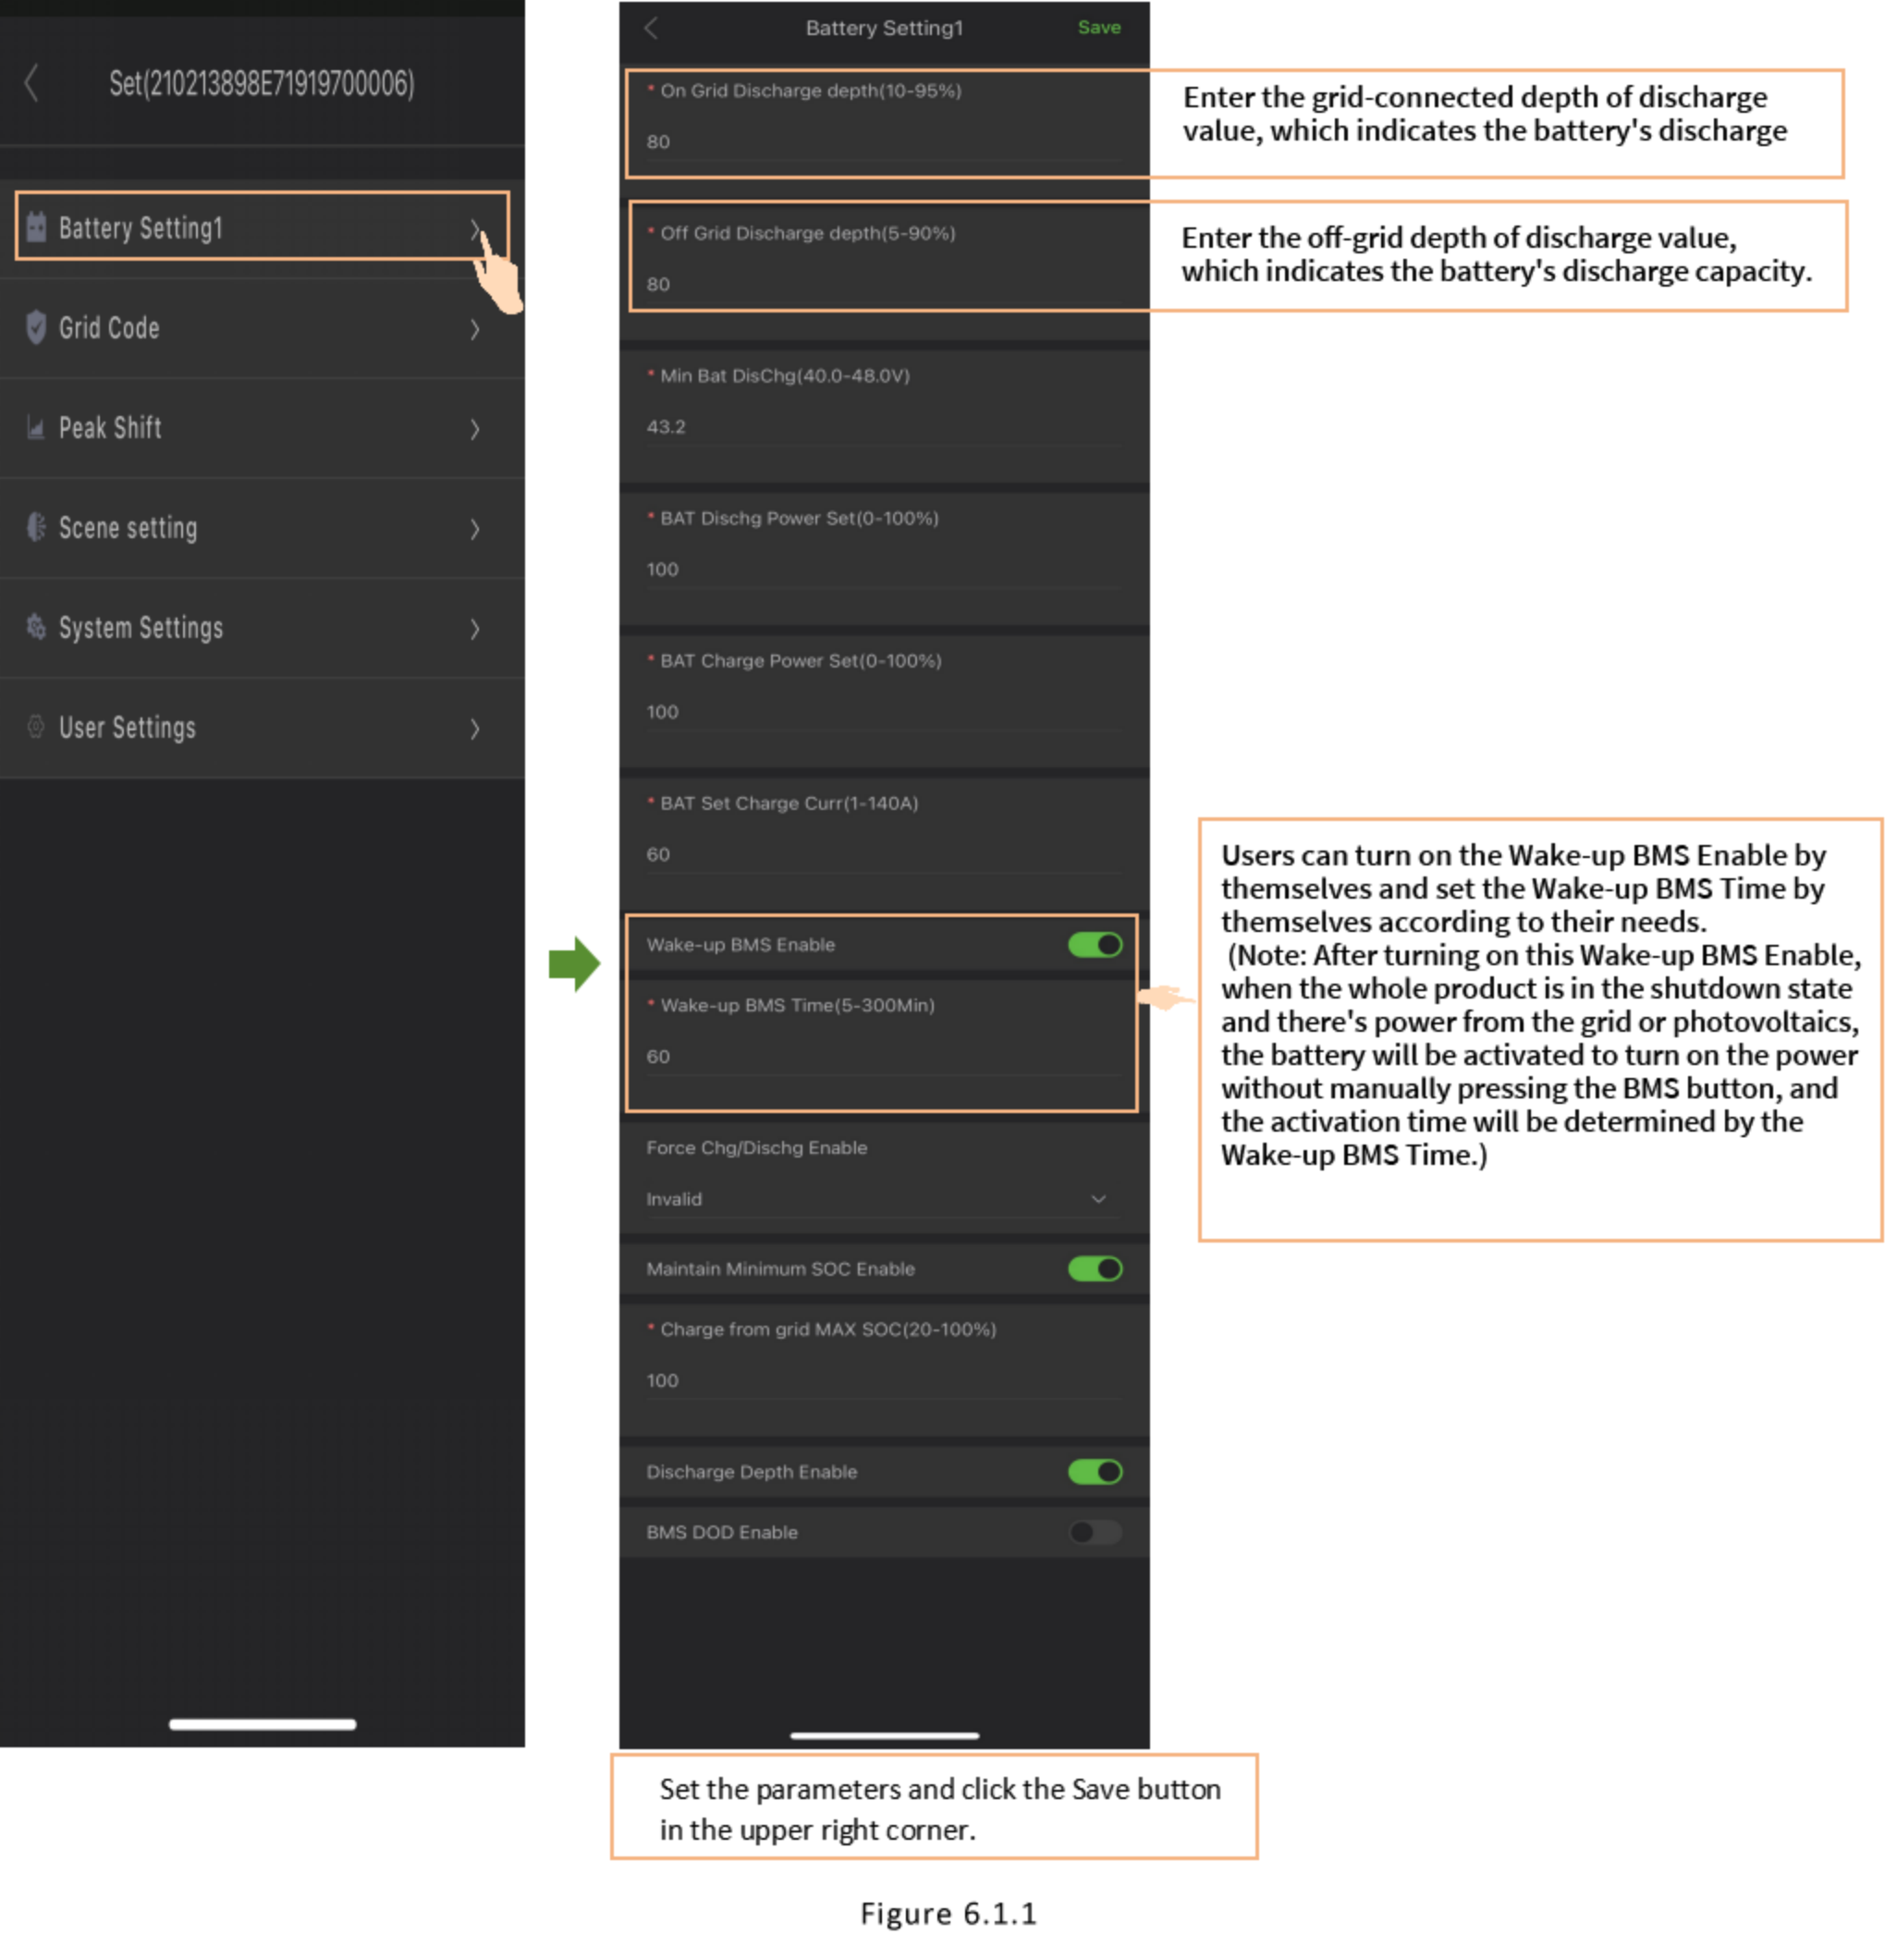
6.1.2 Set battery charging standards
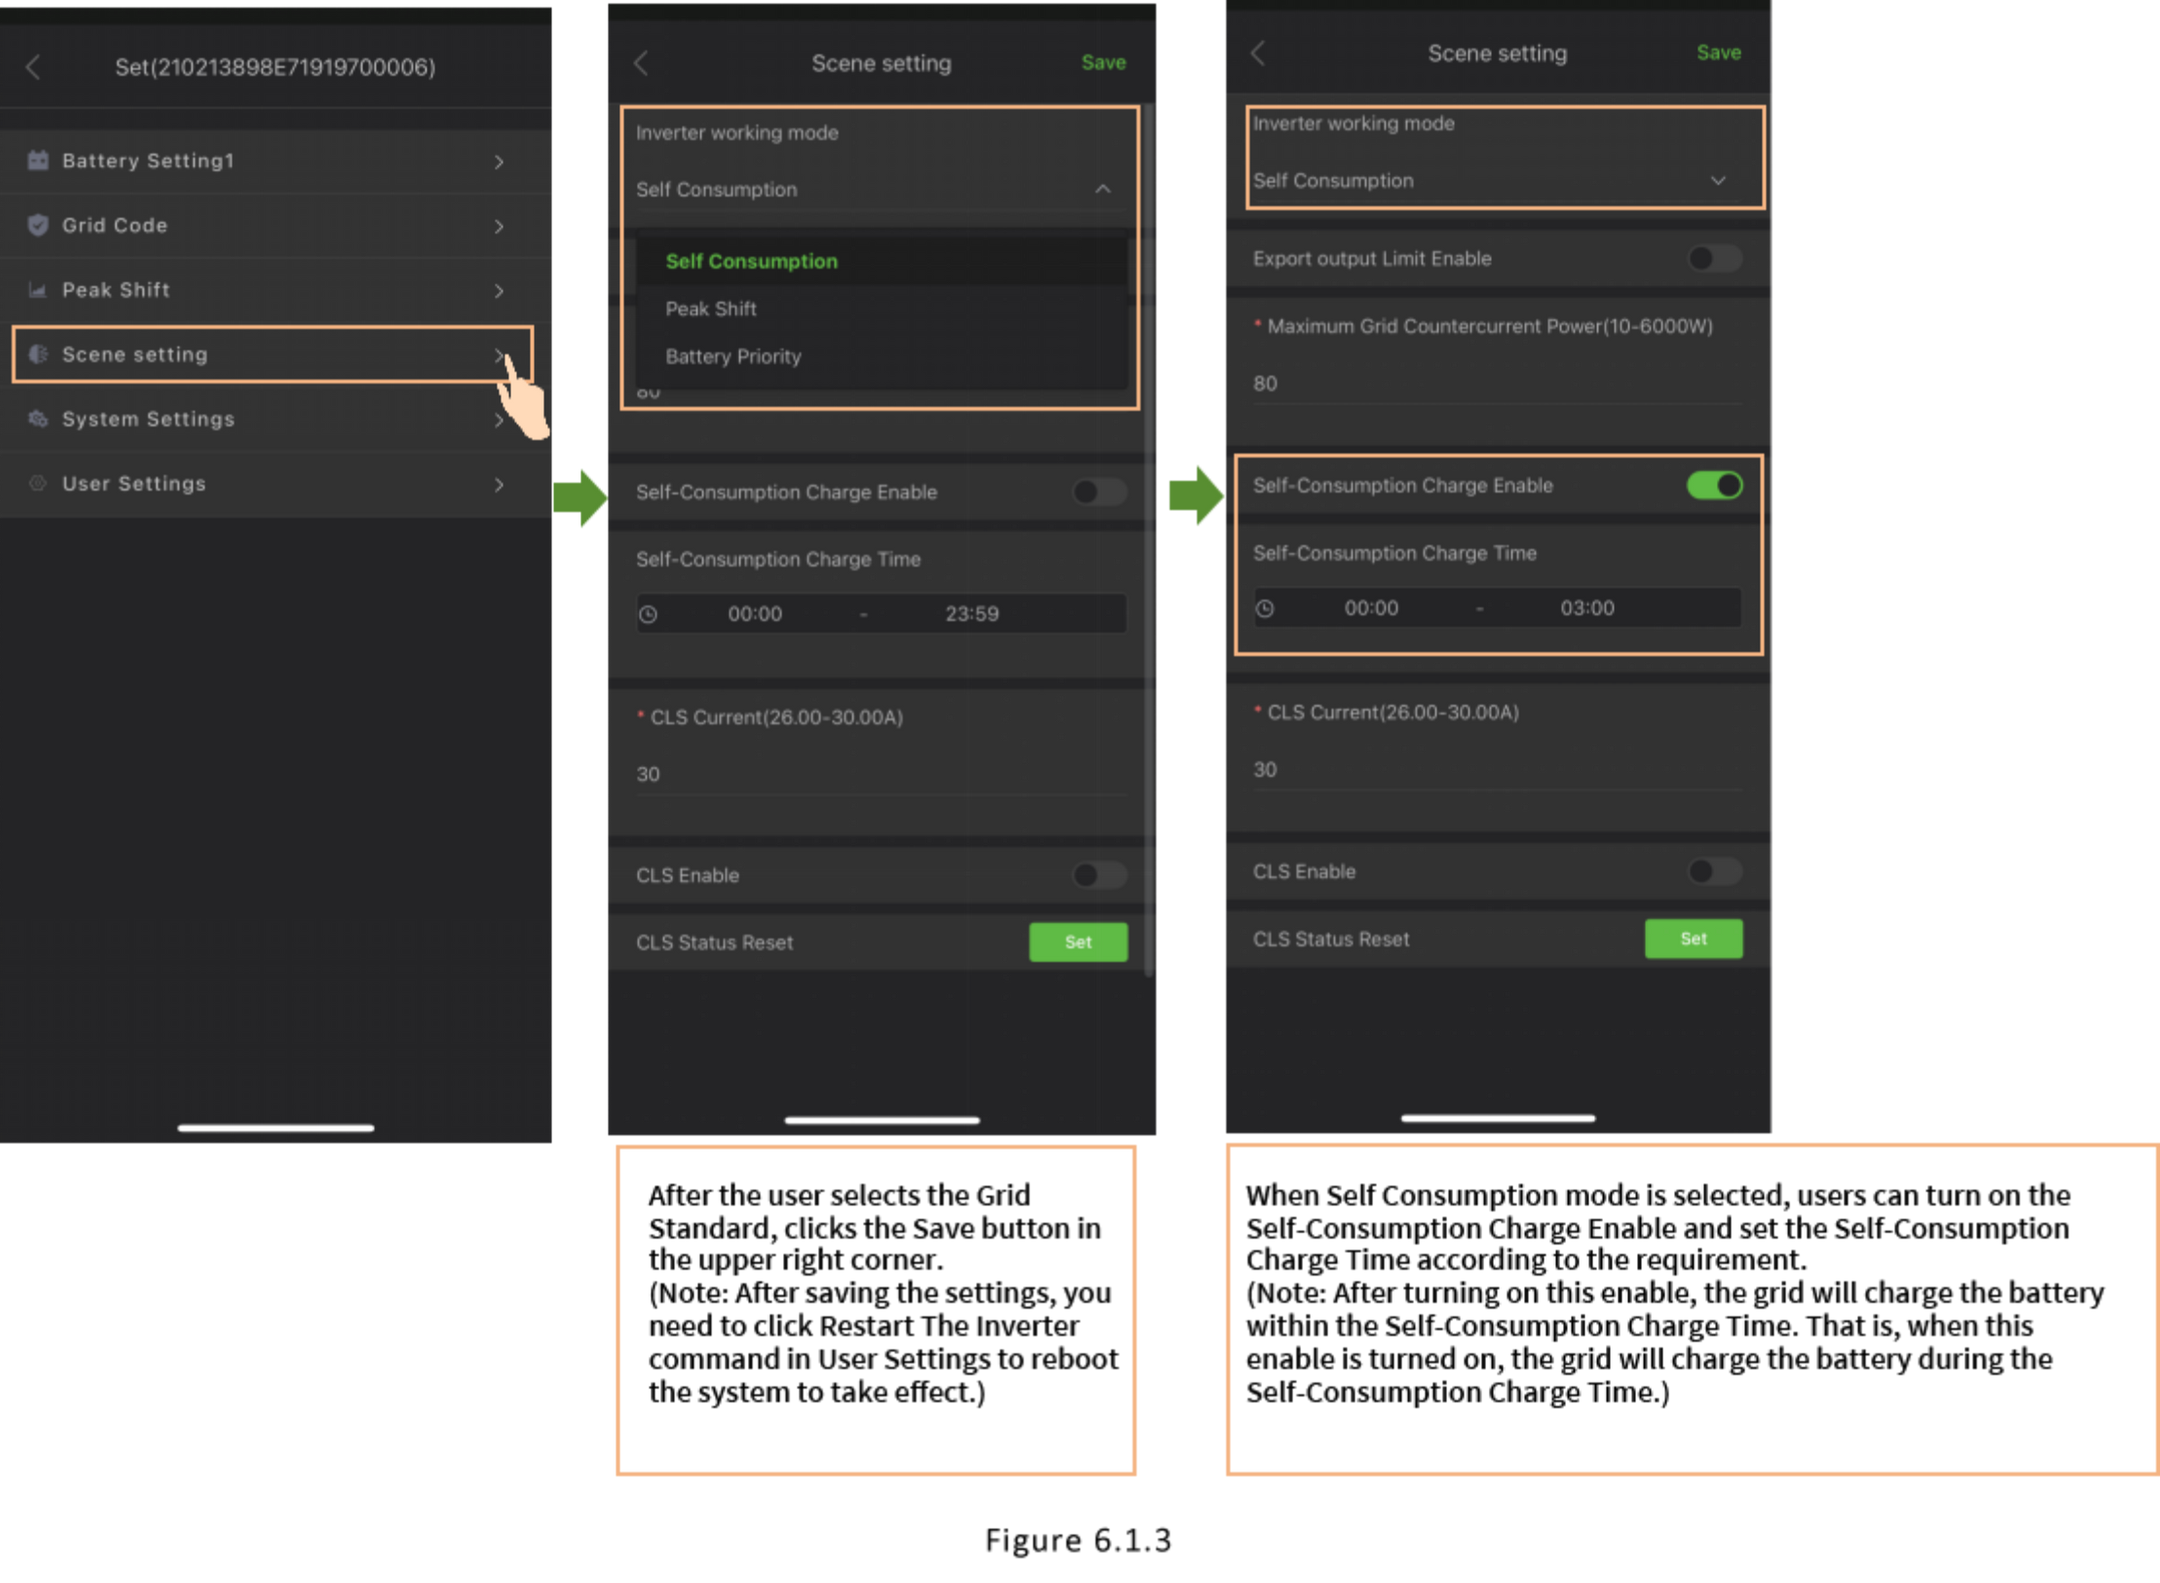
6.1.3 Select User Mode
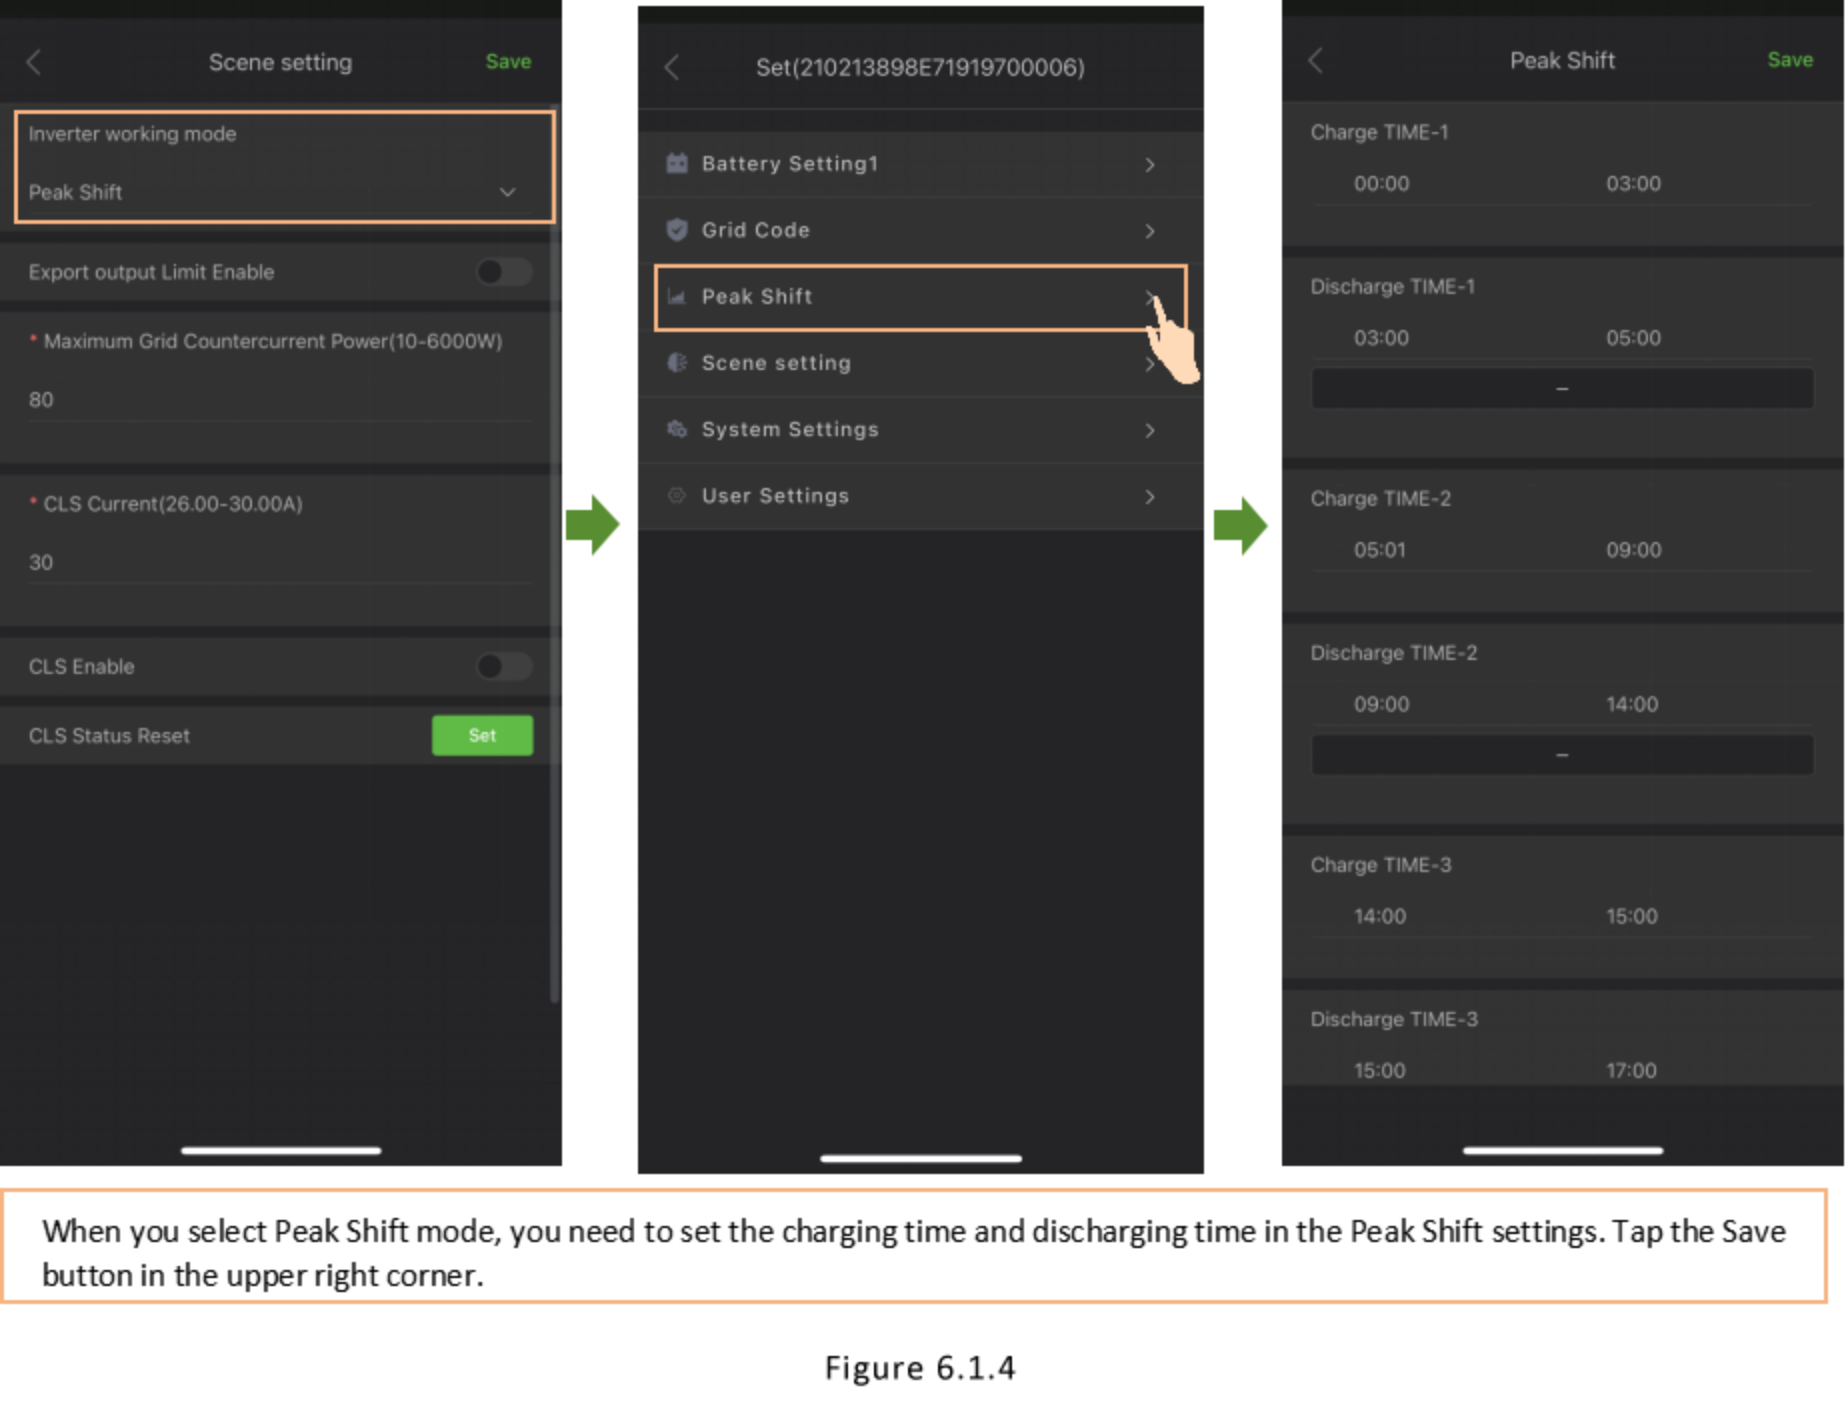
6.1.4 Set Peak Shift Mode
6.1.5 Select CT or Meter. Then Restart the System.
6.2 Mode Setting Descriptions
Load is the first priority in any operating mode.
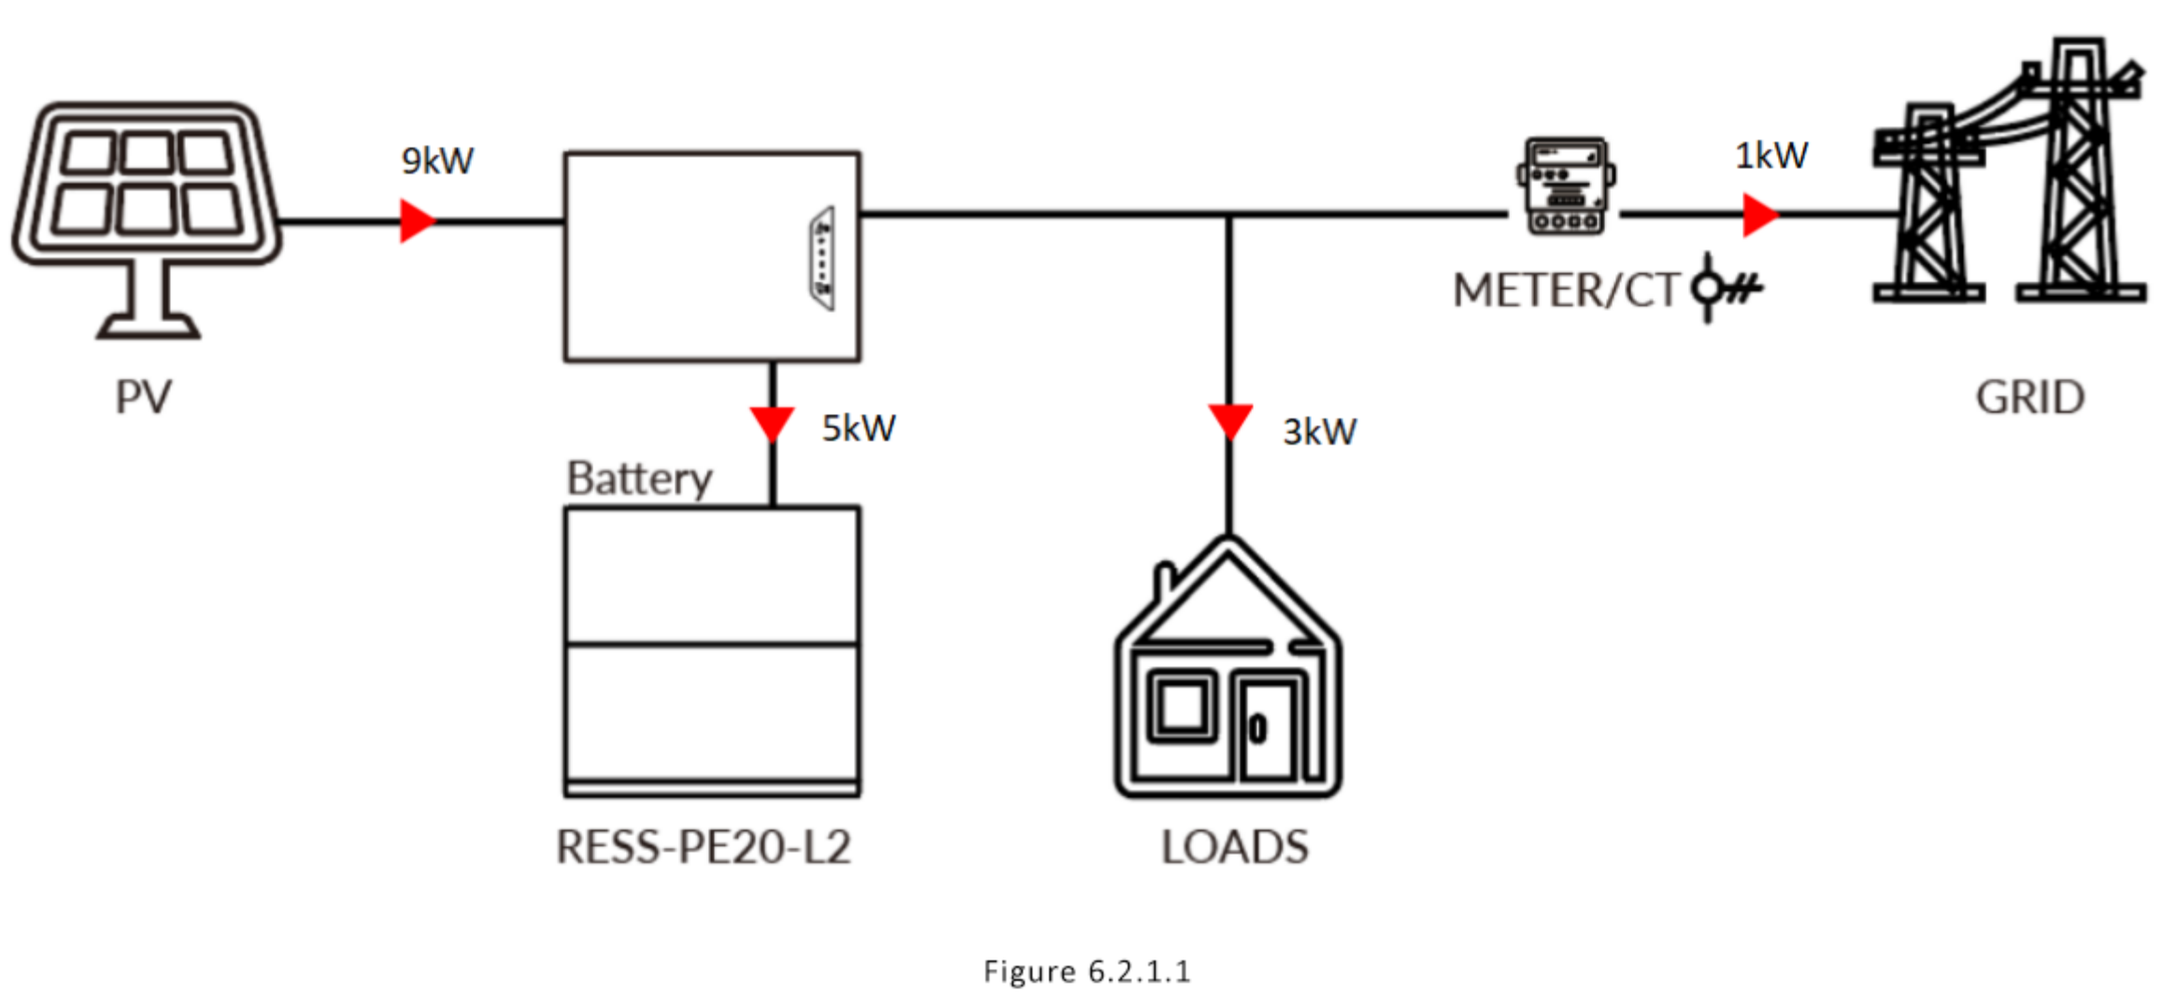
6.2.1 Self Consumption: Energy priority is load → battery → grid.
6.2.1.1 The electricity generated by the photovoltaic system is first used to power the loads. If the generated power exceeds the load demand, the surplus energy is used to charge the battery. Once both the loads and the battery are fully supplied, any remaining power is fed into the grid. The energy priority follows the order: Load > Battery > Grid, as shown in Figure 6.2.1.1.
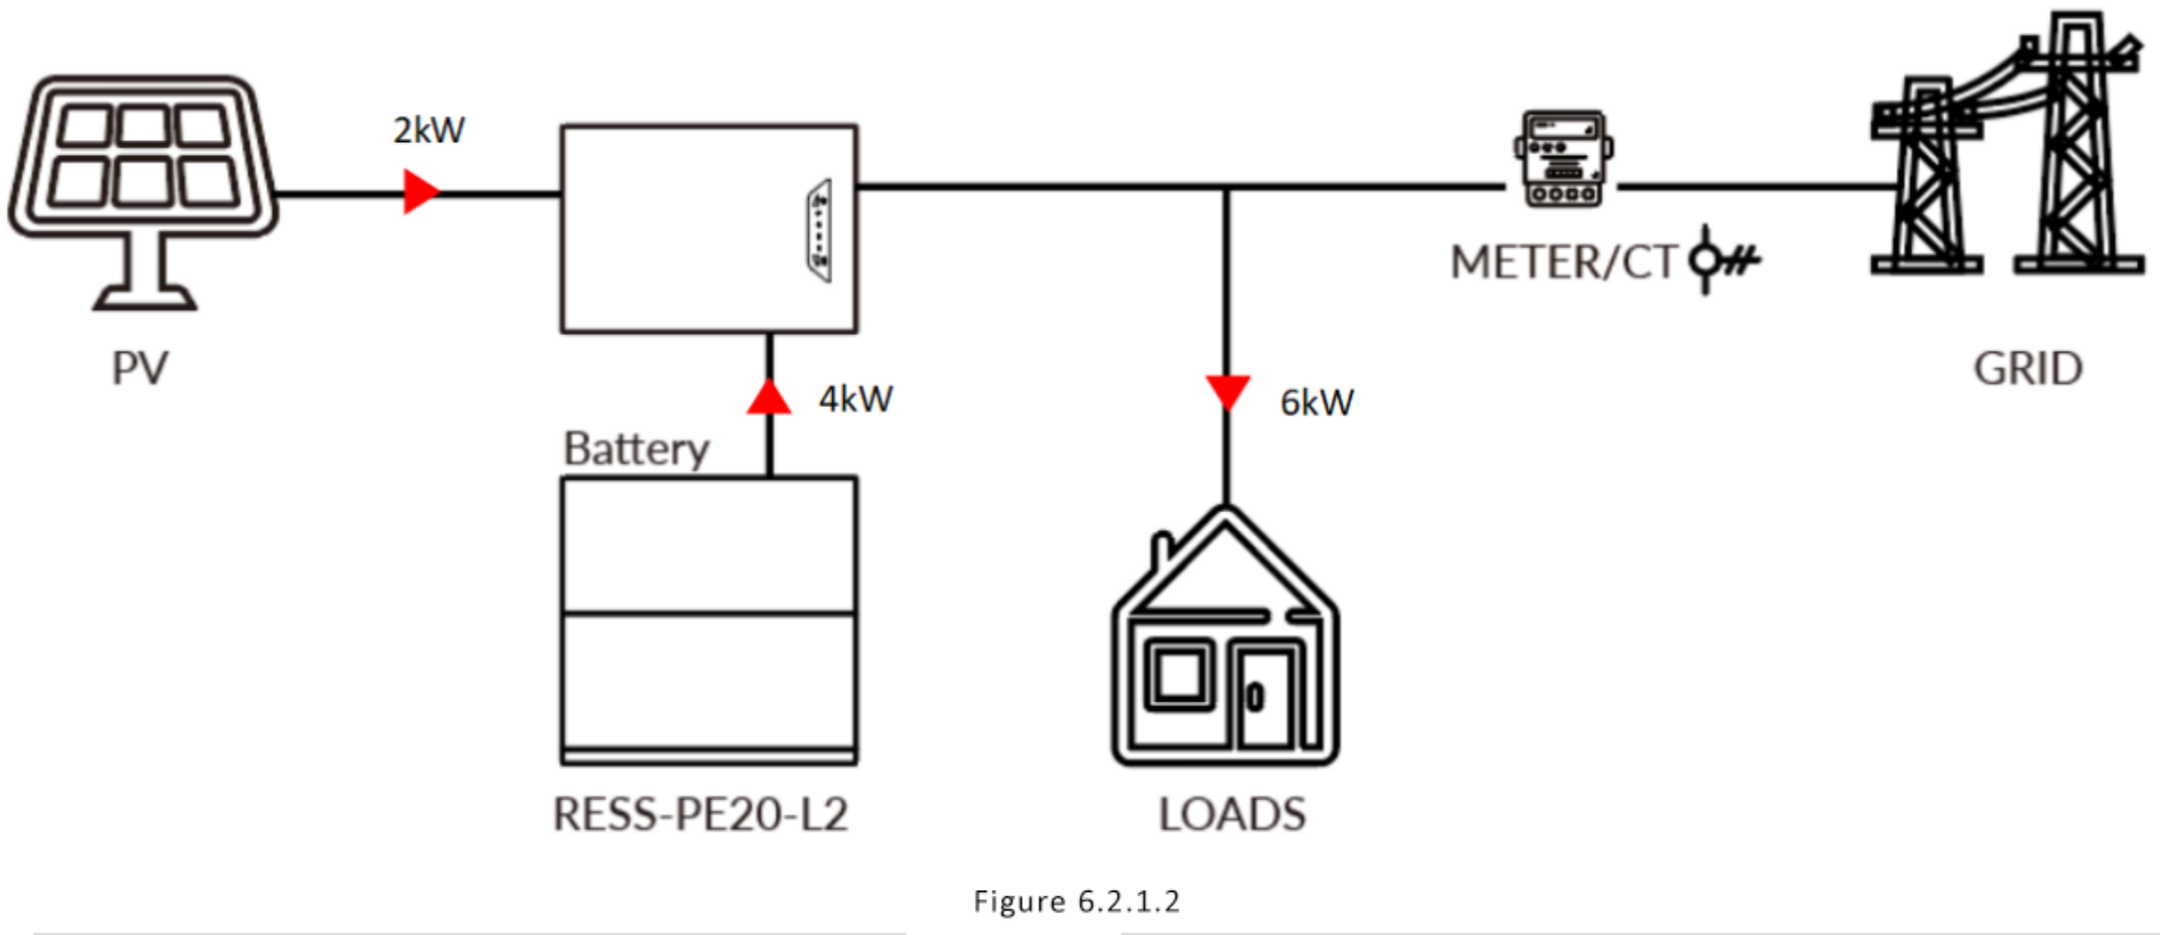
6.2.1.2 When the photovoltaic system, grid, and battery are all available, the photovoltaic power is prioritized to supply the loads. If the photovoltaic power alone is insufficient, the battery will supplement it to meet the load demand. As shown in Figure6.2.1.2.
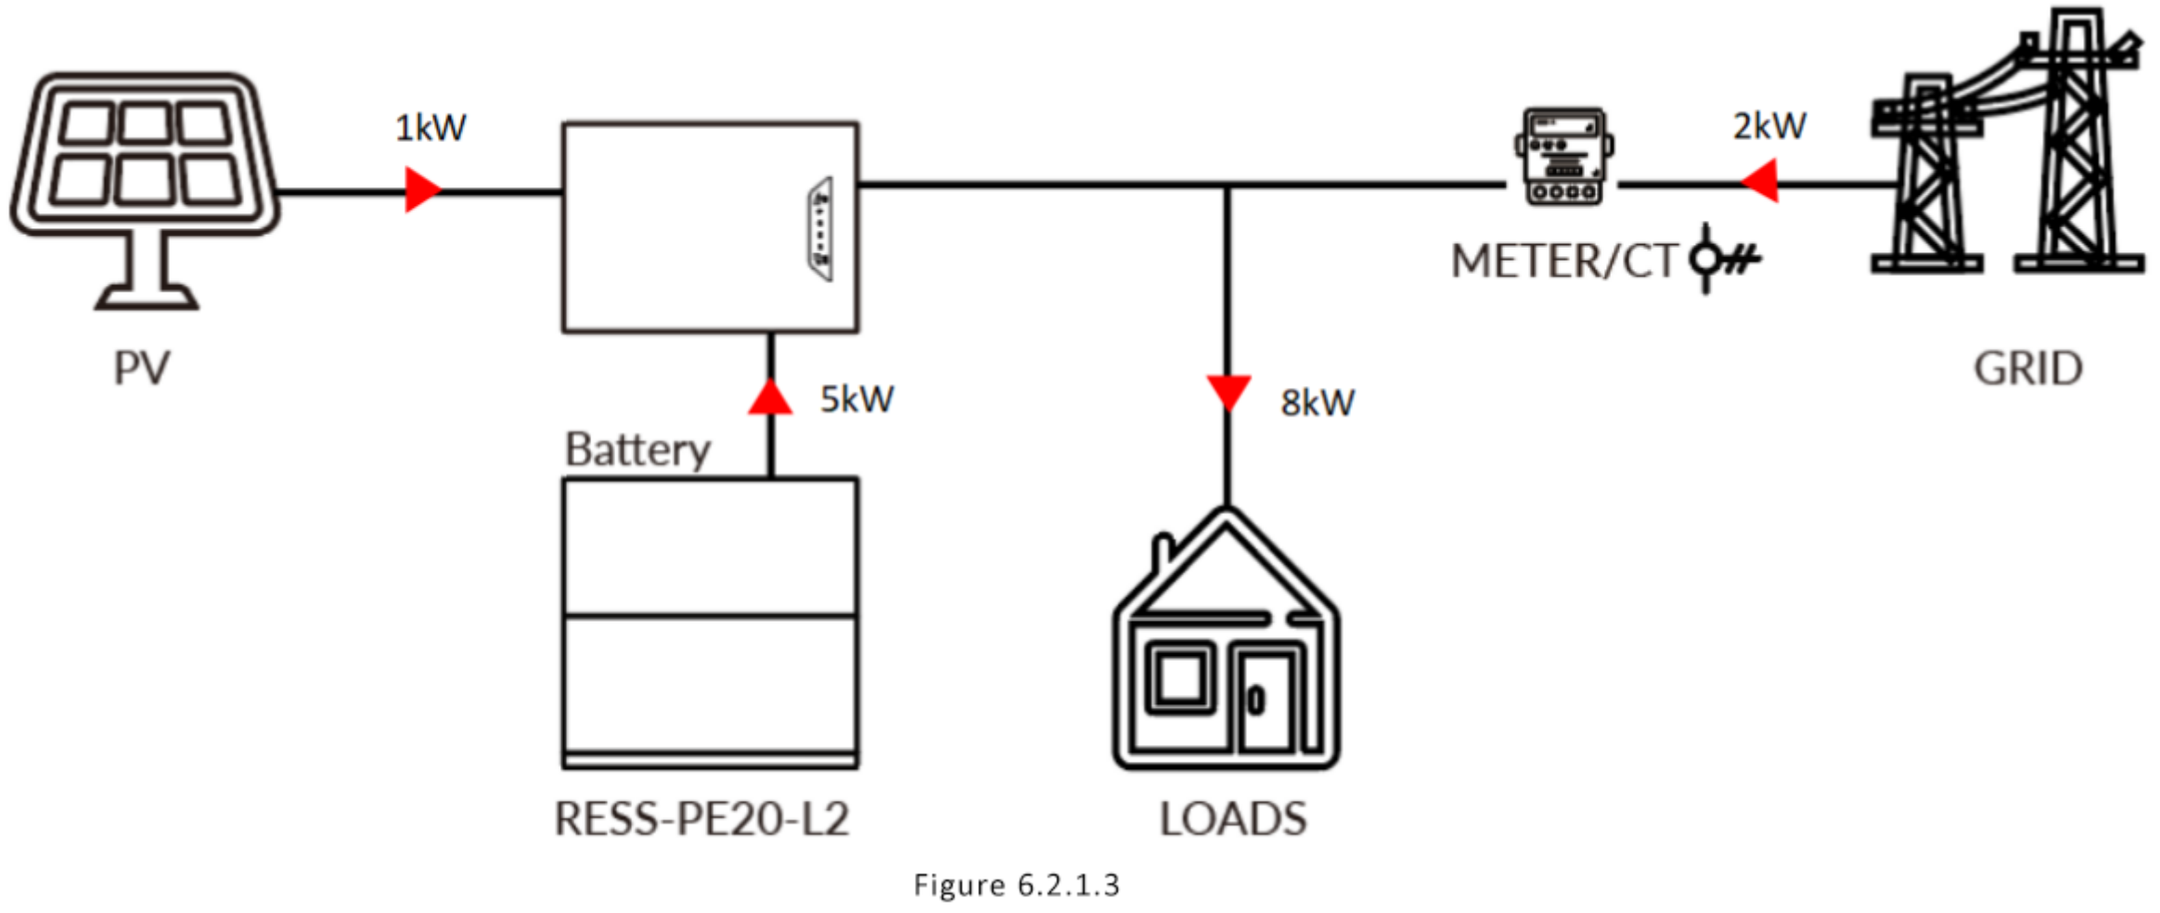
6.2.1.3 When the photovoltaic system, grid, and battery are all available, the electricity generated by the photovoltaic system is used to power the loads first. If the combined power from the photovoltaic system and the battery is insufficient to meet the load demand, the grid will supplement the power supply. As shown in Figure 6.2.1.3.
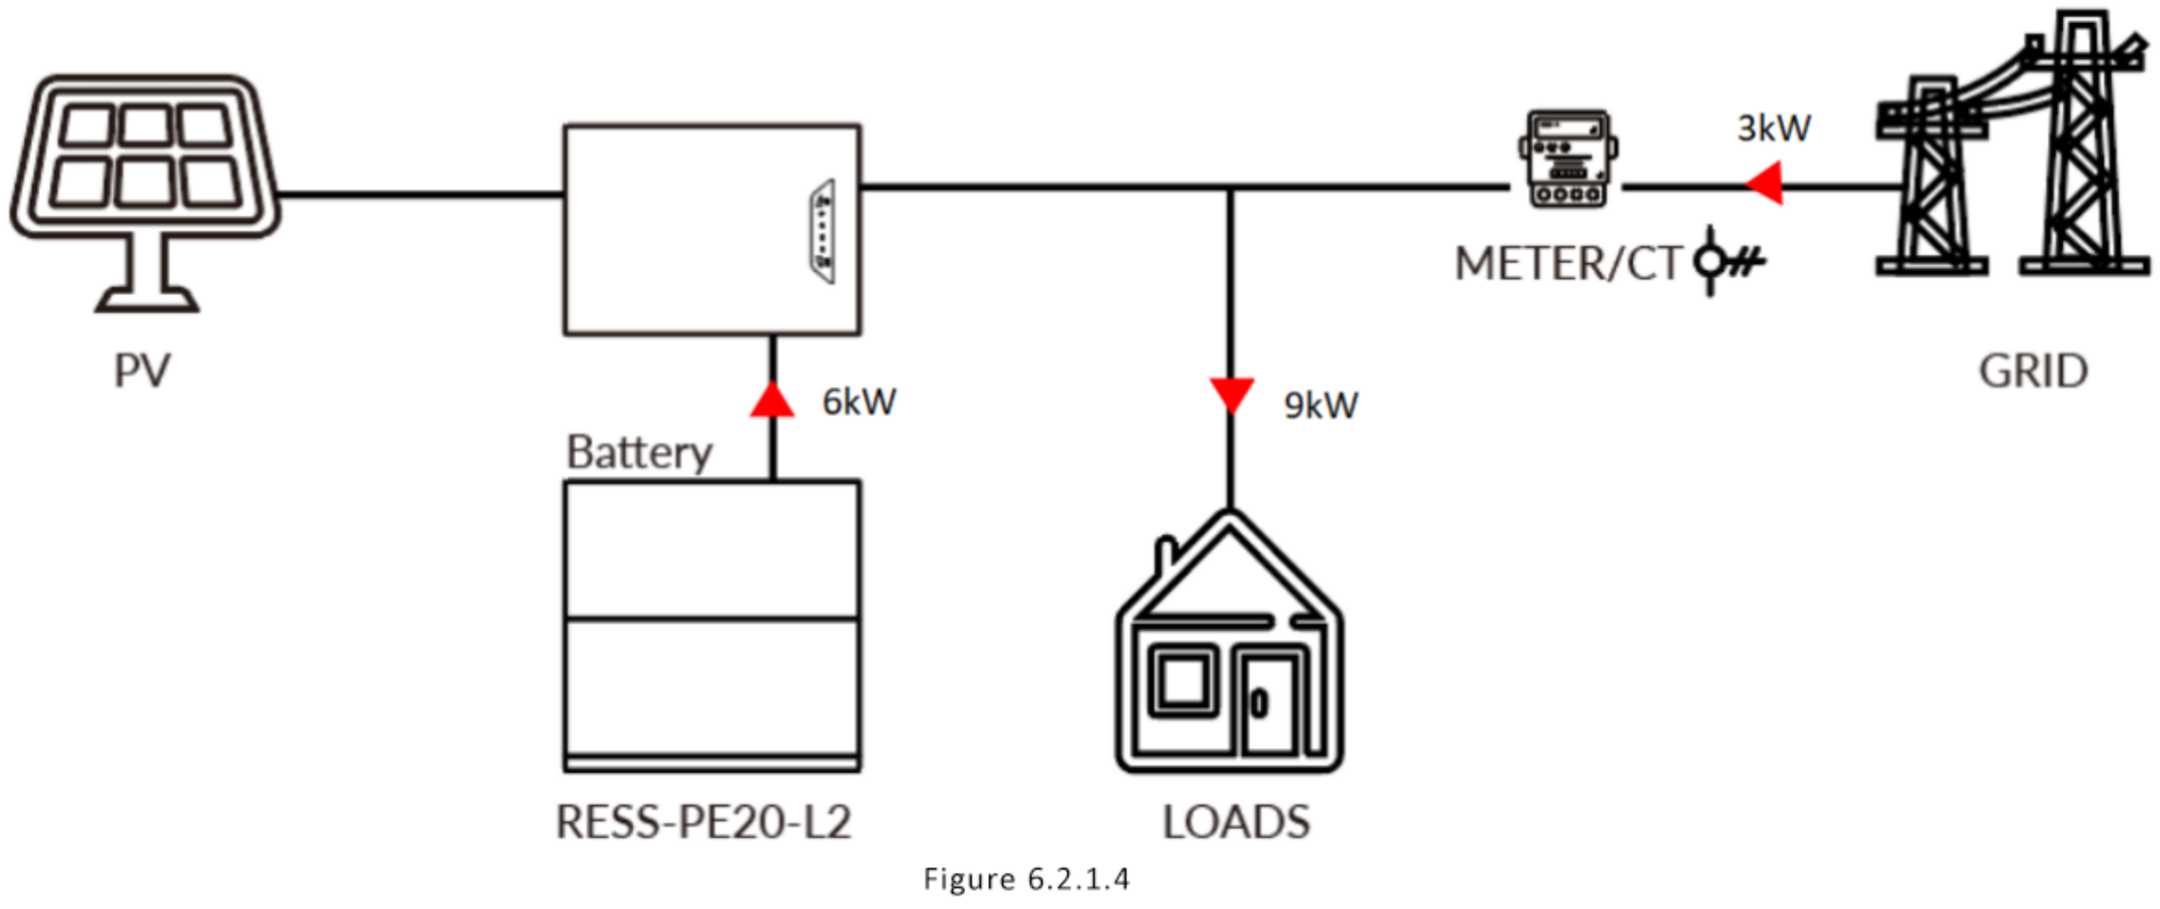
6.2.1.4 When there is no photovoltaic power supply, the battery will discharge first to meet the load, and when the battery capacity is insufficient, the grid will supply power to the load. This is shown in Figure 6.2.1.4.
In this mode, users are able to set the charging and discharging time periods according to local peak-valley electricity prices.
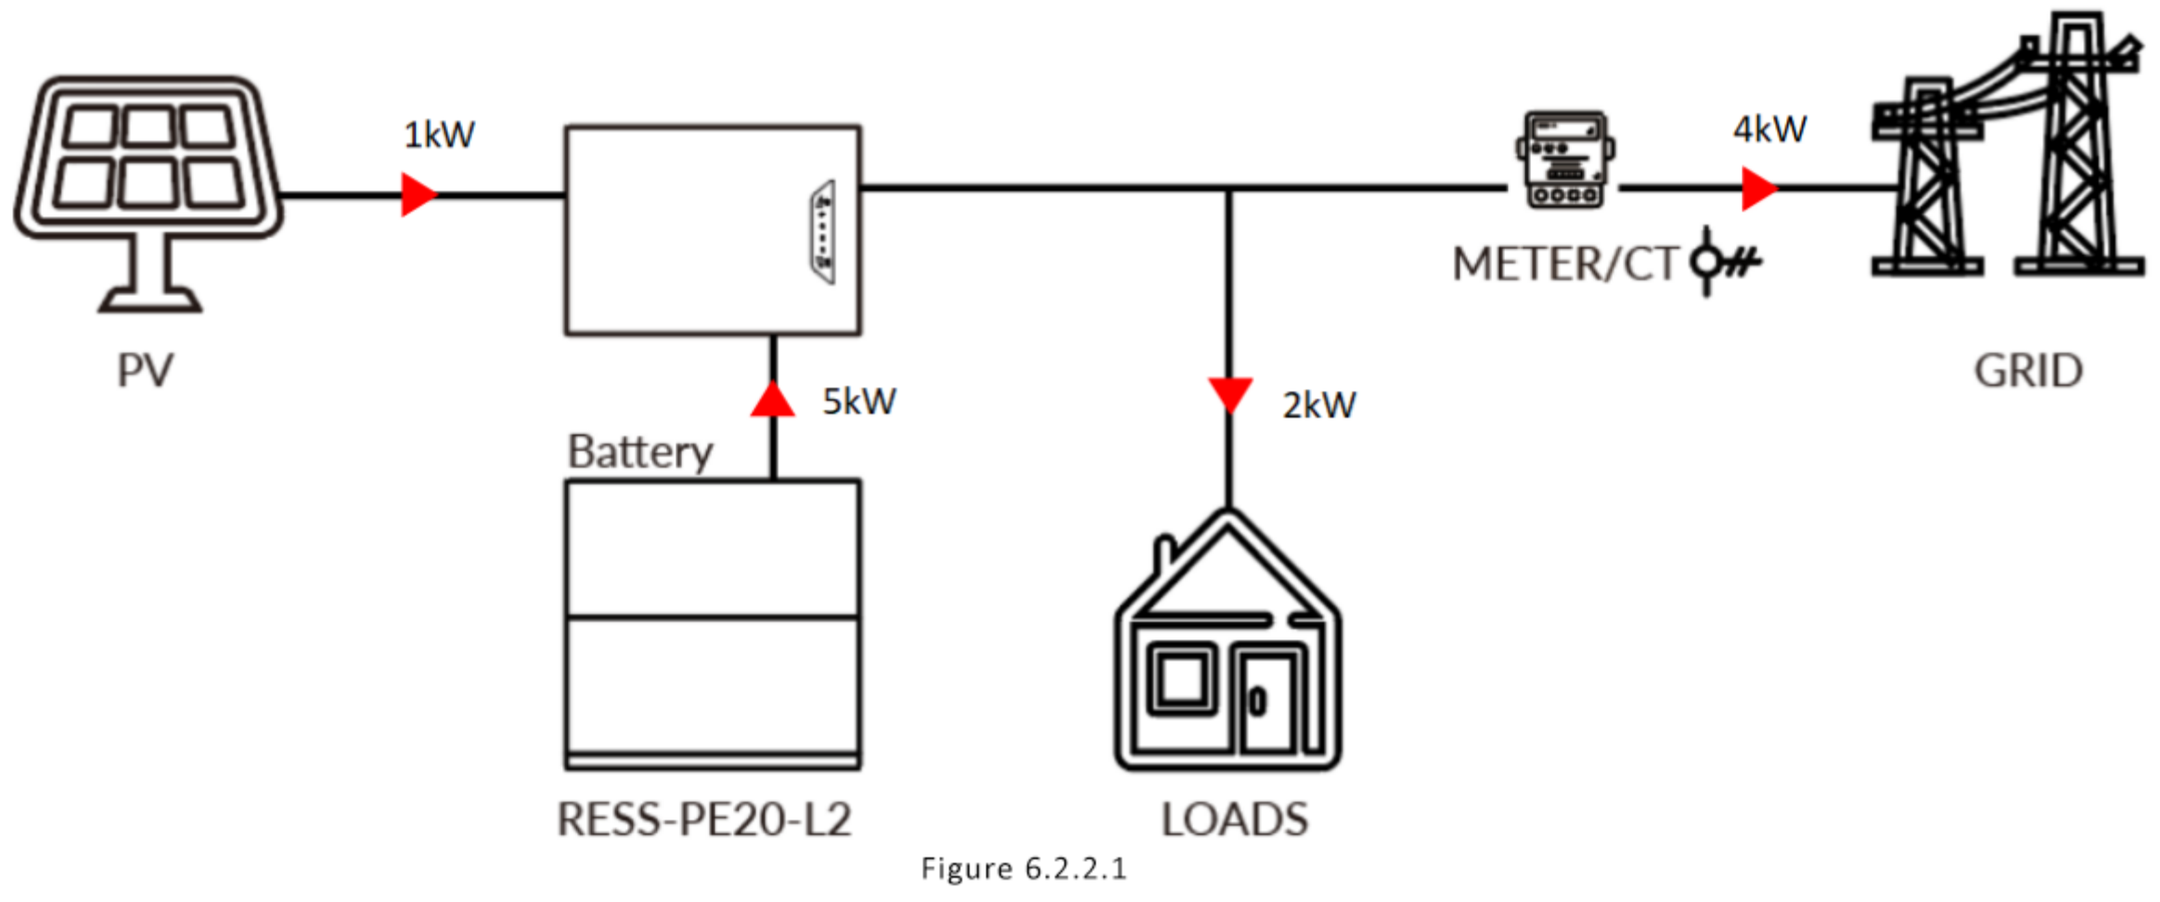
6.2.2.1 Discharging time period: The period prioritizes supplying power to the loads, and any excess energy is delivered to the grid. As shown in Figure 6.2.2.1.
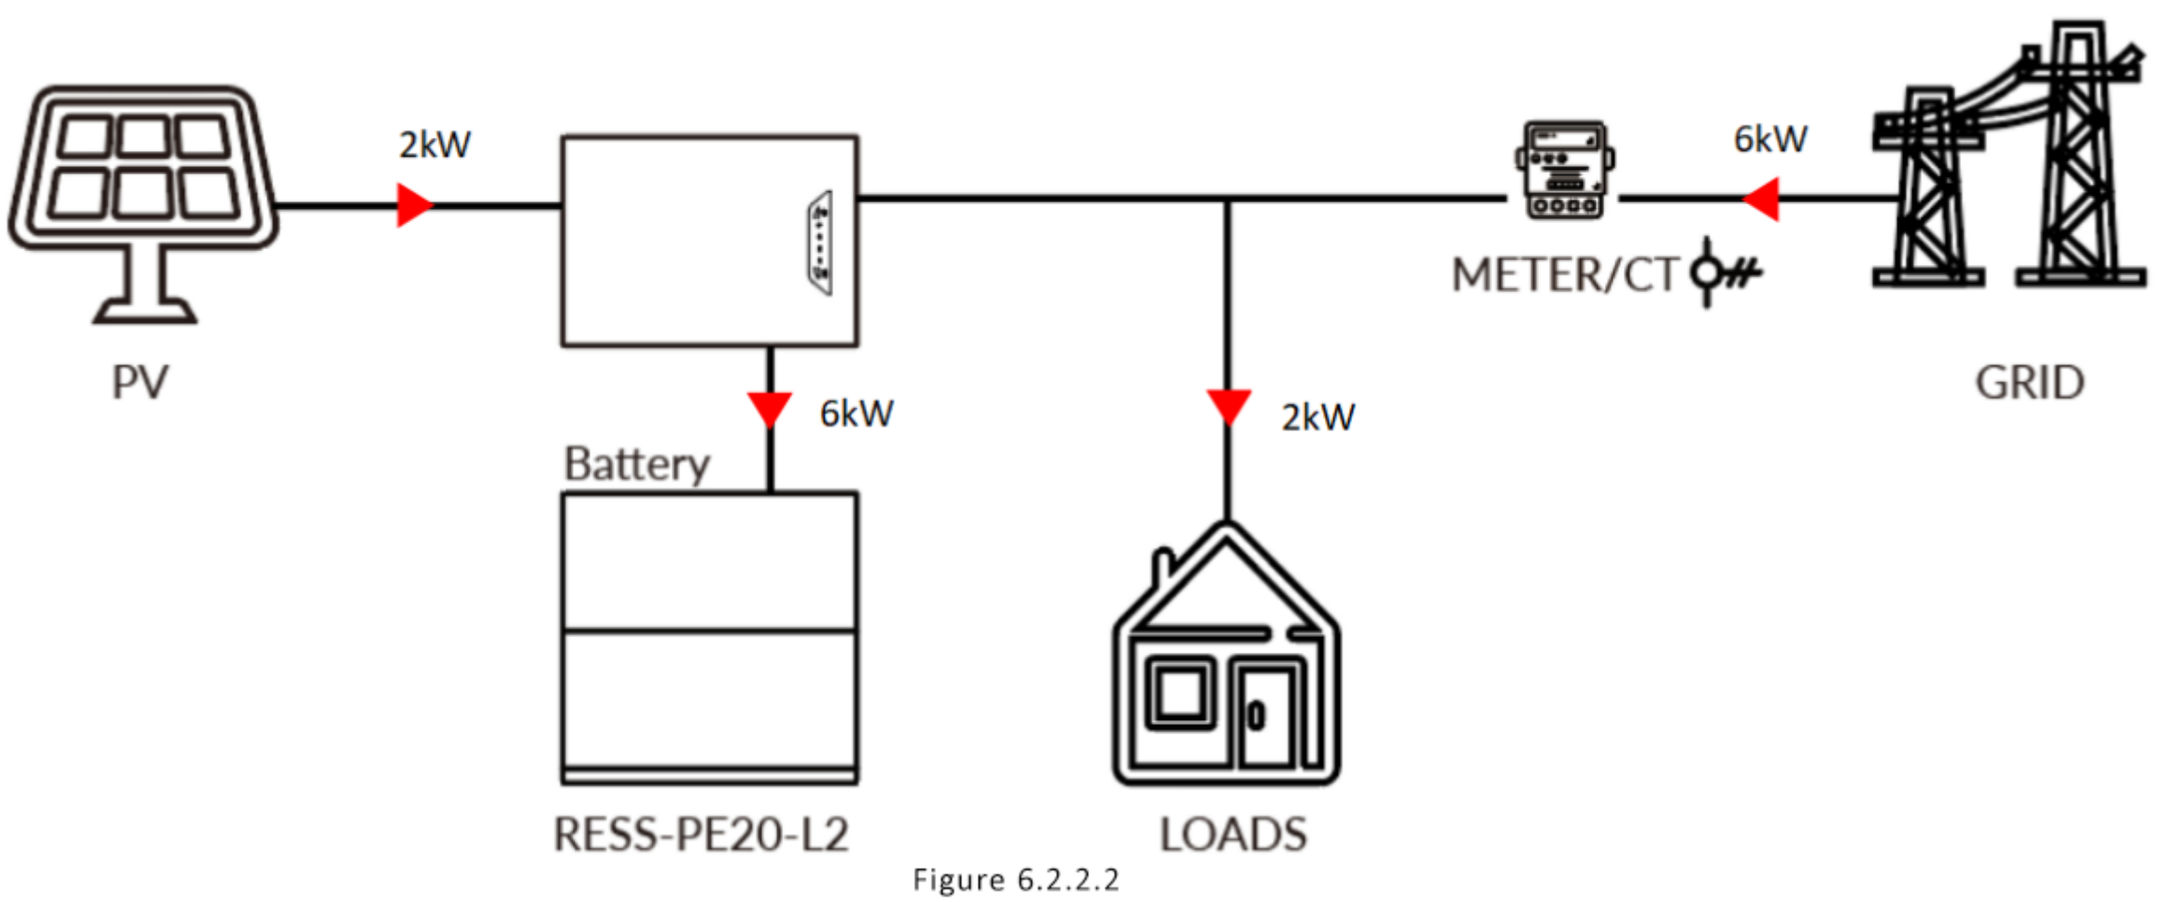
6.2.2.2 Charging time period: First meet the power demand of the load, then charge the battery. As shown in
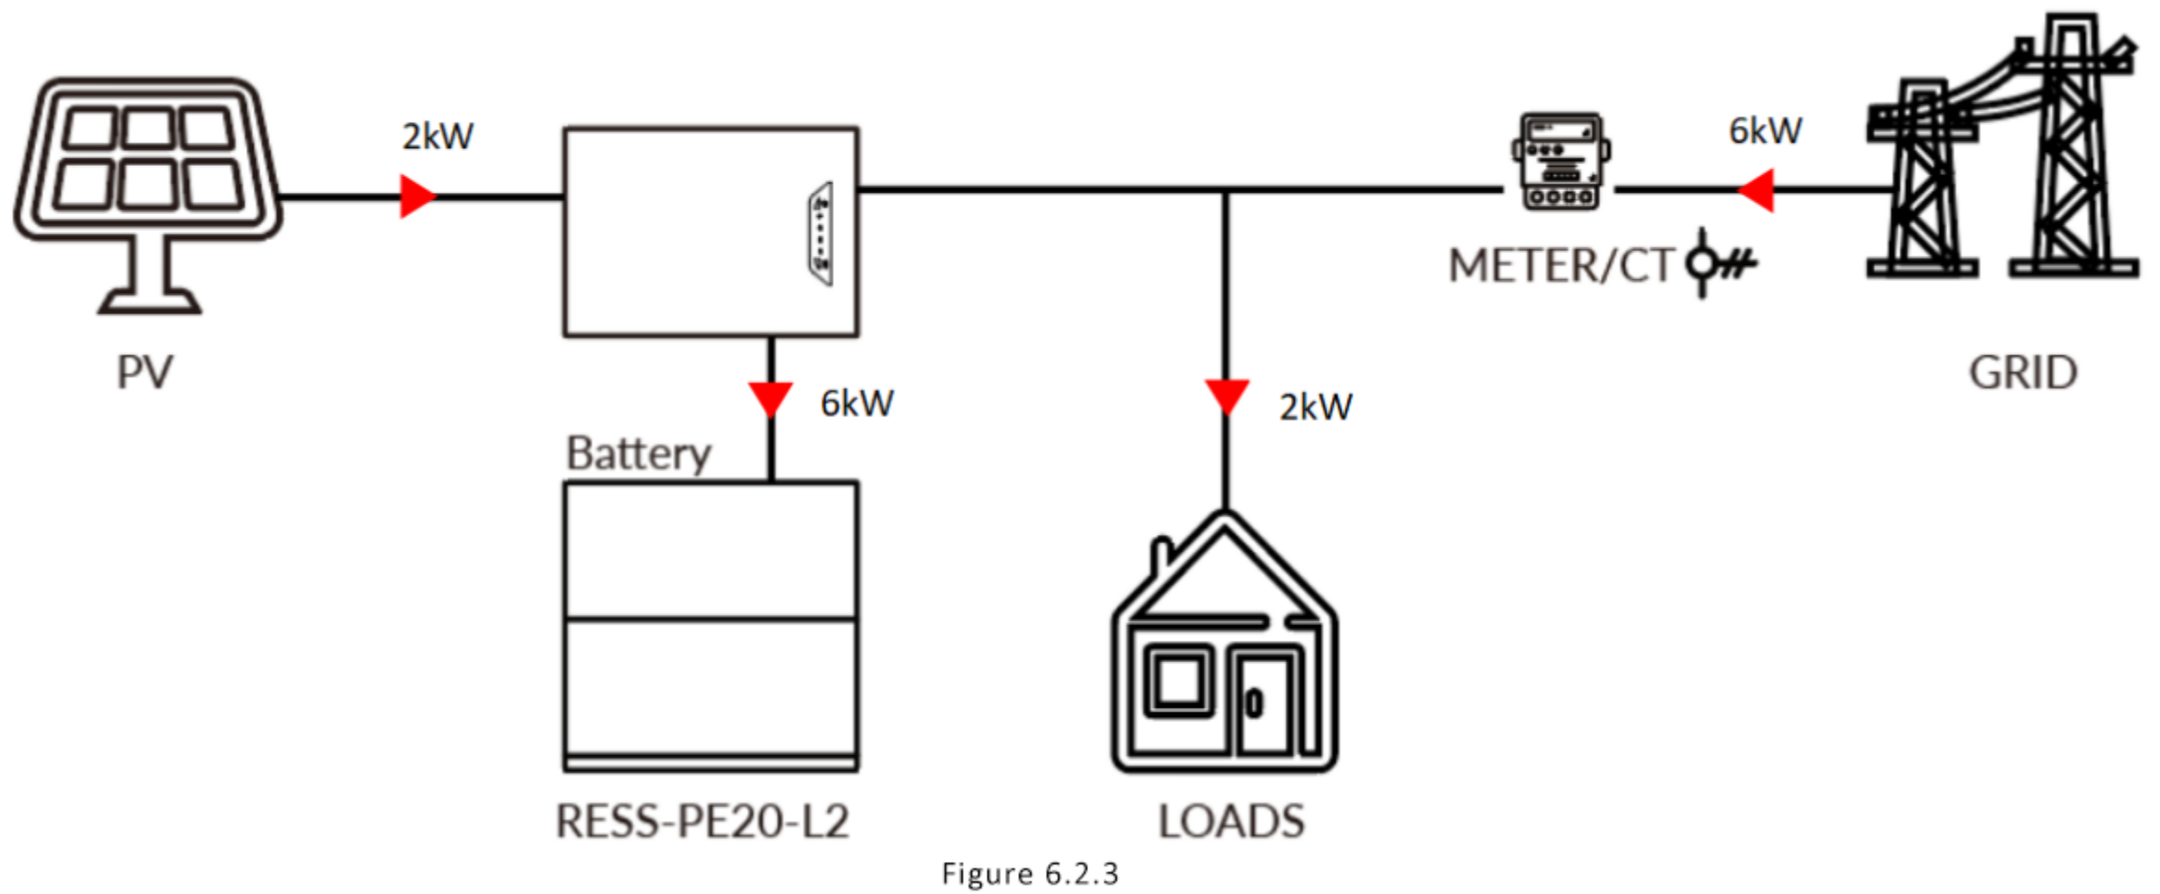
6.2.3 Battery Priority
In this mode, the load's power demand is met first, with any surplus energy used to charge the battery. As shown in Figure 6.2.3.

Ultimati Energie Deutschland GmbH is a Germany-based B2B energy storage system provider specializing in scalable residential and C&I battery storage solutions for European partners.
Become a Partner
Sales: +49 1624886367
Customer Support:
+49 15228457338
Address: Ober der Röth 4, 65824 Schwalbach am Taunus, Germany
Copyright © 2026 Ultimati Energie Deutschland GmbH All rights reserved.